最近,shuttle 发布了新的 Node.js CLI 包,允许用户快速引导由 Next.js 前端加 Axum 后端(一种流行的 Rust Web 框架,以易于上手、语法简单著称)开发的应用程序。
本文打算构建的示例,是一个带有登录门户的记事本应用程序,提供用户注册、用户登录、密码重置等功能。用户在登录之后可以查看、创建、更新和删除笔记内容。本文将主要关注 Rust 后端方面,对于 React.js/Next.js 前端不会过多着墨。
完整代码仓库请参阅此处(https://github.com/joshua-mo-143/nodeshuttle-example)。
马上开始
运行以下命令,即可快速开始本次示例:
npx create-shuttle-app --ts
复制代码
在按下回车键后,系统会提示我们输入名称——您可以随意起名,之后系统会自动安装 Rust 并引导一个使用 Next.js 的应用程序(由于这里我们添加了 ts 标志,所以使用的是 TypeScript);后端部分使用 Rust,再加上相应的 npm 命令,我们可以快速着手后端和前端的开发工作。这里我们使用的后端框架为 Axum,这是一套灵活的高性能框架,语法简单而且与 tower_http(用于创建中间件的强大库)高度兼容。
shuttle 是一个云开发平台,能够简化应用程序的部署流程。它最突出的优点就是“基础设施即代码”,允许大家直接通过代码定义基础设施,无需借助复杂的控制台或外部 yaml.config 文件。这种方式不仅提高了代码的清晰度,同时也能更好地保证编译时的输出质量。需要 Postgres 实例?只需添加相应注释即可。shuttle 还支持 secrets(作为环境变量)、静态文件夹和状态持久性。
接下来,我们需要安装 sqlx-cli,这款命令行工具能帮助我们管理数据库迁移。只须运行以下简单命令,即可完成安装:
这样,只要前往项目文件夹内的后端目录,我们就能使用 sqlx migrate add schema 创建数据库迁移。此命令会添加一个迁移文件夹(如果之前不存在)和一个以_schema.sql 形式命名的新 SQL 文件,其中的“schema”部分代表我们的迁移名称。
这个 SQL 文件包含以下内容:
-- backend/migrations/<timestamp>_schema.sqlDROP TABLE IF EXISTS sessions;
CREATE TABLE IF NOT EXISTS users (    id SERIAL PRIMARY KEY,    username VARCHAR UNIQUE NOT NULL,    email VARCHAR UNIQUE NOT NULL,    password VARCHAR NOT NULL,    createdAt TIMESTAMP WITH TIME ZONE DEFAULT CURRENT_TIMESTAMP );
CREATE TABLE IF NOT EXISTS notes (    id SERIAL PRIMARY KEY,    message VARCHAR NOT NULL,    owner VARCHAR NOT NULL,    createdAt TIMESTAMP WITH TIME ZONE DEFAULT CURRENT_TIMESTAMP );
INSERT INTO notes (message, owner) VALUES ('Hello world!', 'user');
CREATE TABLE IF NOT EXISTS sessions (    id SERIAL PRIMARY KEY,    session_id VARCHAR NOT NULL UNIQUE,    user_id INT NOT NULL UNIQUE);
复制代码
迁移会自动运行。但如果大家想要手动操作,也可以使用 sqlx migrate run --database-url。这种操作之所以可行,是因为我们已经将 SQL 文件设置为幂等,就是说只要已经存在该表、则不再重复创建。这里我们删除会话表,这样当应用程序重新上传之后,由于原先的 cookie 已经失效,用户就必须重新登录。
现在设置已经完成,马上进入正式开发!
前端
在这款应用中,我们需要以下几个页面:
登录和注册页面;
忘记密码时供用户重置密码的页面;
显示记录的仪表板页面;
用于编辑和创建新记录的页面。
大家可以通过以下方式克隆本文中的前端示例:
git clone https://github.com/joshua-mo-143/nodeshuttle-example-frontend
复制代码
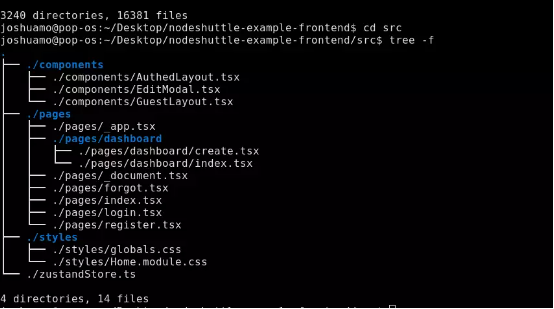
克隆的代码仓库包含一个预先设置好的 src 目录,如下图所示:
其中 components 文件夹中包含两个布局组件,我们需要将页面组件嵌套在其中;另外还有一个用于在仪表板索引页面中编辑记录的 modal。Pages 文件夹则包含我们将在应用中使用的各相关页面组件(文件名代表相应路径)。
这里的 CSS 使用 TailwindCSS,并选择 Zustand 保证在不涉及太多模板的情况下实现简单的基本状态管理。
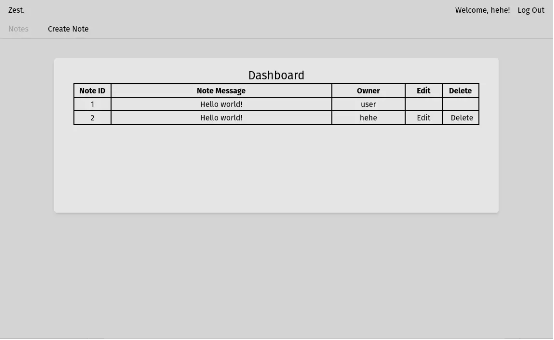
当用户登录之后,已有消息将显示为以下形式:
在后端构建完成之后,用户就能通过前端注册和登录(使用基于 cookie 会话的身份验证机制),并查看、创建、编辑和删除自己的消息。如果用户忘记了密码,还可以通过输入电子邮件来重置密码内容。
如果大家对示例中的前端不满意,也可以参考 GitHub 代码仓库(https://github.com/joshua-mo-143/nodeshuttle-example)来了解 API 调用和状态管理的设置方式。
现在前端部分已经完成,接下来就是后端环节了!
后端
前往 backend 文件夹,我们会看到一个名为 main.rs 的文件。其中包含一个函数,此函数会创建一个基础路由程序并返回“Hello,world!”我们将使用此文件作为应用程序的入口点,然后创建我们在 main 函数中调用的其他文件。
请确保您的 Cargo.toml 文件中包含以下内容:
# Cargo.toml[package]name = "static-next-server"version = "0.1.0"edition = "2021"publish = false
[dependencies]# the rust framework we will be using - https://github.com/tokio-rs/axum/axum = "0.6.1"# extra functionality for Axum https://github.com/tokio-rs/axum/axum-extra = { version = "0.4.2", features = ["spa", "cookie-private"] }# encryption hashing for passwords - https://github.com/Keats/rust-bcryptbcrypt = "0.13.0"# used for writing the CORS layer - https://github.com/hyperium/httphttp = "0.2.9"# send emails over SMTP - https://github.com/lettre/lettrelettre = "0.10.3"# random number generator (for creating a session id) - https://github.com/rust-random/randrand = "0.8.5"# used to be able to deserialize structs from JSON - https://github.com/serde-rs/serdeserde = { version = "1.0.152", features = ["derive"] }# environment variables on shuttleshuttle-secrets = "0.12.0"# the service wrapper for shuttleshuttle-runtime = "0.12.0"# allow us to use axum with shuttleshuttle-axum = "0.12.0"# this is what we use to get a shuttle-provisioned databaseshuttle-shared-db = { version = "0.12.0", features = ["postgres"] }# shuttle static folder supportshuttle-static-folder = "0.12.0"# we use this to query and connect to a database - https://github.com/launchbadge/sqlx/sqlx = { version = "0.6.2", features = ["runtime-tokio-native-tls", "postgres"] }# middleware for axum router - https://github.com/tower-rs/tower-httptower-http = { version = "0.4.0", features = ["cors"] }# pre-req for using shuttle runtime   tokio = "1.26.0"# get a time variable for setting cookie max agetime = "0.3.20"
复制代码
完成之后,接下来就是设置主函数,这样就能使用 shuttle_shared_db 和 shuttle_secrets 来获取 shuttle 免费配置的数据库并使用 secrets,具体方式如下(包括基于 cookie 的会话存储功能,为简洁起见较为粗糙):
// main.rs #[derive(Clone)]pub struct AppState {    postgres: PgPool,    key: Key}
impl FromRef<AppState> for Key {    fn from_ref(state: &AppState) -> Self {        state.key.clone()    }}
#[shuttle_runtime::main]async fn axum(    #[shuttle_static_folder::StaticFolder] static_folder: PathBuf,    #[shuttle_shared_db::Postgres] postgres: PgPool,    #[shuttle_secrets::Secrets] secrets: SecretStore,) -> shuttle_axum::ShuttleAxum {    sqlx::migrate!().run(&postgres).await;
    let state = AppState {        postgres,        key: Key::generate()    };
    let router = create_router(static_folder, state);
    Ok(router.into())}
复制代码
现在就可以创建路由程序了!我们首先要在 backend 目录的 src 文件夹中创建一个 router.rs 文件。我们的大部分路由程序代码都将存放在这里,并在准备好之后将最终版路由程序的函数导入到主文件当中。
现在打开 router.rs 文件并创建一个函数,该函数将返回一个能够路由至注册和登录的路由程序:
// router.rs
// typed request body for logging in - Deserialize is enabled via serde so it can be extracted from JSON responses in axum#[derive(Deserialize)]pub struct LoginDetails {    username: String,    password: String,}
pub fn create_router(state: AppState, folder: PathBuf) -> Router {// create a router that will host both of our new routes once we create them    let api_router = Router::new()           .route("/register", post(register))           .route("/login, post(login))           .with_state(state);
// return a router that nests our API router in an "/api" route and merges it with our static files   Router::new()       .nest("/api", api_router)       .merge(SpaRouter::new("/", static_folder).index_file("index.html"))
}
复制代码
可以看到,接下来要做的就是编写路由程序中使用的函数。另外,我们也可以简单将多个方法串连起来,借此在同一路由内使用多个请求方法(后文将具体介绍)。
// backend/src/router.rspub async fn register(// this is the struct we implement and use in our router - we will need to import this from our main file by adding "use crate::AppState;" at the top of our app    State(state): State<AppState>,// this is the typed request body that we receive from a request - this comes from the axum::Json type    Json(newuser): Json<LoginDetails>,) -> impl IntoResponse {
// avoid storing plaintext passwords - when a user logs in, we will simply verify the hashed password against the request. This is safe to unwrap as this will basically never fail     let hashed_password = bcrypt::hash(newuser.password, 10).unwrap();
    let query = sqlx::query("INSERT INTO users (username, , email, password) values ($1, $2, $3)")// the $1/$2 denotes dynamic variables in a query which will be compiled at runtime - we can bind our own variables to them like so:        .bind(newuser.username)        .bind(newuser.email)        .bind(hashed_password)        .execute(&state.postgres);
// if the request completes successfully, return CREATED status code - if not, return BAD_REQUEST    match query.await {        Ok(_) => (StatusCode::CREATED, "Account created!".to_string()).into_response(),        Err(e) => (            StatusCode::BAD_REQUEST,            format!("Something went wrong: {e}"),        )            .into_response(),    }}
复制代码
我们在这里对密码做散列处理,通过 SQLx 设置查询以创建新用户。如果成功,则返回 402 Created 状态码;如果不成功,则返回 400 Bad Request 状态码以指示错误。
模式匹配是 Rust 中一种非常强大的错误处理机制,而且提供多种使用方式:我们可以使用 if let else 和 let else,二者都涉及模式匹配,后文将具体介绍。
// backend/src/router.rspub async fn login(    State(mut state): State<AppState>,    jar: PrivateCookieJar,    Json(login): Json<LoginDetails>,) -> Result<(PrivateCookieJar, StatusCode), StatusCode> {    let query = sqlx::query("SELECT * FROM users WHERE username = $1")        .bind(&login.username)        .fetch_optional(&state.postgres);
    match query.await {        Ok(res) => {// if bcrypt cannot verify the hash, return early with a BAD_REQUEST error            if bcrypt::verify(login.password, res.unwrap().get("password")).is_err() {                return Err(StatusCode::BAD_REQUEST);            }// generate a random session ID and add the entry to the hashmap                 let session_id = rand::random::<u64>().to_string();
                sqlx::query("INSERT INTO sessions (session_id, user_id) VALUES ($1, $2) ON CONFLICT (user_id) DO UPDATE SET session_id = EXCLUDED.session_id")                .bind(&session_id)                .bind(res.get::<i32, _>("id"))                .execute(&state.postgres)                .await                .expect("Couldn't insert session :(");

            let cookie = Cookie::build("foo", session_id)                .secure(true)                .same_site(SameSite::Strict)                .http_only(true)                .path("/")                .finish();
// propogate cookies by sending the cookie as a return type along with a status code 200            Ok((jar.add(cookie), StatusCode::OK))
        }// if the query fails, return status code 400        Err(_) => Err(StatusCode::BAD_REQUEST),    }}
复制代码
可以看到,请求仅采用各类 JSON 请求主体(因为我们将请求主体设定为 axum::Json 类型,所以它只会接受带有「username」和「password」JSON 请求主体的请求)。这样的 struct 必须实现 serde::Deserialize ,因为我们需要从 JSON 中提取数据,而且 JSON 请求参数本身将作为我们传递给路由函数的最后一个参数。
我们在登录请求中使用了名为 PrivateCookieJar 的 struct。通过这种方式,我们既可以自动处理 HTTP cookie,又不需要为其显式设置标题头(为了传播其中的变更,我们需要将其设置为返回类型并返回变更)。当用户想要访问受保护的路由时,需要从 cookie jar 当中获取值,再根据保存在数据库内的会话 ID 对其进行验证。因为使用的是私有 cookie jar,所以保存在客户端的任何 cookie 都将使用我们在初始 struct 内创建的密钥进行加密,且每次应用启动时都会生成一个新密钥。
现在我们已经添加了用于登录的路由,接下来看看如何添加用于注销的路由和用于验证会话的中间件:
// backend/src/router.rspub async fn logout(State(state): State<AppState>, jar: PrivateCookieJar) -> Result<PrivateCookieJar, StatusCode> {    let Some(cookie) = jar.get("foo").map(|cookie| cookie.value().to_owned()) else {        return Ok(jar)    };
    let query = sqlx::query("DELETE FROM sessions WHERE session_id = $1")        .bind(cookie)        .execute(&state.postgres);

        match query.await {        Ok(_) => Ok(jar.remove(Cookie::named("foo"))),        Err(_) => Err(StatusCode::INTERNAL_SERVER_ERROR)           }}


pub async fn validate_session<B>(    jar: PrivateCookieJar,    State(state): State<AppState>,// Request<B> and Next<B> are required types for middleware from a function in axum    request: Request<B>,    next: Next<B>,) -> (PrivateCookieJar, Response) {// attempt to get the cookie - if it can't find a cookie, return 403    let Some(cookie) = jar.get("foo").map(|cookie| cookie.value().to_owned()) else {
        println!("Couldn't find a cookie in the jar");        return (jar,(StatusCode::FORBIDDEN, "Forbidden!".to_string()).into_response())    };
// attempt to find the created session    let find_session = sqlx::query("SELECT * FROM sessions WHERE session_id = $1")                .bind(cookie)                .execute(&state.postgres)                .await;
// if the created session is OK, carry on as normal and run the route - else, return 403    match find_session {        Ok(res) => (jar, next.run(request).await),        Err(_) => (jar, (StatusCode::FORBIDDEN, "Forbidden!".to_string()).into_response())    }}
复制代码
可以看到,在注销路由这部分,我们会尝试销毁会话、返回 cookie 删除;至于验证路由,我们尝试获取会话 cookie,并保证 cookie 会话在数据库内有效。
下面来看如何为数据库内的各项记录创建最基本的 CRUD 功能。这里我们创建一个使用 sqlx::FromRow 的 struct,这样就能轻松从数据库中提取记录,具体代码如下所示:
// src/backend/router.rs#[derive(sqlx::FromRow, Deserialize, Serialize)]pub struct Note { id: i32, message: String, owner: String,}
复制代码
之后,我们就可以直接使用 sqlx::query_as 并将该变量分类为 struct 的向量,借此实现预期功能,如下所示:
// src/backend/router.rspub async fn view_records(State(state): State<AppState>) -> Json<Vec<Note>> {    let notes: Vec<Note> = sqlx::query_as("SELECT * FROM notes ")        .fetch_all(&state.postgres)        .await.unwrap();
    Json(notes)}
复制代码
很明显,我们要做的就是通过连接查询数据库,并确保我们分类后的返回 struct 上有 sqlx::FromRow 派生宏。通过同样的方式,我们也可以轻松编写出其他路由:
// backend/src/router.rs#[derive(Deserialize)]pub struct RecordRequest {    message: String,    owner: String}
pub async fn create_record(    State(state): State<AppState>,    Json(request): Json<RecordRequest>,) -> Response {    let query = sqlx::query("INSERT INTO notes (message, owner) VALUES ($1, $2)")        .bind(request.message)        .bind(request.owner)        .execute(&state.postgres);
    match query.await {        Ok(_) => (StatusCode::CREATED, "Record created!".to_string()).into_response(),        Err(err) => (            StatusCode::BAD_REQUEST,            format!("Unable to create record: {err}"),        )            .into_response(),    }}
// note here: the "path" is simply the id URL slug, which we will define laterpub async fn edit_record(    State(state): State<AppState>,    Path(id): Path<i32>,    Json(request): Json<RecordRequest>,) -> Response {
    let query = sqlx::query("UPDATE notes SET message = $1 WHERE id = $2 AND owner = $3")        .bind(request.message)        .bind(id)        .bind(request.owner)        .execute(&state.postgres);
    match query.await {        Ok(_) => (StatusCode::OK, format!("Record {id} edited ")).into_response(),        Err(err) => (            StatusCode::BAD_REQUEST,            format!("Unable to edit message: {err}"),        )            .into_response(),    }}
pub async fn destroy_record(State(state): State<AppState>, Path(id): Path<i32>) -> Response {    let query = sqlx::query("DELETE FROM notes WHERE id = $1")        .bind(id)        .execute(&state.postgres);
    match query.await {        Ok(_) => (StatusCode::OK, "Record deleted".to_string()).into_response(),        Err(err) => (            StatusCode::BAD_REQUEST,            format!("Unable to edit message: {err}"),        )            .into_response(),    }}
复制代码
现在,我们已经为这款 Web 应用创建了所有基本功能!但在合并全部路由之前,我们还有最后一项工作。如果用户想要重置密码,应当如何操作?我们当然应该再提供一条自助式的密码重置路由,下面马上开始。
// backend/src/router.rs
pub async fn forgot_password(    State(state): State<AppState>,    Json(email_recipient): Json<String>,) -> Response {    let new_password = Alphanumeric.sample_string(&mut rand::thread_rng(), 16);
let hashed_password = bcrypt::hash(&new_password, 10).unwrap();
    sqlx::query("UPDATE users SET password = $1 WHERE email = $2")            .bind(hashed_password)            .bind(email_recipient)            .execute(&state.postgres)            .await;
    let credentials = Credentials::new(state.smtp_email, state.smtp_password);
    let message = format!("Hello!\n\n Your new password is: {new_password} \n\n Don't share this with anyone else. \n\n Kind regards, \nZest");
    let email = Message::builder()        .from("noreply <your-gmail-address-here>".parse().unwrap())        .to(format!("<{email_recipient}>").parse().unwrap())        .subject("Forgot Password")        .header(ContentType::TEXT_PLAIN)        .body(message)        .unwrap();
// build the SMTP relay with our credentials - in this case we'll be using gmail's SMTP because it's free    let mailer = SmtpTransport::relay("smtp.gmail.com")        .unwrap()        .credentials(credentials)        .build();
// this part x`doesn't really matter since we don't want the user to explicitly know if they've actually received an email or not for security purposes, but if we do then we can create an output based on what we return to the client    match mailer.send(&email) {        Ok(_) => (StatusCode::OK, "Sent".to_string()).into_response(),        Err(e) => (StatusCode::BAD_REQUEST, format!("Error: {e}")).into_response(),    }}
复制代码
我们还需要在 Cargo.toml 层级上使用 Secrets.toml 和 Secrets.dev.toml 文件来添加必要的 secrets。为此,我们需要使用以下格式:
# Secrets.tomlSMTP_EMAIL="your-email-goes-here"SMTP_PASSWORD="your-email-password-goes-here"DOMAIN="<your-project-name-from-shuttle-toml>.shuttleapp.rs"
# You can create a Secrets.dev.toml to use secrets in a development environment - in this case, you can set domain to "127.0.0.1" and copy the other two variables as required.
复制代码
现在应用已经开发完成,接下来就是要为应用整体建立出口路由程序了。我们可以简单进行路由嵌套,并把中间件附加到受保护的路由上,如下所示:
// backend/src/router.rspub fn api_router(state: AppState) -> Router {// CORS is required for our app to work    let cors = CorsLayer::new()        .allow_credentials(true)        .allow_methods(vec![Method::GET, Method::POST, Method::PUT, Method::DELETE])        .allow_headers(vec![ORIGIN, AUTHORIZATION, ACCEPT])        .allow_origin(state.domain.parse::<HeaderValue>().unwrap());
// declare the records router    let notes_router = Router::new()        .route("/", get(view_records))        .route("/create", post(create_record))        .route(// you can add multiple request methods to a route like this            "/:id",       get(view_one_record).put(edit_record).delete(destroy_record),        )        .route_layer(middleware::from_fn_with_state(            state.clone(),            validate_session,        ));
// the routes in this router should be public, so no middleware is required    let auth_router = Router::new()        .route("/register", post(register))        .route("/login", post(login))        .route("/forgot", post(forgot_password))        .route("/logout", get(logout));
// return router that uses all routes from both individual routers, but add the CORS layer as well as AppState which is defined in our entrypoint function    Router::new()        .route("/health", get(health_check))        .nest("/notes", notes_router)        .nest("/auth", auth_router)        .with_state(state)        .layer(cors)}
复制代码
我们可以简单定义两个路由程序来创建一个 API 路由程序,每个路由程序对应自己的路由路径(路由程序受到保护,只有会话通过验证时才会运行相应路由),之后直接返回一个带有健康检查的路由,嵌套我们之前的两个路由,最后为路由程序添加 CORS 和应用状态。
我们的最终路由函数大致如下:
// backend/src/router.rspub fn create_router(static_folder: PathBuf, state: AppState) -> Router {    let api_router = api_router(state);
// merge our static file assets    Router::new()        .nest("/api", api_router)        .merge(SpaRouter::new("/", static_folder).index_file("index.html"))}
复制代码
我们接下来要在主函数(main.rs 当中)的初始入口点函数中使用此函数来生成路由程序,如下所示:
#[derive(Clone)]pub struct AppState {    postgres: PgPool,    key: Key,    smtp_email: String,    smtp_password: String,    domain: String,}
impl FromRef<AppState> for Key {    fn from_ref(state: &AppState) -> Self {        state.key.clone()    }}
#[shuttle_runtime::main]async fn axum(    #[shuttle_static_folder::StaticFolder] static_folder: PathBuf,    #[shuttle_shared_db::Postgres] postgres: PgPool,    #[shuttle_secrets::Secrets] secrets: SecretStore,) -> shuttle_axum::ShuttleAxum {    sqlx::migrate!()        .run(&postgres)        .await        .expect("Something went wrong with migrating :(");
    let smtp_email = secrets        .get("SMTP_EMAIL")        .expect("You need to set your SMTP_EMAIL secret!");
    let smtp_password = secrets        .get("SMTP_PASSWORD")        .expect("You need to set your SMTP_PASSWORD secret!");
// we need to set this so we can put it in our CorsLayer    let domain = secrets        .get("DOMAIN")        .expect("You need to set your DOMAIN secret!");
    let state = AppState {        postgres,        key: Key::generate(),        smtp_email,        smtp_password,        domain,    };
    let router = create_router(static_folder, state);
    Ok(router.into())   }
复制代码
请注意,对于从文件导入的函数,如果其位于前面提到的同一文件目录当中(use router),则需要在 lib.rs 文件中对其做定义;如果大家需要将函数从一个文件导入至另一个非主入口点文件中,也得进行同样的操作。
现在编程部分全部结束,大家可以试试实际部署效果了!
部署
感谢 shuttle,整个部署流程非常简单,只需在项目的根目录中运行 npm run deploy 即可。如果没有错误,shuttle 会启动我们的应用并返回部署信息列表和由 shuttle 配置的数据库连接字符串。如果需要再次查找此数据库字符串,可以在项目的 backend 目录下运行 cargo shuttle status 命令。
在实际部署之前,大家可能还需要提前运行 cargo fmt 和 cargo clippy,因为 Web 服务的构建过程中可能出现警告或错误。如果没有这些组件,大家也可以分别用 rustup component add rustfmt 和 rustup component add clippy 来替代——这里向各位 Rust 开发者强烈推荐这两款工具,绝对是您工具箱中的必备选项。
总结
感谢大家阅读本文!希望这篇文章能带您深入了解如何轻松构建 Rust Web 服务。过去几年间,Rust 实现了显著发展,也降低了新手学习的准入门槛。如果大家还停留在 Rust“生人勿近”的旧观念中,那实在是大可不必,现在正是上手体验的好时机。相信 Rust 强大的功能和愈发完善的用户友好度会给您留下深刻印象。
原文链接:
https://joshmo.hashnode.dev/nextjs-and-rust-an-innovative-approach-to-full-stack-development
相关阅读:
为什么说 Next.js 13 是一个颠覆性版本
Next.js 实践:从 SSR 到 CSR 的优雅降级
我们如何使用 Next.js 将 React 加载时间缩短 70%
先别急着“用 Rust 重写”,可能没有说的那么安全


评论