本文是该教程的第四部分,我将使用 FLASK 将预测模型投入生产。如果你有兴趣,可以先看本教程的第一部分、第二部分、第三部分。
什么是模型部署?模型部署就是将机器学习模型集成到现有的生产环境中,以便基于数据做出实际的业务决策。
我们将使用带有 FLASK 的 Python web API 来部署模型。因此,我们的最终目标是创建一个网站,一旦用户在网站上输入值,该网站就会给你预测的结果。
从 GitHub 下载文件
首先,到我的 GitHub 页面上的 K-pop 仓库下载模型部署文件夹。
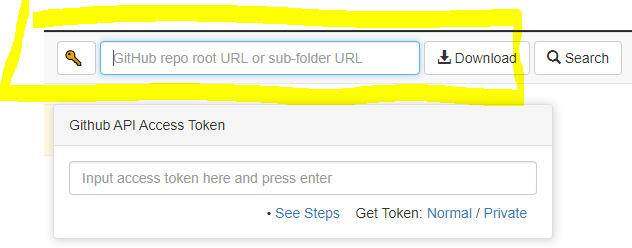
我们将使用名为 GitZip 的网站,它可以让你下载 repo 中的特定文件夹,你所需要做的就是将连接复制并粘贴到模型部署文件夹。
复制并在此处粘贴文件夹链接
你可以随意命名文件夹,我将文件夹命名为“K-pop Model Deployment”。
使用 Spyder IDE
在本教程中,我们将使用 Spyder IDE。
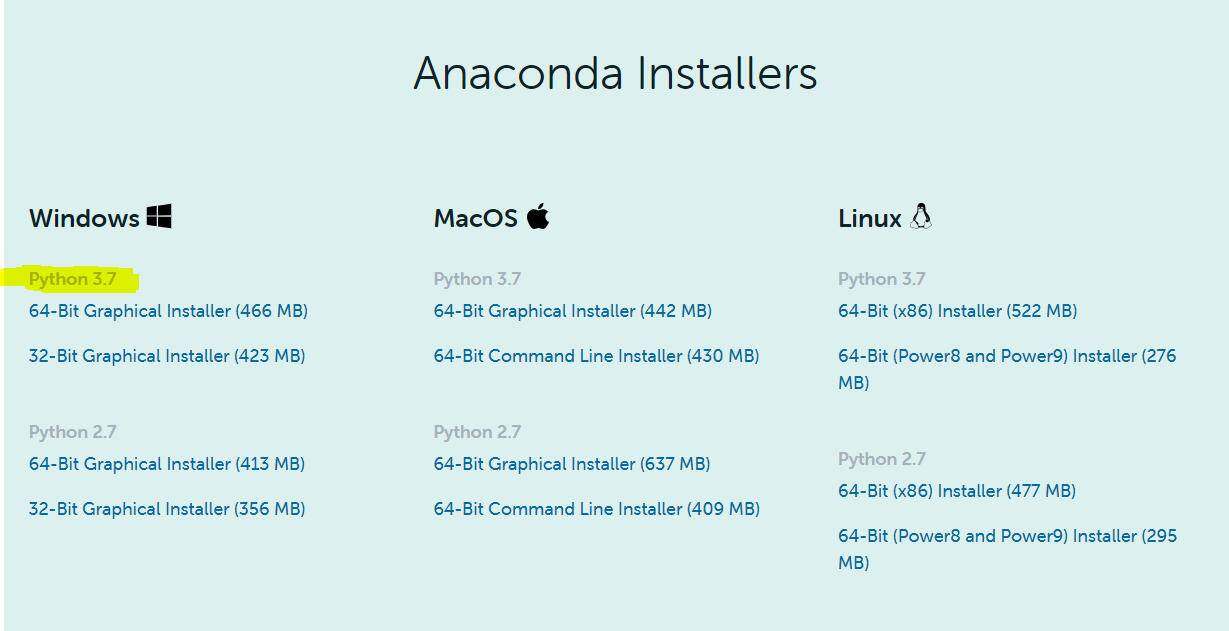
如果你还没有安装 Spyder IDE 的话,可以从这里下载(你需要从 Anaconda 网站下载),请务必下载版本 7.3,因为这是最新版本。
安装 Anaconda(Python 3.7)
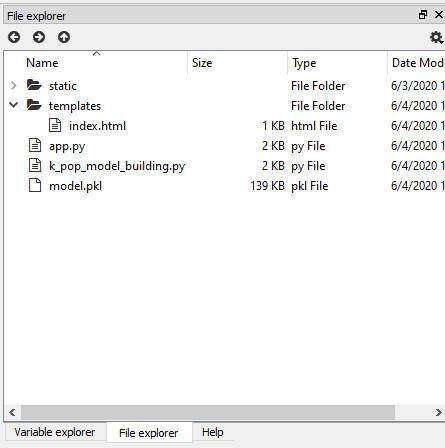
安装后,打开 Spyder IDE,导航到“File Explorer”,然后选择刚刚下载的文件夹。
在 templates 文件夹下打开 app.py、k_pop_model_building.py 和 index.html。
Spyder 中的 File Explorer
只选择连续变量
在上一部教程中,我们使用了.pd.get_dummies(df_model)将类别变量转换为虚拟变量/指标变量。我意识到,这样做会产生太多额外变量,我认为这样对用户不太友好(我们并不希望用户输入 73 个答案)。因此,我们只选择连续变量,这样,用户只需输入 5 个变量(“yr_listened”、“daily_MV_hr”、“yr_merch_spent”、“age”、“num_gr_like”)即可预测他们每天听歌的小时数:“daily_music_hr”。
df_real = df[[“yr_listened”, “daily_music_hr”, “daily_MV_hr”,“yr_merch_spent”, “age”, “num_gr_like”]]
复制代码
然后,进行训练并在此测试分离。
from sklearn.model_selection import train_test_splitX = df_real.drop('daily_music_hr', axis = 1)y = df_real.daily_music_hr.valuesX_train, X_test, y_train, y_test = train_test_split(X, y,test_size = 0.2,random_state = 1)
复制代码
运行 XGBoost 模型
在上一部教程中,我们看到 XGBoost 模型是最好的一个。因此,我们将部署这个模型。
import xgboost as xgbxgb_clf = xgb.sklearn.XGBClassifier(nthread = -1, seed = 1)xgb_clf.fit(X_train, y_train)from sklearn.model_selection import GridSearchCVparams = {'min_child_weight': [5], 'gamma': [1],'subsample': [0.8, 1.0],'colsample_bytree': [0.6, 0.8],'max_depth': [1,2]}gs_xgb = GridSearchCV(xgb_clf, params ,scoring = 'neg_mean_absolute_error',cv = 10)gs_xgb.fit(X_train, y_train)gs_xgb.best_score_xgb_best = gs_xgb.best_estimator_xgb_bestxgb_best.fit(X_train, y_train)
复制代码
保存训练模型
我们可以使用pickle将经过训练的模型保存到磁盘中。然后,它在以后重新加载后,可以完全使用,就像我们已经训练过它一样。
with open('model.pkl', 'wb') as file:pickle.dump(xgb_best, file)
复制代码
使用 FLASK 创建 Web 应用程序
首先,我们需要这两样东西来创建一个 Web 应用程序。
Pythono 脚本将加载经过训练的模型,要求用户将输入值放到网站上,执行预测,并返回结果。
HTML 模板,即网站的格式。这将允许用户输入他们的数据并显示结果。
结构如下所示:
web app/
├── model/
│ └── model.pkl — trained model
├── templates/
│ └── index.html — format of the website
└── app.py — to host the model
创建 app.py 以托管模型
app.py 将成为 Web 应用程序的基础。它将发送网页,从用户哪里获取数据来执行预测。
import flaskimport pickleimport pandas as pdwith open(f'model.pkl', 'rb') as f:model = pickle.load(f)app = flask.Flask(__name__, template_folder='templates')@app.route('/', methods=['GET', 'POST'])def main():if flask.request.method == 'GET':return(flask.render_template('index.html'))if flask.request.method == 'POST':yr_listened = flask.request.form['yr_listened']daily_MV_hr = flask.request.form['daily_MV_hr']yr_merch_spent = flask.request.form['yr_merch_spent']age = flask.request.form['age']num_gr_like = flask.request.form['num_gr_like']input_variables = pd.DataFrame([[yr_listened, daily_MV_hr, yr_merch_spent, age, num_gr_like]],columns=['yr_listened', 'daily_MV_hr', 'yr_merch_spent', 'age', 'num_gr_like'],dtype=float,index=['input'])prediction = model.predict(input_variables)[0]output = float(round(prediction, 2))return flask.render_template('index.html',original_input={'yr_listened':yr_listened,'daily_MV_hr':daily_MV_hr,'yr_merch_spent':yr_merch_spent,'age':age,'num_gr_like':num_gr_like},result=float(output))if __name__ == "__main__":app.run(debug=True)
复制代码
创建 index.html 对网站进行格式化
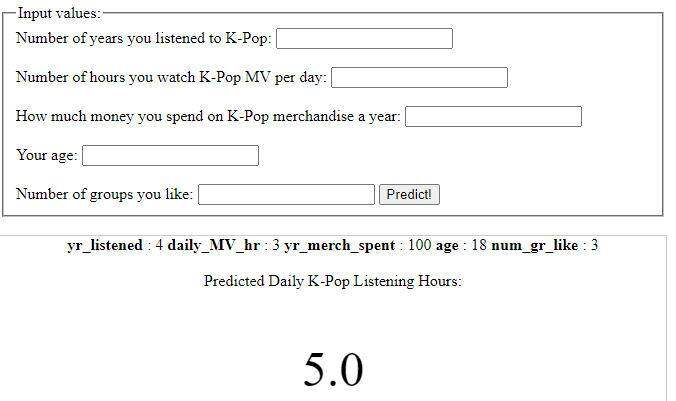
这是该项目的前端部分。它要求用户输入值,执行预测并给出输出结果。这是一种非常基本的样式。我当时试着用 CSS,但无法真正让它工作起来。如果你熟悉 CSS 或者想使用样式,请随意使用。
<!doctype html><html><style></style><head><title>Predicting Daily K-Pop Listening Hours</title></head><form action="{{ url_for('main') }}" method="POST"><fieldset><legend>Input values:</legend>Number of years you listened to K-Pop:<input name="yr_listened" type="number" step=".01" required><br><br> Number of hours you watch K-Pop MV per day:<input name="daily_MV_hr" type="number" step=".01" required><br><br> How much money you spend on K-Pop merchandise a year:<input name="yr_merch_spent" type="number" step=".01" required><br><br> Your age:<input name="age" type="number" step=".01" required><br><br> Number of groups you like:<input name="num_gr_like" type="number" step=".01" required><button type="submit" class="btn btn-primary btn-block btn-large">Predict!</button></fieldset></form><br><div class="result" align="center">{% if result %}{% for variable, value in original_input.items() %}<b>{{ variable }}</b> : {{ value }}{% endfor %}<br><br> Predicted Daily K-Pop Listening Hours:<p style="font-size:50px" step=".01">{{ result }}</p>{% endif %}</div></html>
复制代码
运行 Web 应用程序
现在,我们终于可以进行测试了,看看是否一切都按照我们设想的方式运行。
转到 Anaconda 提示符。
将目录切换到你的工作文件夹(即 cd Desktop → cd k-pop Model Deployment)。
运行 app.py(即 python app.py)
将获得的链接复制并粘贴到浏览器。
输入值并检查它给出了预测结果。
Anaconda 提示符命令示例:
cd Desktopcd K-Pop Model Deploymentpython app.py
复制代码
完成,希望这篇教程对你有所启发。
我的 GitHub 仓库在这里。
作者介绍:
Jaemin Lee,专攻数据分析与数据科学,数据科学应届毕业生。
原文链接:
https://towardsdatascience.com/analyzing-k-pop-using-machine-learning-part-4-productionizing-the-model-model-deployment-a9fc2e703d95


评论