关注仓库,及时获得更新:iOS-Source-Code-Analyze
因为 ObjC 的 runtime 只能在 Mac OS 下才能编译,所以文章中的代码都是在 Mac OS,也就是 x86_64 架构下运行的,对于在 arm64 中运行的代码会特别说明。
写在前面
文章会介绍上古时代 Objective-C 哈希表,也就是 NXHashTable :
NXHashTable 的实现
NXHashTable 的性能分析
NXHashTable 的作用
NXHashTable 的实现有着将近 30 年的历史,不过仍然作为重要的底层数据结构存储整个应用中的类。
文中会涉及一些数据结构方面的简单知识,例如拉链法。
注意:文章中分析的不是 NSHashTable 而是 NXHashTable。
NXHashTable
NXHashTable 的实现位于 hashtable2.mm 文件,我们先来看一下 NXHashTable 的结构以及重要的接口:
Objective-C
typedef struct { const NXHashTablePrototype *prototype; unsigned count; unsigned nbBuckets; void *buckets; const void *info;} NXHashTable;
复制代码
对于结构体中的 NXHashTablePrototype 属性暂且不说,其中的 buckets 是真正用来存储数据的数组。
Objective-C
NXHashTable *NXCreateHashTableFromZone (NXHashTablePrototype prototype, unsigned capacity, const void *info, void *z);unsigned NXCountHashTable (NXHashTable *table);int NXHashMember (NXHashTable *table, const void *data);void *NXHashGet (NXHashTable *table, const void *data);void *NXHashInsert (NXHashTable *table, const void *data);void *NXHashRemove (NXHashTable *table, const void *data);
复制代码
我们会以上面的这些方法作为切入点,分析 NXHashTable 的实现。
NXCreateHashTableFromZone
NXHashTable 使用 NXCreateHashTableFromZone 方法初始化:
Objective-C
NXHashTable *NXCreateHashTableFromZone (NXHashTablePrototype prototype, unsigned capacity, const void *info, void *z) {    NXHashTable      *table;    NXHashTablePrototype   *proto;
    table = ALLOCTABLE(z);    if (! prototypes) bootstrap ();    if (! prototype.hash) prototype.hash = NXPtrHash;    if (! prototype.isEqual) prototype.isEqual = NXPtrIsEqual;    if (! prototype.free) prototype.free = NXNoEffectFree;
    proto = (NXHashTablePrototype *)NXHashGet (prototypes, &prototype);    if (! proto) {        proto = (NXHashTablePrototype *) malloc(sizeof (NXHashTablePrototype));        bcopy ((const char*)&prototype, (char*)proto, sizeof (NXHashTablePrototype));        (void) NXHashInsert (prototypes, proto);        proto = (NXHashTablePrototype *)NXHashGet (prototypes, &prototype);    };    table->prototype = proto;    table->count = 0;    table->info = info;    table->nbBuckets = GOOD_CAPACITY(capacity);    table->buckets = ALLOCBUCKETS(z, table->nbBuckets);    return table;}
复制代码
在这个方法中,绝大多数代码都是用来初始化 table->prototype 的,我们先把这部分全部忽略,分析一下简略版本的实现。
Objective-C
NXHashTable *NXCreateHashTableFromZone (NXHashTablePrototype prototype, unsigned capacity, const void *info, void *z) {    NXHashTable      *table;    NXHashTablePrototype   *proto;
    table = ALLOCTABLE(z);
    ...
    table->count = 0;    table->info = info;    table->nbBuckets = GOOD_CAPACITY(capacity);    table->buckets = ALLOCBUCKETS(z, table->nbBuckets);    return table;}
复制代码
其中 ALLOCTABLE、GOOD_CAPACITY 以及 ALLOCBUCKETS 都是用来辅助初始化的宏:
Objective-C
#define ALLOCTABLE(z) ((NXHashTable *) malloc_zone_malloc ((malloc_zone_t *)z,sizeof (NXHashTable)))#define GOOD_CAPACITY(c) (exp2m1u (log2u (c)+1))#define ALLOCBUCKETS(z,nb) ((HashBucket *) malloc_zone_calloc ((malloc_zone_t *)z, nb, sizeof (HashBucket)))
复制代码
ALLOCTABLE 和 ALLOCBUCKETS 只是调用了 malloc_zone_calloc 来初始化相应的结构体,而 GOOD_CAPACITY 有一些特殊,我们来举个例子说明:
c binary result1 1 12 10 3(0b11)6 110 7(0b111)100 1100100 127(0b111 1111)
复制代码
c 表示传入参数,binary 表示二进制下的参数,而 result 就是 GOOD_CAPACITY 返回的结果。
每次返回当前位数下的二进制最大值。
获得 table->nbBuckets 之后,再初始化 table->nbBuckets * sizeof (HashBucket) 大小的内存空间。
NXHashTablePrototype
在继续分析其它方法之前,我们需要先知道 NXHashTablePrototype 是什么:
Objective-C
typedef struct { uintptr_t (*hash)(const void *info, const void *data); int (*isEqual)(const void *info, const void *data1, const void *data2); void (*free)(const void *info, void *data); int style; /* reserved for future expansion; currently 0 */} NXHashTablePrototype;
复制代码
NXHashTablePrototype 中存储了 hash、isEqual 和 free 的函数指针(用于获取数据的哈希、判断两个数据是否相等以及释放数据)。
在 hashtable2.mm 文件中有一个宏 ISEQUAL 就是用了 NXHashTablePrototype 中的 isEqual 来判断两个数据是否相等:
Objective-C
#define ISEQUAL(table, data1, data2) ((data1 == data2) || (*table->prototype->isEqual)(table->info, data1, data2))
复制代码
可以说,NXHashTablePrototype 中存储了一些构建哈希表必要的函数指针。
因为 NXHashTable 使用拉链法来实现哈希表,在存入表前对数据执行 hash,然后找到对应的 buckets,如果与 buckets 中的数据相同(使用 isEqual 判断),就替换原数据,否则将数据添加到链表中。
HashBucket
在这里另一个需要注意的数据结构就是 HashBucket:
C
typedef struct { unsigned count; oneOrMany elements;} HashBucket;
复制代码
oneOrMany 是一个 union 结构体:
C
typedef union { const void *one; const void **many;} oneOrMany;
复制代码
这么设计的主要原因是提升性能。
如果 HashBucket 中只有一个元素,那么就直接访问 one,否则访问 many,遍历这个 many 列表。
NXCountHashTable
NXCountHashTable 方法应该是我们要介绍的方法中的最简单的一个,它会直接返回 NXHashTable 结构体中的 count。
Objective-C
unsigned NXCountHashTable (NXHashTable *table) { return table->count;}
复制代码
NXHashMember
NXHashMember 的函数签名虽然会返回 int,其实它是一个布尔值,会判断当前的 NXHashTable 中是否包含传入的数据:
Objective-C
int NXHashMember (NXHashTable *table, const void *data) {    HashBucket  *bucket = BUCKETOF(table, data);    unsigned  j = bucket->count;    const void  **pairs;
    if (! j) return 0;    if (j == 1) {        return ISEQUAL(table, data, bucket->elements.one);    };    pairs = bucket->elements.many;    while (j--) {        if (ISEQUAL(table, data, *pairs)) return 1;        pairs ++;    };    return 0;}
复制代码
使用 BUCKETOF 对 data 进行 hash,将结果与哈希表的 buckets 数取模,返回 buckets 数组中对应的 NXHashBucket。
Objective-C
#define BUCKETOF(table, data) (((HashBucket *)table->buckets)+((*table->prototype->hash)(table->info, data) % table->nbBuckets))
复制代码
在获取了 bucket 之后,根据其中元素个数的不同,选择不同的分支:
Objective-C
if (! j) return 0;if (j == 1) { return ISEQUAL(table, data, bucket->elements.one);};pairs = bucket->elements.many;while (j--) { if (ISEQUAL(table, data, *pairs)) return 1; pairs ++;};
复制代码
NXHashGet
其实我一直觉得这个方法可能用处不是很大,尤其是在使用默认的 NXHashTablePrototype 时,因为默认的 NXHashTablePrototype 中的 isEqual 函数指针只是比较两个数据的指针是否相同。
其最大作用就是查看当前 data 是不是在表中。
如果当前数据在表中,那么这个方法只会返回一个相同的指针,没有太多的意义。
它的实现跟上面的 NXHashMember 区别并不大,这里就不过多介绍了:
Objective-C
void *NXHashGet (NXHashTable *table, const void *data) {    HashBucket  *bucket = BUCKETOF(table, data);    unsigned  j = bucket->count;    const void  **pairs;
    if (! j) return NULL;    if (j == 1) {        return ISEQUAL(table, data, bucket->elements.one)        ? (void *) bucket->elements.one : NULL;    };    pairs = bucket->elements.many;    while (j--) {        if (ISEQUAL(table, data, *pairs)) return (void *) *pairs;        pairs ++;    };    return NULL;}
复制代码
NXHashInsert
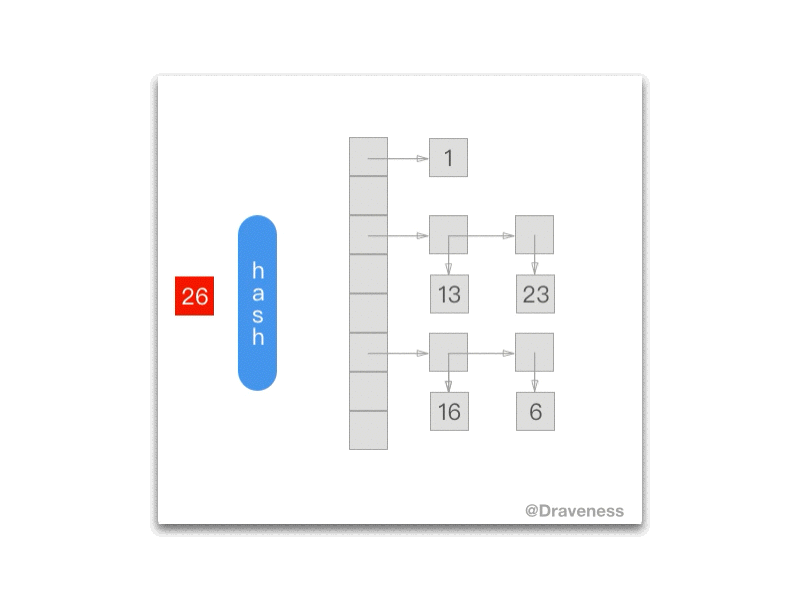
NXHashInsert 是 NXHashTable 中比较重要的方法,其作用就是向表中插入数据:
Objective-C
void *NXHashInsert (NXHashTable *table, const void *data) {    HashBucket *bucket = BUCKETOF(table, data);    unsigned j = bucket->count;    const void **pairs;    const void **newt;
    if (! j) {        bucket->count++;        bucket->elements.one = data;        table->count++;        return NULL;    };    if (j == 1) {        if (ISEQUAL(table, data, bucket->elements.one)) {            const void *old = bucket->elements.one;            bucket->elements.one = data;            return (void *) old;        };        newt = ALLOCPAIRS(z, 2);        newt[1] = bucket->elements.one;        *newt = data;        bucket->count++;        bucket->elements.many = newt;        table->count++;        if (table->count > table->nbBuckets) _NXHashRehash (table);        return NULL;    };    pairs = bucket->elements.many;    while (j--) {        if (ISEQUAL(table, data, *pairs)) {            const void  *old = *pairs;            *pairs = data;            return (void *) old;        };        pairs ++;    };    newt = ALLOCPAIRS(z, bucket->count+1);    if (bucket->count) bcopy ((const char*)bucket->elements.many, (char*)(newt+1), bucket->count * PTRSIZE);    *newt = data;    FREEPAIRS (bucket->elements.many);    bucket->count++;    bucket->elements.many = newt;    table->count++;    if (table->count > table->nbBuckets) _NXHashRehash (table);    return NULL;}
复制代码
虽然这里的实现比上面的两个方法复杂得多,但是脉络仍然很清晰,我们将插入的过程分为三种情况:
bucket->count == 0
bucket->count == 1
bucket->count > 1
如果对应的 bucket 为空:
Objective-C
if (! j) { bucket->count++; bucket->elements.one = data; table->count++; return NULL;};
复制代码
将数据直接填入 bucket,增加 bucket 中元素的数目,以及 table 中存储的元素的数目:
如果原来的 buckets 中有一个元素,它会替换或者使用 many 替换原来的 one:
Objective-C
if (j == 1) {    if (ISEQUAL(table, data, bucket->elements.one)) {        const void  *old = bucket->elements.one;        bucket->elements.one = data;        return (void *) old;    };    newt = ALLOCPAIRS(z, 2);    newt[1] = bucket->elements.one;    *newt = data;    bucket->count++;    bucket->elements.many = newt;    table->count++;
    ...
    return NULL;};
复制代码
当前数据 data 如果与 bucket 中存储的数据相同,就会更新这个数据,否则就会使用 ALLOCPAIRS 初始化一个新的数组,然后将 data 和原来的数据传入。
但是如果原来的 bucket 中存储的元素大于 1,那么会在链表的头部追加一个新的元素:
Objective-C
while (j--) { if (ISEQUAL(table, data, *pairs)) { const void *old = *pairs; *pairs = data; return (void *) old; }; pairs ++;};newt = ALLOCPAIRS(z, bucket->count+1);if (bucket->count) bcopy ((const char*)bucket->elements.many, (char*)(newt+1), bucket->count * PTRSIZE);*newt = data;FREEPAIRS (bucket->elements.many);bucket->count++;bucket->elements.many = newt;table->count++;
复制代码
上面的代码使用 bcopy 将原链表中元素拷贝到新的数组 newt 中。
在每次添加完一个元素之后,都会进行下面的判断:
Objective-C
if (table->count > table->nbBuckets) _NXHashRehash (table);
复制代码
上面的这行代码会保证哈希表中的元素数据小于等于表中的 bucket 数量。
这就是 buckets 后面的列表非常短的原因,在理想情况下,每一个 buckets 中都只存储一个或零个元素。
_NXHashRehash
如果哈希表在添加元素后,其中的数据多于 buckets 数量,就会对 NXHashTable 进行 _NXHashRehash 操作。
Objective-C
static void _NXHashRehash (NXHashTable *table) { _NXHashRehashToCapacity (table, MORE_CAPACITY(table->nbBuckets));}
复制代码
它调用 _NXHashRehashToCapacity 方法来扩大 NXHashTable 的容量(HashBucket 的个数)。
C
#define MORE_CAPACITY(b) (b*2+1)
复制代码
而 MORE_CAPACITY 会将当前哈希表的容量翻倍,并将新的容量传入 _NXHashRehashToCapacity 中:
Objective-C
void _NXHashRehashToCapacity (NXHashTable *table, unsigned newCapacity) {    NXHashTable  *old;    NXHashState  state;    void  *aux;    __unused void *z = ZONE_FROM_PTR(table);
    old = ALLOCTABLE(z);    old->prototype = table->prototype; old->count = table->count;    old->nbBuckets = table->nbBuckets; old->buckets = table->buckets;    table->nbBuckets = newCapacity;    table->count = 0; table->buckets = ALLOCBUCKETS(z, table->nbBuckets);    state = NXInitHashState (old);    while (NXNextHashState (old, &state, &aux))        (void) NXHashInsert (table, aux);    freeBuckets (old, NO);
    free (old->buckets);    free (old);}
复制代码
创建一个 NXHashTable 的指针指向原哈希表
改变哈希表的 nbBuckets,并重新初始化哈希表的 buckets 数组
重新将元素插入到哈希表中
释放原哈希表 old 以及 buckets
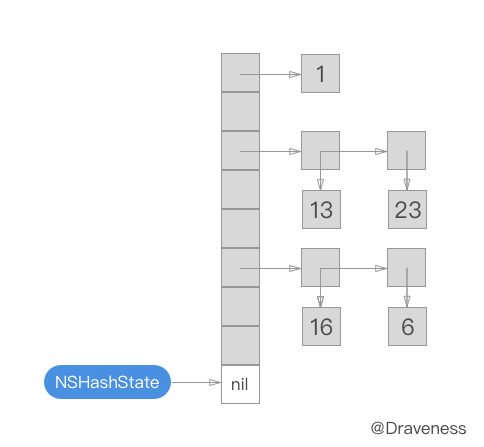
NXHashState
在将元素重新插入到哈希表中涉及了一个非常奇怪的结构体 NXHashState,这个结构体主要作用是遍历 NXHashTable 中的元素。
Objective-C
typedef struct { int i; int j;} NXHashState;
复制代码
我们可以使用如下的代码对哈希表中的元素进行遍历:
Objective-C
unsigned count = 0; MyData *data; NXHashState state = NXInitHashState(table); while (NXNextHashState(table, &state, &data)) { count++; }
复制代码
代码片段中调用了两个方法,分别是 NXInitHashState 以及 NXNextHashState:
Objective-C
NXHashState NXInitHashState (NXHashTable *table) {    NXHashState  state;
    state.i = table->nbBuckets;    state.j = 0;    return state;};
复制代码
NXInitHashState 会将 NXHashState 指向哈希表的最末端:
这个位置其实并不属于 NXHashTable,它一定会为空。
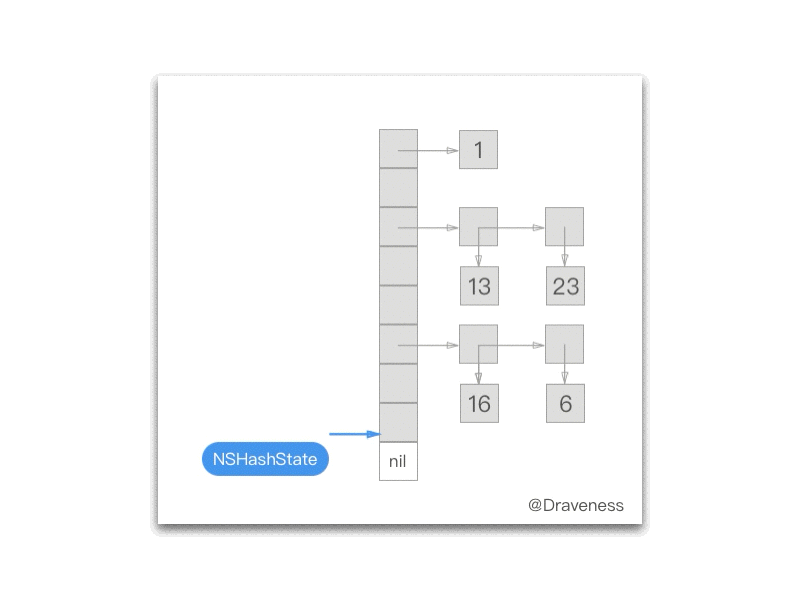
而每次调用 NXNextHashState 都会向『前』移动一次:
Objective-C
int NXNextHashState (NXHashTable *table, NXHashState *state, void **data) {    HashBucket    *buckets = (HashBucket *) table->buckets;
    while (state->j == 0) {        if (state->i == 0) return NO;        state->i--; state->j = buckets[state->i].count;    }    state->j--;    buckets += state->i;    *data = (void *) ((buckets->count == 1)                      ? buckets->elements.one : buckets->elements.many[state->j]);    return YES;};
复制代码
下面的 gif 为我们展示了每一次调用 NXNextHashState 方法之后当前的 NXHashState:
NXHashRemove
这里的 NXHashRemove在某种意义上是 NXHashInsert 的逆操作:
Objective-C
void *NXHashRemove (NXHashTable *table, const void *data) {    HashBucket  *bucket = BUCKETOF(table, data);    unsigned  j = bucket->count;    const void  **pairs;    const void  **newt;    __unused void *z = ZONE_FROM_PTR(table);
    if (! j) return NULL;    if (j == 1) {        if (! ISEQUAL(table, data, bucket->elements.one)) return NULL;        data = bucket->elements.one;        table->count--; bucket->count--; bucket->elements.one = NULL;        return (void *) data;    };    pairs = bucket->elements.many;    if (j == 2) {        if (ISEQUAL(table, data, pairs[0])) {            bucket->elements.one = pairs[1]; data = pairs[0];        }        else if (ISEQUAL(table, data, pairs[1])) {            bucket->elements.one = pairs[0]; data = pairs[1];        }        else return NULL;        FREEPAIRS (pairs);        table->count--; bucket->count--;        return (void *) data;    };    while (j--) {        if (ISEQUAL(table, data, *pairs)) {            data = *pairs;            /* we shrink this bucket */            newt = (bucket->count-1)            ? ALLOCPAIRS(z, bucket->count-1) : NULL;            if (bucket->count-1 != j)                bcopy ((const char*)bucket->elements.many, (char*)newt, PTRSIZE*(bucket->count-j-1));            if (j)                bcopy ((const char*)(bucket->elements.many + bucket->count-j), (char*)(newt+bucket->count-j-1), PTRSIZE*j);            FREEPAIRS (bucket->elements.many);            table->count--; bucket->count--; bucket->elements.many = newt;            return (void *) data;        };        pairs ++;    };    return NULL;}
复制代码
它的实现也分为三种情况,不过在这里就不多说了。
NXHashTable 的性能
在已经熟悉了 NXHashTable 的具体实现之后,我们要分析插入不同数据量级的情况下,所需要的时间,这里是主程序的代码,分别测试了在 100, 1000, 10000, 100000, 1000000, 2000000, 3000000, 5000000, 10000000 数据下 NXHashTable 的性能表现:
Objective-C
#import <Foundation/Foundation.h>#import "hashtable2.h"
int main(int argc, const char * argv[]) {    @autoreleasepool {        NSArray<NSNumber *> *capacities = @[            @100,            @1000,            @10000,            @100000,            @1000000,            @2000000,            @3000000,            @5000000,            @10000000        ];
        for (NSNumber *capacity in capacities) {            NXHashTable *hashTable = NXCreateHashTable(NXPtrPrototype, 0, NULL);            NSDate *methodStart = [NSDate date];            for (NSInteger i = 0; i < capacity.integerValue; i++) {                NSString *value = [NSString stringWithFormat:@"%ld", (long)i];                NXHashInsert(hashTable, (__bridge void *)value);            }            NSDate *methodFinish = [NSDate date];            NSTimeInterval executionTime = [methodFinish timeIntervalSinceDate:methodStart];            NSLog(@"Capacities: %@, executionTime = %f, meanTime = %.10f", capacity, executionTime, executionTime / capacity.integerValue);
            free(hashTable);        }
    }    return 0;}
复制代码
代码中初始化了一个 capacities 存储需要测量的数据量级,然后调用 NXHashInsert 方法将相当数量级的数据添加到哈希表中:
| Capacities | Execution Time | Mean Time |
|---|
100 | 0.000334 | 0.0000033402 1000 | 0.001962 | 0.0000019619 10000 | 0.022001 | 0.0000022001 100000 | 0.349998 | 0.0000035000 1000000 | 2.622551 | 0.0000026226 2000000 | 4.165023 | 0.0000020825 3000000 | 6.973098 | 0.0000023244 5000000 | 13.179743 | 0.0000026359
复制代码
10000000 | 53.387356 | 0.0000053387
在对 NXHashTable 的性能测试中,当数据量小于 5000000 时,执行时间的增长还是线性的,平均时间也基本稳定,但是一旦数据量达到了千万级,执行时间就会出现显著的增长。
如果仅仅在哈希表中插入数据,相信其时间增长应该都是线性的,这里出现问题的原因推测是在对哈希表进行 Rehash 的时候,迁移原数据至新的数组所造成的。
如何避免哈希表的 Rehash 呢,重新回顾一下创建哈希表的函数:
Objective-C
NXHashTable *NXCreateHashTable (NXHashTablePrototype prototype, unsigned capacity, const void *info);
复制代码
这个函数的签名中包含一个 capacity 的参数,我们在上面的代码中传入了 0,也就是最开始的 buckets 数为 0,但是它的数目并不是固定的,它会随着哈希表中数据的增多,逐渐变大。
capacity 只是一个提示,帮助 NXHashTable 了解其中会存储多少数据。
如果在创建 NXHashTable 时传入 capacity.integerValue:
Objective-C
NXHashTable *hashTable = NXCreateHashTable(NXPtrPrototype, capacity.integerValue, NULL);
复制代码
重新运行代码,测量性能:
| Capacities | Execution Time | Mean Time |
|---|
100 | 0.000740 | 0.0000073999 1000 | 0.003442 | 0.0000034420 10000 | 0.023341 | 0.0000023341100000 | 0.215209 | 0.0000021521
复制代码
1000000 | 1.836802 | 0.0000018368
2000000 | 3.683246 | 0.0000018416
3000000 | 5.474610 | 0.0000018249
5000000 | 10.576254 | 0.0000021153
10000000 | 46.725459 | 0.0000046725
虽然在测试 10,000,000 数据时其平均时间依然是 5,000,000 时的二倍,不过整体的性能都有所提升,然而这部分性能的损耗暂时还不是很清楚原因。
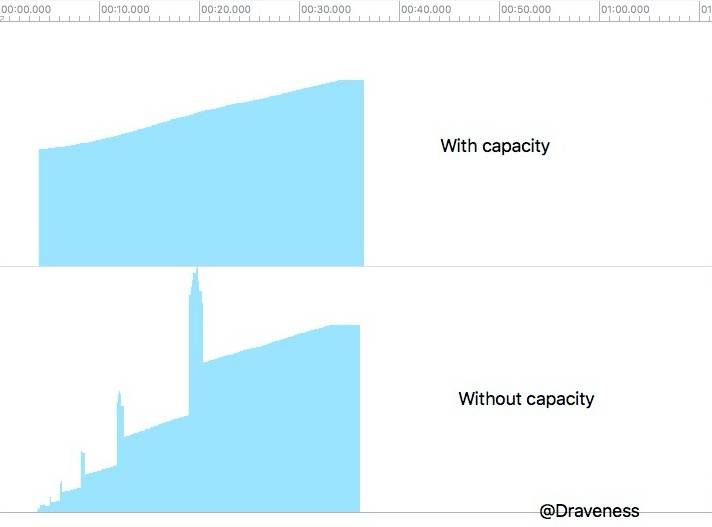
如果我们使用 Instrument 对有无 capacity 的情况进行比较(这是在使用 2,000,000 数据时进行的测试):
没有传入 capacity 的哈希表会在多次插入之后出现一个峰值(由于 Rehash 引起的,其宽度就是 Rehash 使用的时间),而传入 capacity 的哈希表会在代码刚运行时就初始化足够大的数组。
NSMutableArray 性能
这部分只算是一个小插曲,你可以选择跳过这一小节的内容。
NSMutableArray 的构造器 - (instancetype)initWithCapacity:(NSUInteger)numItems 也有一个参数 capacity,虽然数组和哈希表是两种数据结构。
不过我们这里主要研究的是:传入 capacity 是否会对性能造成影响。
首先是使用 init 创建的 NSMutableArray 数组,也就是没有传入 capacity:
| Capacities | Execution Time | Mean Time |
|---|
100 | 0.000539 | 0.0000053900 1000 | 0.003185 | 0.0000031850 10000 | 0.074033 | 0.0000074033100000 | 0.370899 | 0.0000037090
复制代码
1000000 | 1.504855 | 0.0000015049
2000000 | 2.852519 | 0.0000014263
3000000 | 3.995536 | 0.0000013318
5000000 | 6.833879 | 0.0000013668
10000000 | 14.444605 | 0.0000014445
下面是使用 initWithCapacity: 创建的数组:
| Capacities | Execution Time | Mean Time |
|---|
100 | 0.000256 | 0.0000025600 1000 | 0.001775 | 0.0000017750 10000 | 0.015906 | 0.0000015906100000 | 0.174376 | 0.0000017438
复制代码
1000000 | 1.650481 | 0.0000016505
2000000 | 2.802310 | 0.0000014012
3000000 | 4.451261 | 0.0000014838
5000000 | 7.093753 | 0.0000014188
10000000 | 14.598415 | 0.0000014598
你可以在表格中看到,两者在执行效率上并没有显著的差异或者区别。
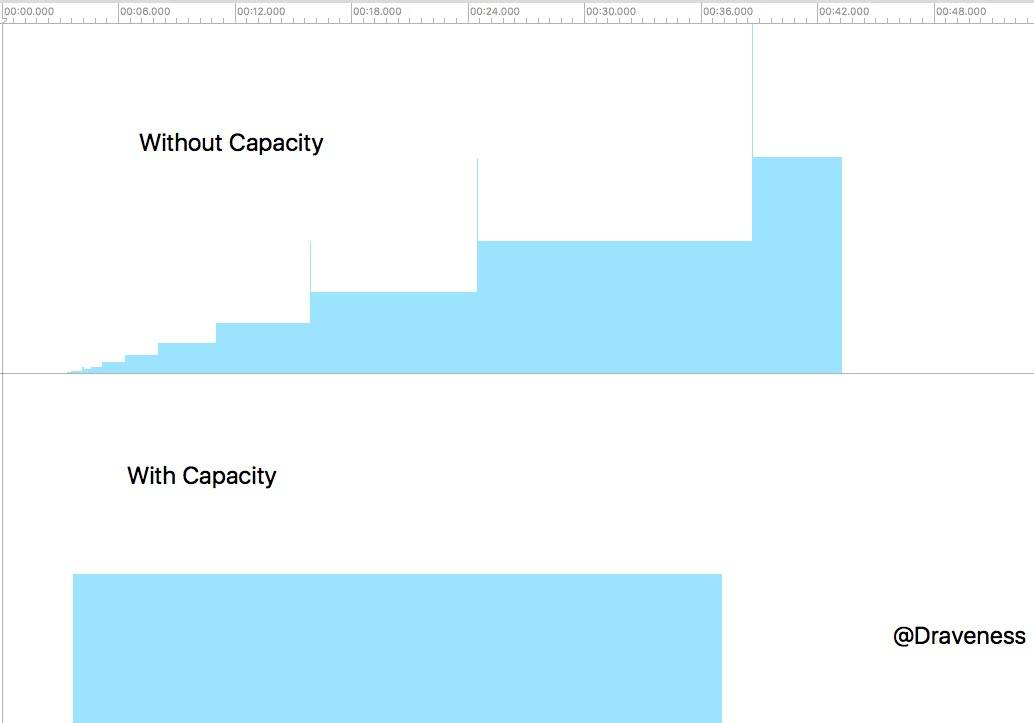
但是如果使用 instrument 来查看两者的内存分配,可以很明显的看到,没有传入 capacity 的 NSMutableArray 会在可变数组内存占用增加前出现一个短暂的内存分配峰值。
导致这一现象的原始可能是:在将原数组中的内容移入新数组时,临时变量申请了大量的内存控件。
在之后关于 CoreFoundation 源代码分析的文中会介绍它们是怎么实现的。
NXHashTable 的应用
在整个 objc/runtime 中,作为私有的数据结构 NXHashTable,直接使用了它的就是存储所有类或者元类的哈希表(在这里会忽略对元类的存储,因为实现几乎完全相同):
Objective-C
static NXHashTable *realized_class_hash = nil;
复制代码
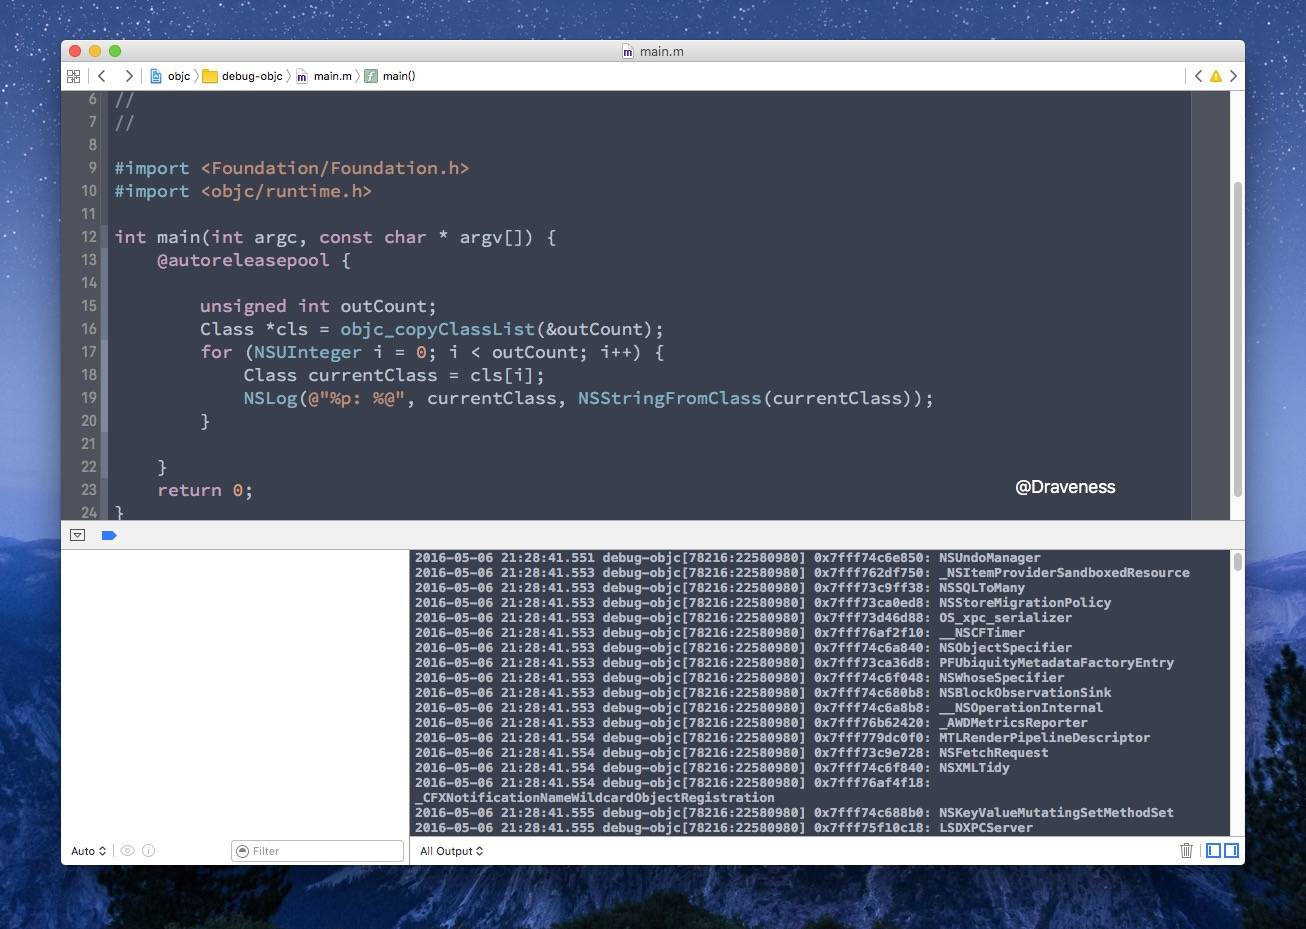
我么可以使用 objc_copyClassList 获取类的数组:
Objective-C
Class *objc_copyClassList(unsigned int *outCount){    rwlock_writer_t lock(runtimeLock);
    realizeAllClasses();
    Class *result = nil;    NXHashTable *classes = realizedClasses();    unsigned int count = NXCountHashTable(classes);
    if (count > 0) {        Class cls;        NXHashState state = NXInitHashState(classes);        result = (Class *)malloc((1+count) * sizeof(Class));        count = 0;        while (NXNextHashState(classes, &state, (void **)&cls)) {            result[count++] = cls;        }        result[count] = nil;    }
    if (outCount) *outCount = count;    return result;}
复制代码
调用 realizedClasses 返回 realized_class_hash 哈希表
使用 NSHashState 遍历 realized_class_hash 中的类,并将所有的类存入 result
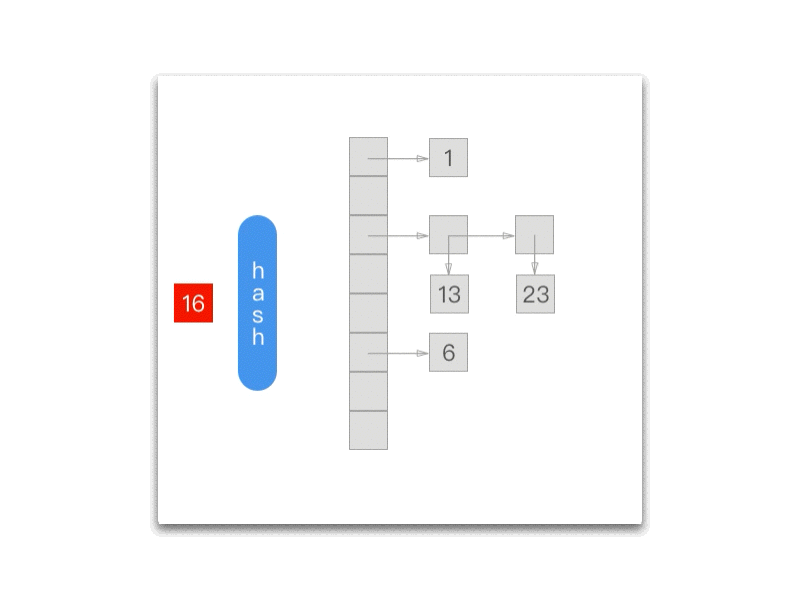
接下来使用上面的方法,打印出 realized_class_hash 中存储的所有类:
小结
NXHashTable 在 OS X 10.1 中就已经标记为弃用了,但是依旧支持着 runtime 底层的工作。
NXHashTable 可以说有着非常非常久远的历史了,最早可以追溯到将近 30 多年前 NeXT 时代:
C
// hashtable2.mm 文件中
hashtable2.mCopyright 1989-1996 NeXT Software, Inc.Created by Bertrand Serlet, Feb 89
复制代码
NSHashTable 对哈希表的实现还是非常优雅的,可以说非常标准的使用了拉链法实现哈希表。
不过现在,我们会使用 NSHashTable 来取代这个上古时代的产物。
本文转载自 Draveness 技术博客。
原文链接:https://draveness.me/hashtable


评论