
在我们的第一篇文章中,用 MonoTouch 在 iPhone 上创建了一个应用程序。我们用到了 outlet 和 action,了解了基本的应用程序结构,并创建了一个简单的用户界面。在这篇文章中,我们将要创建另外一个简单的应用程序,不过这次要学习下如何使用 Views(视图)和 View Controllers(视图控制器)来创建一个具有多个界面的应用程序。特别地,我们将使用UINavigationController来在应用程序里的两个界面间进行导航。
在开始构建应用程序之前,让我们简单熟悉下 iPhone 应用程序所用的这个重要设计模式。
模型 - 视图 - 控制器(MVC)模式
Cocoa Touch 使用了一种修改版本的 MVC 模式来处理 GUI 的显示。MVC 模式(自 1979 年以来)已经出现很长时间了,它皆在分离显示用户界面所需的大量任务,并处理用户交互。
正如名称所蕴含的,MVC 具有三个主要部分,Model(模型)、View(视图)和 Controller(控制器):
- 模型——模型是特定于领域的数据表现形式。比如说,我们正在创建一个任务列表应用程序。你可能会有一个 Task 对象的集合,书写为 List
。 你或许把这些数据保存在数据库、XML 文件,或者甚至从 Web Service 中得到,不过 MVC 不那么关心它们是在何处 / 如何来持久保存的(乃至它们是什么)。相反,它特别专注于如何显示这些数据,并处理与用户交互的。 - 视图——视图代表了数据如何实际地显示出来。在我们这个假设的任务应用程序中,会在一个网页(以 HTML 的方式)中来显示这些任务,也会在一个 WPF 页面中(以 XAML 的方式)来显示,或者在一个 iPhone 应用程序中显示为UITableView 。如果用户点击某个任务,要删除之,那么视图通常会触发一个事件,或对 Controller(控制器)进行一个回调。
- 控制器——控制器是模型和视图间的粘合剂。控制器的目的就是获取模型中的数据,告知视图来显示。控制器还侦听着视图的事件,在用户选中一个任务来删除的时候,控制着任务从模型中删除。
通过分离显示数据、持久化数据和处理用户交互的职责,MVC 模式有助于创建易于理解的代码。而且,它促进了视图和模型的解耦,以便模型能被重用。例如,在你的应用程序中,有两个界面,基于 Web 的和 WPF 的,那么你可以在两者中都使用同样的模型定义代码。
因而,在很多 MVC 框架中不管具体的工作方式如何,基本原理都大致如此的。然而,在 Cocoa(及 Cocoa Touch)中,还是或多或少有所不同,苹果用 MVC 来代表 Views(视图)、View Controller(视图控制器)和 Models(模型);但是在不同的控件中,它们却不是完全一致的,实现的方式也不太一样。我们将在构建示例应用程序的时候了解更多细节。
在 MonoTouch 中的视图和视图控制器
我之前简短地提到,在 iPhone 应用程序中,你只能显示一个窗口。不过可以包含很多界面。要做到这点,你需要为每个界面都添加一个视图和视图控制器。
视图实际上包含了所有可视化元素,比如标签、按钮等等,而视图控制器处理在视图上的实际用户交互(通过事件),并让你在这些事件被触发的时候运行相应的代码。做一个粗略的比喻的话,这就是和 ASP.NET 或 WPF 有点类似的模型,在这些模型中,你通过 HTML 或 XAML 来定义用户界面,在后置代码中处理事件。
在你导向另外一个页面的时候,就把视图控制器放到视图控制器堆栈中。在这个要构建的应用程序中,我们将使用 Navigation View Controller(导航视图控制器,UINavigationController)来处理不同的界面,因为它提供了一种方式可以在界面之间非常容易地导航,通过这种基于层级模式的导航栏,让你的用户能够藉由视图控制器往后和往前进行导航。
UINavigationController 在很多内置的 iPhone 应用程序都能看到。例如,在查看短信列表的时候,如果你点击其中一个,顶部导航栏将在顶部显示一个左箭头按钮,让你可以回到显示消息列表的视图。
具有多个界面的 Hello World 应用
现在,在概念上了解了 MVC 的工作原理后,让我们实际地创建一个应用程序来实践下。
首先,在 MonoDevelop 中新建一个 MonoTouch iPhone 解决方案,命名为 Example_HelloWorld_2(如果你忘记如何操作可以参考一下第一篇文章)。
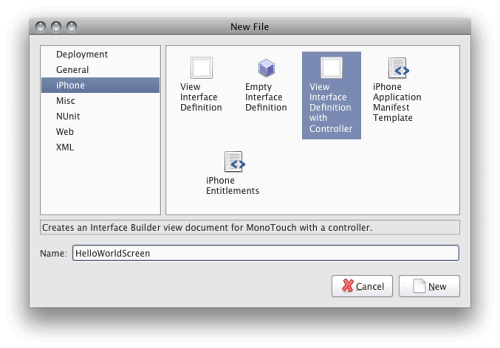
接着,添加两个视图控制器(以及相关的视图)来服务于我们将要执行导航的应用程序中的界面。要完成这个步骤,在项目上点击右键,选择“Add : New File”。
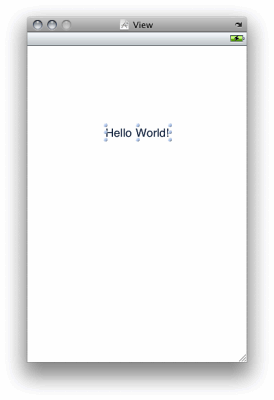
在 Interface Builder 中打开.xib 文件,添加一个标签到HelloWorldScreen上,修改文本为“Hello World”,另外添加一个文本到HelloUniverseScreen上,修改文本为“Hello Universe”,如下图所示:
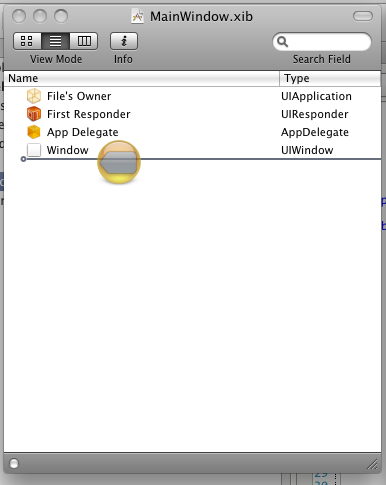
现在,让我们添加一个 Navigation Controller 到 Main Window 上。方式是,在 Interface Builder 里打开 MainWindow.xib,从 Library Window 中拖一个 Navigation Controller 到 Document Window 上:
Navigation Controller 具有如下几个部分:
- Navigation Controller(导航控制器)——这是控制器的主要部分,处理导航事件,把所有东西糅合在一起。
- Navigation Bar(导航栏)——这是显示在顶部的工具条,让用户能够看到它处于导航层级的什么位置,并可以导航回去。
- 视图控制器——这个部分用来控制着视图的显示。
- Navigation Item(导航条目)—— 就是显示在导航栏上的部分,实际上就是用于导航的按钮,也显示相应的标题
接下来,我们添加一个 Table View 到 Navigation Controller 上,以便能创建一个用于各个界面的链接列表。要完成这个步骤,从 Library 中拖一个UITableView到 Navigation Controller 里的 View Controller 上:

改变一下导航栏的标题。在 Navigation Controller 上双击顶部栏,键入“Hello World Home!”:
我必须使用 Table View 来包含 Navigation Items 吗?
不用,你可以放任何东西到 View Controller 中。我们将在后面看到,在你导航到一个新界面的时候,你是调用NavigationController.PushViewController方法,并把要去的界面的 View Controller 传递给它。在用户点击按钮的时候,我们能轻易地实现它。
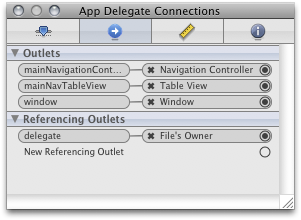
现在,我们获得了所需的 Navigation Controller 以及相关的 Table View,还需要让两者都可被后置代码访问。需要让 Navigation Controller 在代码中可访问,以便我们能把 View Controllers 传给它;也需要让 Table View 在代码中可访问,以便我们能用要导航到的界面的名称来填充它。
要实现这个步骤,要为它们创建 Outlets,正如我们在第一篇文章所做的那样的。我们把 Navigation Controller 取名为mainNavigationController,把 Table View 取名为mainNavTableView。要确保在 AppDelegate 中创建它们。在你完成后,Connection Inspector 应该看上去如下所示:
接着,需要设置在应用程序启动的时候显示 Navigation Controller。还记得之前在 Main.cs 中注释掉的Window.AddSubview代码吗?对,这就是我们现在要使用的代码。我们把那行代码改为如下:
// If you have defined a view, add it here: window.AddSubview (this.mainNavigationController.View);
AddSubView 很像 WPF、ASP.NET 等中的 AddControl 语句。通过把它传递给mainNavigationController对象的 View 属性,我们就可告知窗口去显示这个 Navigation Controller 的界面。
现在让我们来运行一下应用程序,会看到下图所示的样子:
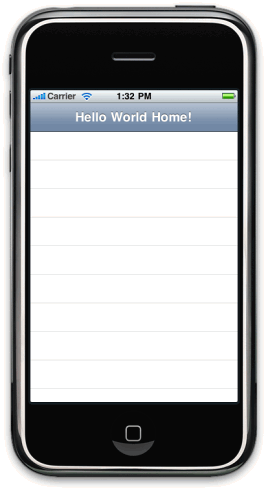
这样 Navigation Controller 就可显示出来了,不过还没有任何链接指向其他界面。为了设置链接,必须用数据来填充 Table View。这就需要创建一个UITableViewDataSource 对象,把它绑定给 Table View 的 DataSource 属性。在传统的.NET 编程中,你可以绑定任何实现了IEnumerable 接口的对象到 DataSource 属性上,并设定一些数据绑定参数(比如需要显示那些字段),这样就实现了巧妙的数据绑定。在 Cocoa 中,工作方式稍微不同,正如我们看到的,在绑定上的对象需要创建新条目的时候,DataSource 本身都会被调用,DataSource 实际负责它们的创建。
之前,我们实现了 DataSource,现在来创建将要真正使用的条目。创建一个名为 NavItem 的类。在项目上点右键,选择“Add : New File”,再选择“General : Empty Class”,命名为“NavItem”,如下图:
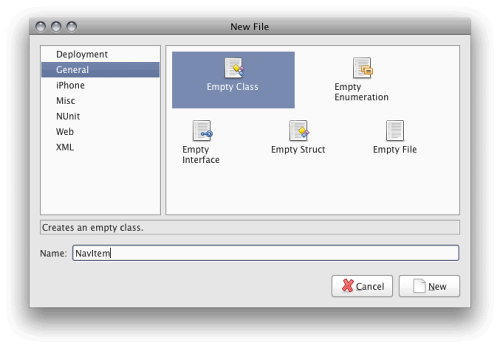
现在,把如下代码写到里面:
using System; using MonoTouch.UIKit; namespace Example_HelloWorld_2 { //======================================================================== /// <summary> /// /// </summary> public class NavItem { //============================================================= #region -= declarations =- /// <summary> /// The name of the nav item, shows up as the label /// </summary> public string Name { get { return this._name; } set { this._name = value; } } protected string _name; /// <summary> /// The UIViewController that the nav item opens. Use this property if you /// wanted to early instantiate the controller when the nav table is built out, /// otherwise just set the Type property and it will lazy-instantiate when the /// nav item is clicked on. /// </summary> public UIViewController Controller { get { return this._controller; } set { this._controller = value; } } protected UIViewController _controller; /// <summary> /// The Type of the UIViewController. Set this to the type and leave the Controller /// property empty to lazy-instantiate the ViewController when the nav item is /// clicked. /// </summary> public Type ControllerType { get { return this._controllerType; } set { this._controllerType = value; } } protected Type _controllerType; /// <summary> /// a list of the constructor args (if neccesary) for the controller. use this in /// conjunction with ControllerType if lazy-creating controllers. /// </summary> public object[] ControllerConstructorArgs { get { return this._controllerConstructorArgs; } set { this._controllerConstructorArgs = value; this._controllerConstructorTypes = new Type[this._controllerConstructorArgs.Length]; for (int i = 0; i < this._controllerConstructorArgs.Length; i++) { this._controllerConstructorTypes[i] = this._controllerConstructorArgs[i].GetType (); } } } protected object[] _controllerConstructorArgs = new object[] { }; /// <summary> /// The types of constructor args. /// </summary> public Type[] ControllerConstructorTypes { get { return this._controllerConstructorTypes; } } protected Type[] _controllerConstructorTypes = Type.EmptyTypes; #endregion //======================================================================== //======================================================================== #region -= constructors =- public NavItem () { } public NavItem (string name) : this() { this._name = name; } public NavItem (string name, UIViewController controller) : this(name) { this._controller = controller; } public NavItem (string name, Type controllerType) : this(name) { this._controllerType = controllerType; } public NavItem (string name, Type controllerType, object[] controllerConstructorArgs) : this(name, controllerType) { this.ControllerConstructorArgs = controllerConstructorArgs; } #endregion //=============================================================== } }
这个类非常简单。我们首先来看一下其中的属性:
- Name——打算在 Navigation Table 中显示的界面名称。
- Controller——界面对应的实际UIViewController 。
- ControllerType——界面对应的UIVeiwController的类型,这里只是存储着这个控制器的类型,并在需要的时候才来创建它,从而实现UIViewController的后期实例化目标。
- ControllerConstructorArgs ——如果你的 UIViewController 具有任何构造参数,并且你希望传递它的话,就在这个属性上设置。在我们的例子中,不需要用到这个属性,所以现在可以忽略它,不过我在这里还是列出,因为它对于需要后期创建的类是很有用的。
- ControllerConstructorTypes ——这是一个只读属性,读取从ControllerConstructorArgs设置的类型,其用于实例化控件。
类的剩余部分就是一些基本的构造器。
现在,我们编写好了 NavItem,就可以来为 Navigation Table View 创建一个能实际使用的 DataSource。创建一个名为NavTableViewDataSource的新类。做法和已经编好的 NavItem 的类似。
现在,把下面代码写入:
using System; using System.Collections.Generic; using MonoTouch.UIKit; using MonoTouch.Foundation; namespace Example_HelloWorld_2 { //======================================================================== // // The data source for our Navigation TableView // public class NavTableViewDataSource : UITableViewDataSource { /// <summary> /// The collection of Navigation Items that we bind to our Navigation Table /// </summary> public List<NavItem> NavItems { get { return this._navItems; } set { this._navItems = value; } } protected List<NavItem> _navItems; /// <summary> /// Constructor /// </summary> public NavTableViewDataSource (List<NavItem> navItems) { this._navItems = navItems; } /// <summary> /// Called by the TableView to determine how man cells to create for that particular section. /// </summary> public override int RowsInSection (UITableView tableView, int section) { return this._navItems.Count; } /// <summary> /// Called by the TableView to actually build each cell. /// </summary> public override UITableViewCell GetCell (UITableView tableView, NSIndexPath indexPath) { //---- declare vars string cellIdentifier = "SimpleCellTemplate"; //---- try to grab a cell object from the internal queue var cell = tableView.DequeueReusableCell (cellIdentifier); //---- if there wasn't any available, just create a new one if (cell == null) { cell = new UITableViewCell (UITableViewCellStyle.Default, cellIdentifier); } //---- set the cell properties cell.TextLabel.Text = this._navItems[indexPath.Row].Name; cell.Accessory = UITableViewCellAccessory.DisclosureIndicator; //---- return the cell return cell; } } //==================================================================== }
快速浏览一下代码。第一部分是我们的 List
接着,我们重写了RowsInSection方法。Table Views 能具有多个分段,在每个分段上都可以放置条目。RowsInSection 基于 section 参数传递进来的分段索引来返回条目的数量。在我们的例子中,只具有一个分段,那么我们就返回 NavItem 集合的 Count 属性。
最后一个方法是 GetCell,这里就是数据绑定实际发生的地方。这个方法被 UITableView 在构建每行数据的时候所调用。你可以利用这个方法来构建出 Table 中的每行数据,以显示出你期望的内容。
此处,我们所做的第一件事情就是通过DequeueReusableCell 方法从TableView 中得到UITableViewCell 对象。TableView 保持着一个UITableViewCell 对象的内部对象池,其基于CellIdentifiers来进行查找。它让你可以为UITableViewCell 创建自定义模板(只用创建一次),并重用这个模板,而不是 GetCell 每次被调用的时候都重复创建模板,这样就提高了性能。我们第一次调用DequeueReusableCell,它不会返回任何东西,那么就要创建一个新的UITableViewCell。之后的每次调用,UITableViewCell已经存在,就只需直接重用它就行。
我们使用 Default 的单元格样式(cell style),其只为我们提供了很少的自定义选项,所以接下来的事情就是把TextLabel.Text 属性设置为NavItem的Name 属性值。接着,我们设置Accessory 属性来使用DisclosureIndicator,其只是一个显示在 Navigation Item 右边的简单箭头。
现在,我们已经得到了创建好的UITableViewDataSource ,是时候使用它了。在 MonoDevelop 中打开 Main.cs,把如下的代码行添加到AppDelegate 类中:
protected List<NavItem> _navItems = new List<NavItem> ();
它将保存我们的 NavItem 对象。
接下来,添加如下代码到FinishedLaunching 方法中,在Window.MakeKeyAndVisible()之后:
//---- create our list of items in the nav this._navItems.Add (new NavItem ("Hello World", typeof(HelloWorldScreen))); this._navItems.Add (new NavItem ("Hello Universe", typeof(HelloUniverseScreen))); //---- configure our datasource this.mainNavTableView.DataSource = new NavTableViewDataSource (this._navItems);
在这里我们做的所有这些事情,就是创建两个 NavItem 对象,并把它们添加到 _navItems 集合中。接着,我们创建一个NavTableViewDataSource 对象,把它绑定到 Navigation Table View。
把之前代码加入后,我们的 AppDelegate 类看上去如下所示:
// The name AppDelegate is referenced in the MainWindow.xib file. public partial class AppDelegate : UIApplicationDelegate { protected List<NavItem> _navItems = new List<NavItem> (); // This method is invoked when the application has loaded its UI and its ready to run public override bool FinishedLaunching (UIApplication app, NSDictionary options) { // If you have defined a view, add it here: window.AddSubview (this.mainNavigationController.View); window.MakeKeyAndVisible (); //---- create our list of items in the nav this._navItems.Add (new NavItem ("Hello World", typeof(HelloWorldScreen))); this._navItems.Add (new NavItem ("Hello Universe", typeof(HelloUniverseScreen))); //---- configure our datasource this.mainNavTableView.DataSource = new NavTableViewDataSource (this._navItems); return true; } // This method is required in iPhoneOS 3.0 public override void OnActivated (UIApplication application) { } }
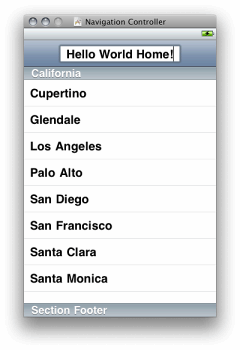
如果你现在运行应用程序,你将看到如下所示的样子:
我们现在拥有了构建好的导航条目,不过在点击它们的时候不会发生任何事情。在你点击一个条目的时候,UITableView 会引发一个事件,不过需要我们传递给它一个特别的类,叫作UITableViewDelegate ,它是检测这些事件实际处理类。要实现这个步骤,就在项目中创建一个新类,命名为“NavTableDelegate”,并写入如下代码:
using MonoTouch.Foundation; using MonoTouch.UIKit; using System; using System.Collections.Generic; using System.Reflection; namespace Example_HelloWorld_2 { //======================================================================== // // This class receives notifications that happen on the UITableView // public class NavTableDelegate : UITableViewDelegate { //---- declare vars UINavigationController _navigationController; List<NavItem> _navItems; //======================================================================== /// <summary> /// Constructor /// </summary> public NavTableDelegate (UINavigationController navigationController, List<NavItem> navItems) { this._navigationController = navigationController; this._navItems = navItems; } //======================================================================== //======================================================================== /// <summary> /// Is called when a row is selected /// </summary> public override void RowSelected (UITableView tableView, NSIndexPath indexPath) { //---- get a reference to the nav item NavItem navItem = this._navItems[indexPath.Row]; //---- if the nav item has a proper controller, push it on to the NavigationController // NOTE: we could also raise an event here, to loosely couple this, but isn't neccessary, // because we'll only ever use this this way if (navItem.Controller != null) { this._navigationController.PushViewController (navItem.Controller, true); //---- show the nav bar (we don't show it on the home page) this._navigationController.NavigationBarHidden = false; } else { if (navItem.ControllerType != null) { //---- ConstructorInfo ctor = null; //---- if the nav item has constructor aguments if (navItem.ControllerConstructorArgs.Length > 0) { //---- look for the constructor ctor = navItem.ControllerType.GetConstructor (navItem.ControllerConstructorTypes); } else { //---- search for the default constructor ctor = navItem.ControllerType.GetConstructor (System.Type.EmptyTypes); } //---- if we found the constructor if (ctor != null) { //---- UIViewController instance = null; if (navItem.ControllerConstructorArgs.Length > 0) { //---- instance the view controller instance = ctor.Invoke (navItem.ControllerConstructorArgs) as UIViewController; } else { //---- instance the view controller instance = ctor.Invoke (null) as UIViewController; } if (instance != null) { //---- save the object navItem.Controller = instance; //---- push the view controller onto the stack this._navigationController.PushViewController (navItem.Controller, true); } else { Console.WriteLine ("instance of view controller not created"); } } else { Console.WriteLine ("constructor not found"); } } } } //================================================================== } //======================================================================== }
这个类的第一部分是针对UINavigationController 和NavItem 对象的集合的一对声明,下面的构造器会需要用到它们。在下面的方法——RowSelected中我们将看到,为什么需要它。
RowSelected 在用户点击某行的时候UITableView 会调用它,并会返回给我们一个UITableView 的引用,以及用户点击条目的NSIndexPath 。首先,我们要根据NSIndexPath 来找到相应的NavItem 。接着,我们把NavItem 的UIViewController 传递给NavigationController。如果Controller 是空的,那么我们就会基于它的类型进行实例化。
最后的两个操作,就是我们为什么需要NavItem 集合和NavigationController引用的原因。
现在,我们有了UITableViewDelegate,就可以来组合在一起。返回到 Main.cs 文件中,在AppDelegate 类中添加如下代码行到设置DataSource 属性的后面:
this.mainNavTableView.Delegate = new NavTableDelegate (this.mainNavigationController, this._navItems);
这样就创建了一个新的NavTableDelegate 类,以及指向 Navigation Controller 和NavItems集合的引用,且会告知mainNavTable 使用它来处理事件。
Main.cs 文件中的AppDelegate 类将会如下面代码所示:
// The name AppDelegate is referenced in the MainWindow.xib file. public partial class AppDelegate : UIApplicationDelegate { protected List<NavItem> _navItems = new List<NavItem> (); // This method is invoked when the application has loaded its UI and its ready to run public override bool FinishedLaunching (UIApplication app, NSDictionary options) { // If you have defined a view, add it here: window.AddSubview (this.mainNavigationController.View); window.MakeKeyAndVisible (); //---- create our list of items in the nav this._navItems.Add (new NavItem ("Hello World", typeof(HelloWorldScreen))); this._navItems.Add (new NavItem ("Hello Universe", typeof(HelloUniverseScreen))); //---- configure our datasource this.mainNavTableView.DataSource = new NavTableViewDataSource (this._navItems); this.mainNavTableView.Delegate = new NavTableDelegate (this.mainNavigationController, this._navItems); return true; } // This method is required in iPhoneOS 3.0 public override void OnActivated (UIApplication application) { } }
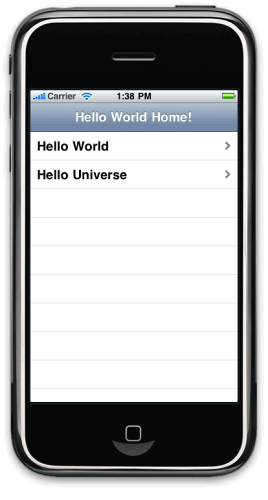
现在,我们运行一下应用程序,看一下会发生什么,点击“Hello World”你将看到如下的效果:
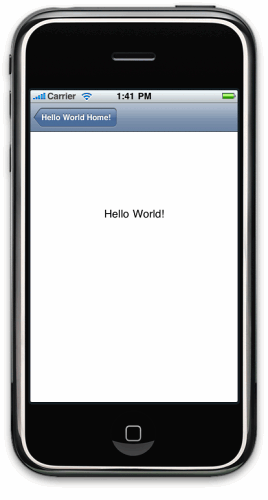
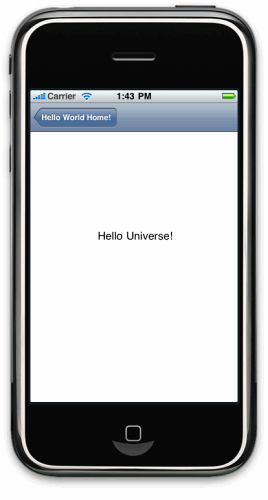
注意,我们会自动地在顶部得到一个“Hello World Home”按钮,这样就能让我们返回到主界面上。点击“Hello Universe”将得到如下界面:
恭喜你!你现在应该已经对 MonoTouch iPhone 应用程序中多个界面是如何工作的有了一个基本的概念,以及对UINavigationController 的工作原理有了一定了解。
查看英文原文: An Intro to the Model-View-Controller in MonoTouch
感谢马国耀对本文的审校。
给InfoQ 中文站投稿或者参与内容翻译工作,请邮件至 editors@cn.infoq.com 。也欢迎大家加入到 InfoQ 中文站用户讨论组中与我们的编辑和其他读者朋友交流。

暂无签名

腾讯云云原生提质增效实践精选集 2024
《2024腾讯云云原生提质增效实践精选集》出炉,5大热门技术领域,13个行业精选标杆案例,痛点到解决方案全...


评论