玩转webpack(二):webpack的核心对象

2019 年 8 月 21 日

玩转webpack(二):webpack的核心对象

webpack 是一个强大的模块打包工具,之所以强大的一个原因在于它拥有灵活、丰富的插件机制。但是 webpack 的文档不太友好,就我自己的学习经历来说,官方的文档并不详细,网上的学习资料又少有完整的概述和例子。所以,在研究了一段时间的 webpack 源码之后,自己希望写个系列文章,结合自己的实践一起来谈谈 webpack 插件这个主题,也希望能够帮助其他人更全面地了解 webpack。


这篇文章是系列文章的第二篇,将会从对象的角度来讲解 webpack。如果你想从整体角度了解 webpack,可以先阅读系列文章的第一篇:


玩转webpack(一):webpack的基本架构和构建流程


P.S. 以下的分析都基于 webpack 3.6.0


P.S. 本文将继续沿用第一篇文章的名词,任务点表示通过 plugin 方法注册的名称


webpack 中的核心对象


跟第一篇文章类似,我们不会将所有 webpack 中的对象都拿出来讲解,而是整理了一些比较核心的概念。我们可以先看看下面的类图:


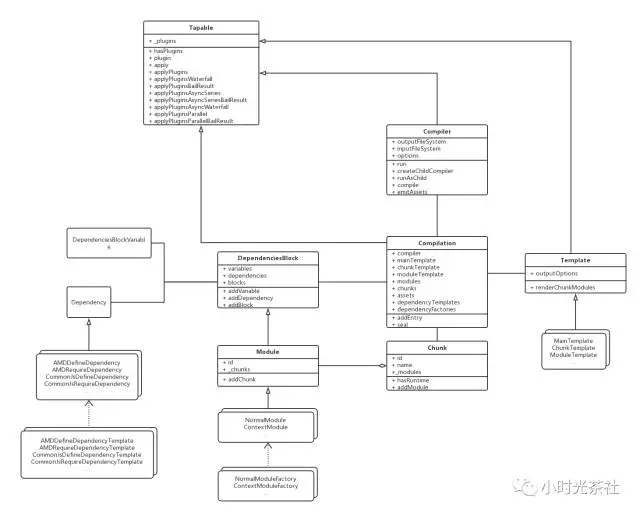
下面的论述将会逐一讲述类图中的对象,首先我们先来看一下最顶层的类 Tapable。


Tapable


Tapable 提供了 webpack 中基于任务点的架构基础,它将提供任务点注册的方法以及触发的方法。


一个简单的例子,使用 plugin 方法来注册一个任务点,然后使用 applyPlugins 方法触发:


let obj = new Tapable()obj.plugin("name", (params1, params2) => {    console.log(params1) // 1    console.log(params2) // params})
obj.applyPlugins("name", 1, "params")
复制代码


Tapable 里面注册任务点只有 plugin 方法,但是触发任务点的方法是提供了很多,可以分为同步和异步执行两类:


同步执行:


  • applyPlugins(name,…params)

  • applyPlugins0(name)

  • applyPlugins1(name,param)

  • applyPlugins2(name,param1,param2)

  • applyPluginsWaterfall(name,init,…params)

  • applyPluginsWaterfall0(name,init)

  • applyPluginsWaterfall1(name,init,param)

  • applyPluginsWaterfall2(name,init,param1,param2)

  • applyPluginsBailResult(name,…params)

  • applyPluginsBailResult0(name)

  • applyPluginsBailResult1(name,param)

  • applyPluginsBailResult2(name,param1,param2)

  • applyPluginsBailResult3(name,param1,param2,param3)

  • applyPluginsBailResult4(name,param1,param2,param3,param4)

  • applyPluginsBailResult5(name,param1,param2,param3,param4,param5)


异步执行:


  • applyPluginsAsync(name,…params,callback)

  • applyPluginsAsyncSeries(name,…params,callback)

  • applyPluginsAsyncSeries1(name,param,callback)

  • applyPluginsAsyncSeriesBailResult(name,…params,callback)

  • applyPluginsAsyncSeriesBailResult1(name,param,callback)

  • applyPluginsAsyncWaterfall(name,init,…params,callback)

  • applyPluginsParallel(name,…params,callback)

  • applyPluginsParallelBailResult(name,…params,callback)

  • applyPluginsParallelBailResult1(name,param,callback)


虽然上面的方法看起来很多,但从函数名就联想到函数的实际功能:


  • Waterfall 的方法会将上一个监听器的执行结果传给下一个

  • BailResult 的方法只会执行到第一个返回结果不为undefined的监听器

  • Series 的方法会严格线性来执行异步监听器,只有上一个结束下一个才会开始

  • Parallel 的方法会并行执行异步监听器


函数名称最后如果带有数字,那么会按照实际的参数传给监听器。如果有数字,则严格按照数字来传递参数个数。


最后 Tapable 类还提供了一个方法 apply,它的作用是提供了外部插件注册任务点的统一接口,要求都在 apply 方法内部进行任务点注册逻辑:


let t = new Tapable()
let somePlugins = [{ apply(t) { t.plugin("name", () => { console.log("1") return true }) }}, { apply(t) { t.plugin("name", () => { console.log("2") }) }}]
t.apply(somePlugins)
t.applyPlugins("name") // 1 2t.applyPluginsBailResult("name") // 1
复制代码


webpack 中自定义插件就是调用 Compiler 实例对象(继承于 Tapable)的 apply 方法:


// webpack.config.jsmodule.exports = {    plugins: [{        apply(compiler) {            compiler.plugin("done", (stat) => {                console.log("it works!")            })        }    }]}
// https://github.com/webpack/webpack/blob/master/lib/webpack.jsif(options.plugins && Array.isArray(options.plugins)) {compiler.apply.apply(compiler, options.plugins);}
复制代码


webpack 源码中随处可以见 Tapable 的身影,在了解其工作原理对理解源码很有帮助。 Compiler 继承了 Tapable,同时也作为构建的入口对象,下面我们来看一下。


Compiler


Compiler 是一个编译器实例,在 webpack 的每个进程中只会创建一个对象,它用来创建构建对象 Compilation,本身需要注意的属性和方法并不是很多。下面我们找几个主要的属性来说一下。


options 属性


当 webpack 开始运行时,第一件事就是解析我们传入的配置,然后将配置赋值给 Compiler 实例:


// https://github.com/webpack/webpack/blob/master/lib/webpack.js#L37
compiler = new Compiler();// 其他代码..compiler.options = new WebpackOptionsApply().process(options, compiler);
复制代码


因此,我们可以直接通过这个属性来获取到解析后的 webpack 配置:


class CustomPlugin {    constructor() {}    apply(compiler) {        compiler.plugin("run", (compiler) => {            console.log(compiler.options)        })    }}
复制代码


如果你不满足于官网给出的配置文档,想要了解更多配置解析,可以看看 WebpackOptionsDefaulter.js 这个文件,这里不再赘述。


输入输出


Compiler 实例在一开始也会初始化输入输出,分别是 inputFileSystem 和 outputFileSystem 属性,一般情况下这两个属性都是对应的 nodejs 中拓展后的 fs 对象。但是有一点要注意,当 Compiler 实例以 watch 模式运行时, outputFileSystem 会被重写成内存输出对象。也就是说,实际上在 watch 模式下,webpack 构建后的文件并不会生成真正的文件,而是保存在内存中。


我们可以使用 inputFileSystem 和 outputFileSystem 属性来帮助我们实现一些文件操作,如果你希望自定义插件的一些输入输出行为能够跟 webpack 尽量同步,那么最好使用 Compiler 提供的这两个变量:


class CustomPlugin {    constructor() {}    apply(compiler) {        compiler.outputFileSystem.mkdirp("/path/to/dir", (error) => {            compiler.outputFileSystem.writeFile("/path/to/file", "utf-8", (error) =>            })        })    }}
复制代码


webpack 的 inputFileSystem 会相对更复杂一点,它内部实现了一些缓存的机制,使得性能效率更高。如果对这部分有兴趣,可以从这个 NodeEnvironmentPlugin 插件开始看起,它是内部初始化了 inputFileSystem 和 outputFileSystem:


// https://github.com/webpack/webpack/blob/master/lib/node/NodeEnvironmentPlugin.js
class NodeEnvironmentPlugin { apply(compiler) { compiler.inputFileSystem = new CachedInputFileSystem(new NodeJsInputFileSyste const inputFileSystem = compiler.inputFileSystem; compiler.outputFileSystem = new NodeOutputFileSystem(); compiler.watchFileSystem = new NodeWatchFileSystem(compiler.inputFileSystem); compiler.plugin("before-run", (compiler, callback) => { if(compiler.inputFileSystem === inputFileSystem) inputFileSystem.purge(); callback(); }); }}
复制代码


创建子编译器


在第一篇文章讲解 Compilation 实例化的时候,有略微提及到创建子编译器的内容:


这里为什么会有 compilation 和 this-compilation 两个任务点?其实是跟子编译器有关, Compiler 实例通过 createChildCompiler 方法可以创建子编译器实例 childCompiler,创建时 childCompiler 会复制 compiler 实例的任务点监听器。任务点 compilation 的监听器会被复制,而任务点 this-compilation 的监听器不会被复制。 更多关于子编译器的内容,将在其他文章中讨论。


这里我们来仔细看一下子编译器是如何创建的, Compiler 实例通过 createChildCompiler 的方法来创建:


// https://github.com/webpack/webpack/blob/master/lib/Compiler.js
class Compiler extends Tapable { // 其他代码.. createChildCompiler(compilation, compilerName, compilerIndex, outputOptions, plugins) { const childCompiler = new Compiler(); if(Array.isArray(plugins)) { plugins.forEach(plugin => childCompiler.apply(plugin)); } for(const name in this._plugins) { if(["make", "compile", "emit", "after-emit", "invalid", "done", "this-compilation"].indexOf(name) < 0) childCompiler._plugins[name] = this._plugins[name].slice(); } childCompiler.name = compilerName; childCompiler.outputPath = this.outputPath; childCompiler.inputFileSystem = this.inputFileSystem; childCompiler.outputFileSystem = null; childCompiler.resolvers = this.resolvers; childCompiler.fileTimestamps = this.fileTimestamps; childCompiler.contextTimestamps = this.contextTimestamps;
const relativeCompilerName = makePathsRelative(this.context, compilerName); if(!this.records[relativeCompilerName]) this.records[relativeCompilerName] = []; if(this.records[relativeCompilerName][compilerIndex]) childCompiler.records = this.records[relativeCompilerName][compilerIndex]; else this.records[relativeCompilerName].push(childCompiler.records = {});
childCompiler.options = Object.create(this.options); childCompiler.options.output = Object.create(childCompiler.options.output); for(const name in outputOptions) { childCompiler.options.output[name] = outputOptions[name]; } childCompiler.parentCompilation = compilation; compilation.applyPlugins("child-compiler", childCompiler, compilerName, compilerIndex);
return childCompiler; }}

复制代码


上面的代码看起来很多,但其实主要逻辑基本都是在拷贝父编译器的属性到子编译器上面。值得注意的一点是第 10 - 13 行,子编译器在拷贝父编译器的任务点时,会过滤掉 make, compile, emit, after-emit, invalid, done, this-compilation 这些任务点。


如果你阅读过第一篇文章(如果没有,推荐先看一下),应该会知道上面任务点在整个构建流程中的位置。从这里我们也可以看出来,子编译器跟父编译器的一个差别在于,子编译器并没有完整的构建流程。 比如子编译器没有文件生成阶段( emit 任务点),它的文件生成必须挂靠在父编译器下面来实现。


另外需要注意的是,子编译器的运行入口并非 run 方法 ,而是有单独的 runAsChild 方法来运行,从代码上面也能够直接看出来,它马上调用了 compile 方法,跳过了 run, make 等任务点:


// https://github.com/webpack/webpack/blob/master/lib/Compiler.js
class Compiler extends Tapable { // 其他代码.. runAsChild(callback) { this.compile((err, compilation) => { if(err) return callback(err); this.parentCompilation.children.push(compilation); Object.keys(compilation.assets).forEach(name => { this.parentCompilation.assets[name] = compilation.assets[name]; }); const entries = Object.keys(compilation.entrypoints).map(name => { return compilation.entrypoints[name].chunks; }).reduce((array, chunks) => { return array.concat(chunks); }, []); return callback(null, entries, compilation); }); }}

复制代码


那么子编译器有什么作用呢?从上面功能和流程来看,子编译器仍然拥有完整的模块解析和 chunk 生成阶段。也就是说我们可以利用子编译器来独立(于父编译器)跑完一个核心构建流程,额外生成一些需要的模块或者 chunk。


事实上一些外部的 webpack 插件就是这么做的,比如常用的插件 html-webpack-plugin 中,就是利用子编译器来独立完成 html 文件的构建,为什么不能直接读取 html 文件?因为 html 文件中可能依赖其他外部资源(比如 img 的 src 属性),所以加载 html 文件时仍然需要一个额外的完整的构建流程来完成这个任务,子编译器的作用在这里就体现出来了:


// https://github.com/jantimon/html-webpack-plugin/blob/master/lib/compiler.js#L46
var compilerName = getCompilerName(context, outputFilename);var childCompiler = compilation.createChildCompiler(compilerName, outputOptions);childCompiler.context = context;childCompiler.apply( new NodeTemplatePlugin(outputOptions), new NodeTargetPlugin(), new LibraryTemplatePlugin('HTML_WEBPACK_PLUGIN_RESULT', 'var'), new SingleEntryPlugin(this.context, template), // html⽂件作为 entry new LoaderTargetPlugin('node'));
// 其他代码..
childCompiler.runAsChild(function (err, entries, childCompilation) {// 其他代码..
// childCompilation.assets 属性可以拿到构建后的⽂件代码})

复制代码


在下一篇文章中我们将亲自实现一个插件,关于子编译器的具体实践到时再继续讨论。


Compilation


接下来我们来看看最重要的 Compilation 对象,在上一篇文章中,我们已经说明过部分属性了,比如我们简单回顾一下


  • modules 记录了所有解析后的模块

  • chunks 记录了所有chunk

  • assets记录了所有要生成的文件


上面这三个属性已经包含了 Compilation 对象中大部分的信息,但是我们也只是有个大致的概念,特别是 modules 中每个模块实例到底是什么东西,我们并不太清楚。所以下面的内容将会比较细地讲解。


但如果你对这部分内容不感兴趣也可以直接跳过,因为能真正使用的场景不会太多,但它能加深对 webpack 构建的理解。


所谓的模块


Compilation 在解析过程中,会将解析后的模块记录在 modules 属性中,那么每一个模块实例又是什么呢?


首先我们先回顾一下最开始的类图,我们会发现跟模块相关的类非常多,看起来类之间的关系也十分复杂,但其实只要记住下面的公式就很好理解:


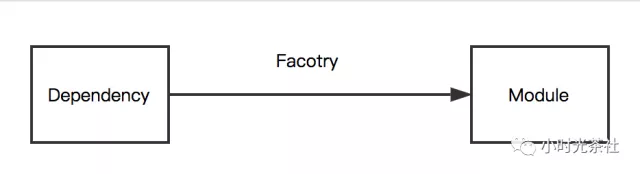
这个公式的解读是: 一个依赖对象(Dependency)经过对应的工厂对象(Factory)创建之后,就能够生成对应的模块实例(Module)。


首先什么是 Dependency?我个人的理解是,还未被解析成模块实例的依赖对象。比如我们运行 webpack 时传入的入口模块,或者一个模块依赖的其他模块,都会先生成一个 Dependency 对象。作为基类的 Dependency 十分简单,内部只有一个 module 属性来记录最终生成的模块实例。但是它的派生类非常多,webpack 中有单独的文件夹(webpack/lib/dependencies)来存放所有的派生类,这里的每一个派生类都对应着一种依赖的场景。比如从 CommonJS 中 require 一个模块,那么会先生成 CommonJSRequireDependency。


有了 Dependency 之后,如何找到对应的工厂对象呢?Dependecy 的每一个派生类在使用前,都会先确定对应的工厂对象,比如 SingleEntryDependency 对应的工厂对象是 NormalModuleFactory。这些信息全部是记录在 Compilation 对象的 dependencyFactories 属性中,这个属性是 ES6 中的 Map 对象。直接看下面的代码可能更容易理解:


// https://github.com/webpack/webpack/blob/master/lib/SingleEntryPlugin.jsclass SingleEntryPlugin {    apply(compiler) {        compiler.plugin("compilation", (compilation, params) => {            const normalModuleFactory = params.normalModuleFactory;
// 这⾥记录了 SingleEntryDependency 对应的⼯⼚对象是 NormalModuleFactory compilation.dependencyFactories.set(SingleEntryDependency, normalModuleFactory); }); compiler.plugin("make", (compilation, callback) => { // ⼊⼝的模块会先变成⼀个 Dependency 对象 const dep = SingleEntryPlugin.createDependency(this.entry, this.name); compilation.addEntry(this.context, dep, this.name, callback); }); }}
// https://github.com/webpack/webpack/blob/master/lib/Compilation.jsclass Compilation extends Tapable { _addModuleChain(context, dependency, onModule, callback) { // 其他代码..
// 开始构建时,通过 Compilation 的 dependenciesFactories 属性找到对应的⼯⼚对象 const moduleFactory = this.dependencyFactories.get(dependency.constructor); if(!moduleFactory) { throw new Error(`No dependency factory available for this dependency type: ${dependency.constructor.name}`); } this.semaphore.acquire(() => { // 调⽤⼯⼚对象的 create ⽅法,dependency作为参数传⼊,最终⽣成模块实例 moduleFactory.create({ contextInfo: { issuer: "", compiler: this.compiler.name }, context: context, dependencies: [dependency] // 作为参数传⼊ }, (err, module) => { // module就是⽣成的模块实例
// 其他代码.. }) }) }}

复制代码


一种工厂对象只会生成一种模块,所以不同的模块实例都会有不同的工厂对象来生成。模块的生成过程我们在第一篇文章有讨论过,无非就是解析模块的 request, loaders 等信息然后实例化。


模块对象有哪些特性呢?同样在第一篇文章中,我们知道一个模块在实例化之后并不意味着构建就结束了,它还有一个内部构建的过程。所有的模块实例都有一个 build 方法,这个方法的作用是开始加载模块源码(并应用 loaders),并且通过 js 解析器来完成依赖解析。这里要两个点要注意:


1.模块源码最终是保存在 _source 属性中,可以通过 _source.source() 来得到。注意在 build 之前 _source是不存在的。

2.js 解析器解析之后会记录所有的模块依赖,这些依赖其实会分为三种,分别记录在 variables, dependencies, blocks属性。模块构建之后的递归构建过程,其实就是读取这三个属性来重复上面的过程:依赖 => 工厂 => 模块


我们再来看看这些模块类,从前面的类图看,它们是继承于 Module 类。这个类实际上才是我们平常用来跟 chunk 打交道的类对象,它内部有 _chunks 属性来记录后续所在的 chunk 信息,并且提供了很多相关的方法来操作这个对象: addChunk, removeChunk, isInChunk, mapChunks 等。后面我们也会看到, Chunk 类与之对应。


Module 类往上还会继承于 DependenciesBlock,这个是所有模块的基类,它包含了处理依赖所需要的属性和方法。上面所说的 variables, dependencies, blocks 也是这个基类拥有的三个属性。它们分别是:


  • variables 对应需要对应的外部变量,比如 __filename, __dirname, process 等node环境下特有的变量

  • dependencies 对应需要解析的其他普通模块,比如 require("./a") 中的 a 模块会先生成一个 CommonJSRequireDependency

  • blocks 对应需要解析的代码块(最终会对应成一个 chunk),比如 require.ensure("./b"),这里的 b 会生成一个 DependenciesBlock 对象


经过上面的讨论之后,我们基本将 webpack 中于模块相关的对象、概念都涉及到了,剩下还有模块渲染相关的模板,会在下面描述 Template 时继续讨论。


Chunk


讨论完 webpack 的模块之后,下面需要说明的是 Chunk 对象。关于 chunk 的生成,在第一篇文章中有涉及,这里不再赘述。 chunk 只有一个相关类,而且并不复杂。 Chunk 类内部的主要属性是 _modules,用来记录包含的所有模块对象,并且提供了很多方法来操作: addModule, removeModule, mapModules 等。


另外有几个方法可能比较实用,这里也列出来:


  • integrate 用来合并其他chunk

  • split 用来生成新的子 chunk

  • hasRuntime 判断是否是入口 chunk 其他关于 chunk 的内容,有兴趣的同学可以直接查看源码。


Template


Compilation 实例在生成最终文件时,需要将所有的 chunk 渲染(生成代码)出来,这个时候需要用到下面几个属性:


  • mainTemplate 对应 MainTemplate 类,用来渲染入口 chunk

  • chunkTemplate 对应 ChunkTemplate 类,用来传染非入口 chunk

  • moduleTemplate 对应 ModuleTemplate,用来渲染 chunk 中的模块

  • dependencyTemplates 记录每一个依赖类对应的模板


在第一篇文章时,有略微描述过 chunk 渲染的过程,这里再仔细地过一遍,看看这几个属性是如何应用在渲染过程中的:


首先 chunk 的渲染入口是 mainTemplate 和 chunkTemplate 的 render 方法。根据 chunk 是否是入口 chunk 来区分使用哪一个:


// https://github.com/webpack/webpack/blob/master/lib/Compilation.js
if(chunk.hasRuntime()) { // ⼊⼝chunk source = this.mainTemplate.render(this.hash, chunk, this.moduleTemplate, this.dependencyTemplates);} else { source = this.chunkTemplate.render(chunk, this.moduleTemplate, this.dependencyTemplates);}
复制代码


两个类的 render 方法将生成不同的"包装代码", MainTemplate 对应的入口 chunk 需要带有 webpack 的启动代码,所以会有一些函数的声明和启动。


这两个类都只负责这些"包装代码"的生成,包装代码中间的每个模块代码,是通过调用 renderChunkModules 方法来生成的。这里的 renderChunkModules 是由他们的基类 Template 类提供,方法会遍历 chunk 中的模块,然后使用 ModuleTemplate 来渲染。


// https://github.com/webpack/webpack/blob/master/lib/MainTemplate.js// MainTemplate的部分render⽅法:const source = new ConcatSource();source.add("/******/ (function(modules) { // webpackBootstrap\n");
source.add(new PrefixSource("/******/", bootstrapSource));source.add("/******/ })\n");source.add("/************************************************************************/\n");
source.add("/******/ (");// 调⽤ renderChunkModules ⽅法,遍历这个 chunk 的所有模块⽣成对应的代码const modules = this.renderChunkModules(chunk, moduleTemplate, dependencyTemplates, "/******/ ");source.add(this.applyPluginsWaterfall("modules", modules, chunk, hash, moduleTemplate, dependencyTemplates));source.add(")");
// https://github.com/webpack/webpack/blob/master/lib/Template.jsmodule.exports = class Template extends Tapable { // 其他代码.. renderChunkModules(chunk, moduleTemplate, dependencyTemplates, prefix) { // 其他代码.. var allModules = chunk.mapModules(function(module) { return { id: module.id, // 调⽤ moduleTemplate.render ⽅法 source: moduleTemplate.render(module, dependencyTemplates, chunk) }; }); // 其他代码.. }}
复制代码


ModuleTemplate 做的事情跟 MainTemplate 类似,它同样只是生成"包装代码"来封装真正的模块代码,而真正的模块代码,是通过模块实例的 source 方法来提供。该方法会先读取 _source 属性,即模块内部构建时应用 loaders 之后生成的代码,然后使用 dependencyTemplates 来更新模块源码。


dependencyTemplates 是 Compilation 对象的一个属性,它跟 dependencyFactories 同样是个 Map 对象,记录了所有的依赖类对应的模板类。


上面用文字来描述这个过程可能十分难懂,所以我们直接看实际的例子。比如下面这个文件:


let a = require("./a")
复制代码


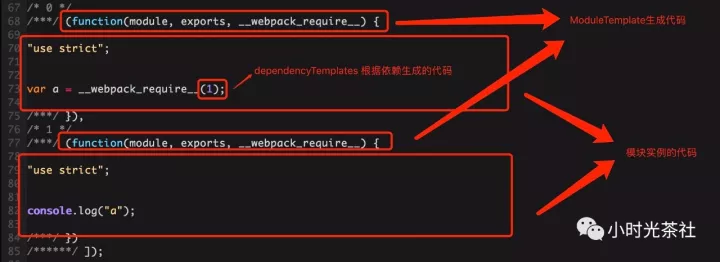
我们来看看使用 webpack 构建后最终的文件:


/******/ (function(modules) { // webpackBootstrap/******/    // The module cache/******/    var installedModules = {};/******//******/    // The require function/******/    function __webpack_require__(moduleId) {/******//******/        // Check if module is in cache/******/        if(installedModules[moduleId]) {/******/            return installedModules[moduleId].exports;/******/         }/******/        // Create a new module (and put it into the cache)/******/        var module = installedModules[moduleId] = {/******/            i: moduleId,/******/            l: false,/******/            exports: {}/******/        };/******//******/        // Execute the module function/******/        modules[moduleId].call(module.exports, module, module.exports, __webpack_require__);/******//******/        // Flag the module as loaded/******/        module.l = true;/******//******/        // Return the exports of the module/******/        return module.exports;/******/    }/******//******//******/    // expose the modules object (__webpack_modules__)/******/    __webpack_require__.m = modules;/******//******/    // expose the module cache/******/    __webpack_require__.c = installedModules;/******//******/    // define getter function for harmony exports/******/    __webpack_require__.d = function(exports, name, getter) {/******/        if(!__webpack_require__.o(exports, name)) {/******/            Object.defineProperty(exports, name, {/******/                configurable: false,/******/                enumerable: true,/******/                get: getter/******/            });/******/        }/******/    };/******//******/    // getDefaultExport function for compatibility with non-harmony modules/******/    __webpack_require__.n = function(module) {/******/        var getter = module && module.__esModule ?/******/            function getDefault() { return module['default']; } :/******/            function getModuleExports() { return module; };/******/        __webpack_require__.d(getter, 'a', getter);/******/        return getter;/******/    };/******//******/    // Object.prototype.hasOwnProperty.call/******/    __webpack_require__.o = function(object, property) { return Object.prototype.hasOwnProperty.call(object, property);/******//******/    // __webpack_public_path__/******/    __webpack_require__.p = "";/******//******/    // Load entry module and return exports/******/    return __webpack_require__(__webpack_require__.s = 0);/******/ })/************************************************************************//******/ ([/* 0 *//***/ (function(module, exports, __webpack_require__) { "use strict";
var a = __webpack_require__(1);/***/ }),/* 1 *//***/ (function(module, exports, __webpack_require__) {"use strict";
console.log("a");
/***/ })/******/ ]);
复制代码


其中,从 1-66 行都是 MainTemplate 生成的启动代码,剩余的代码生成如下图所示:


总结


通过这篇文章,我们将 webpack 中的一些核心概念和对象都进行了不同程度的讨论,这里再总结一下他们主要的作用和意义:


  • Tapable 为 webpack 的整体构建流程提供了基础,利用事件机制来分离庞大的构建任务,保证了 webpack 强大的配置能力。

  • Compiler 对象作为构建入口对象,负责解析全局的 webpack 配置,再将配置应用到 Compilation 对象中。

  • Compilation 对象是每一次构建的核心对象,包含了一次构建过程的全部信息。理清楚 Compilation 对象核心的任务点和相关数据,是理解 webpack 构建过程的关键。


以上内容,希望能够帮助大家进一步了解 webpack ,感谢大家阅读~


作者介绍:


陈柏信,腾讯前端开发,目前主要负责手 Q 游戏中心业务开发,以及项目相关的技术升级、架构优化等工作。


本文转载自公众号小时光茶舍(ID:gh_7322a0f167b5)。


原文链接:


https://mp.weixin.qq.com/s/XioJR-YV5TKFLnG_NUjoYw


2019 年 8 月 21 日 11:251164

评论

发布
暂无评论
发现更多内容

springboot + rabbitmq 做智能家居,我也没想到会这么简单

程序员内点事

Java Spring Boot RabbitMQ 智能设备

Week01 作业

Conn

架构师训练营第三周作业

张锐

架构师训练营 第3周作业

Lingjun

极客大学架构师训练营

每周学习总结

Conn

极客大学架构师训练营

创业公司技术体系建设

星际行者

Kubernetes DevOps APM 基础设施

设计模式-单例&组合

Z冰红茶

第三周作业

胡江涛

极客大学架构师训练营

第二周学习总结

任小龙

第三章总结

架构师训练营 第3周总结

Lingjun

极客大学架构师训练营

如何搭建一个本地服务器集群

Rayjun

分布式

模式与重构

满山李子

Week 03 学习总结 代码重构

Z冰红茶

从印度兵力分布聊聊Mybatis中#和$的区别

程序那些事

Java sql mybatis 印度兵力

依赖倒置原则

任小龙

架构师面试题(2)

满山李子

数字政府升级下的数据产品探索

数据司令

大数据 政务信息化 数字政务

「架构师训练营」第 3 周作业

邓江川。

接口隔离原则-Cache类优化

yupi

邮件领域还有创新吗?

池建强

创业 软件 创新 邮件

架构师训练营 -week3 命题作业

J.Spring

极客大学架构师训练营

单例及组合模式实践

WulalaOlala

设计模式 极客大学架构师训练营

重学设计模式之单例模式

设计模式 单例模式 Singleton

Raft探索历程--Part1

老胡爱分享

分布式协同 raft

Feign Client 原理和使用

公众号:好奇心森林

Spring Boot HTTP

一些有用的工具、开源项目收集

陈皮

week3 作业

雪涛公子

week3 总结

雪涛公子

LeetCode 2. Add Two Numbers

liu_liu

数据结构 算法 链表 LeetCode

面试急转弯:List如何一边遍历,一边删除?

Java小咖秀

玩转webpack(二):webpack的核心对象-InfoQ