
背景
上月立过一个 flag,看完 vue-router 的源码,可到后面逐渐发现 vue-router 的源码并不是像很多总结的文章那么容易理解,阅读过你就会发现里面的很多地方都会有多层的函数调用关系,还有大量的 this 指向问题,而且会有很多辅助函数需要去理解。但还是坚持啃下来了(当然还没看完,内容是真的多),下面是我在政采云(实习)工作闲暇时间阅读源码的一些感悟和总结,并带分析了大三时期使用的 vue-element-admin 这个 vuer 无所不知的后台框架的动态路由权限控制原理。顺便附带本文实践 demo 地址: 基于后台框架开发的 学生管理系统。
vue-router 源码分析

首先阅读源码之前最好是将 Vue 和 vue-router 的源码克隆下来,然后第一遍阅读建议先跟着 官方文档 先走一遍基础用法,然后第二遍开始阅读源码,先理清楚各层级目录的作用和抽出一些核心的文件出来,过一遍代码的同时写个小的 demo 边看边打断点调试,看不懂没关系,可以边看边参考一些总结的比较好的文章,最后将比较重要的原理过程根据自己的理解整理出来,然后画一画相关的知识脑图加深印象。
前置知识: flow 语法
JS 在编译过程中可能看不出一些隐蔽的错误,但在运行过程中会报各种各样的 bug。flow 的作用就是编译期间进行静态类型检查,尽早发现错误,抛出异常。
Vue、Vue-router 等大型项目往往需要这种工具去做静态类型检查以保证代码的可维护性和可靠性。本文所分析的 vue-router 源码中就大量的采用了 flow 去编写函数,所以学习 flow 的语法是有必要的。
首先安装 flow 环境,初始化环境
npm install flow-bin -gflow init在 index.js 中输入这一段报错的代码
/*@flow*/function add(x: string, y: number): number { return x + y}add(2, 11)在控制台输入 flow,这个时候不出意外就会抛出异常提示,这就是简单的 flow 使用方法。
具体用法还需要参考 flow官网 ,另外这种语法是类似于 TypeScript 的。
注册
我们平时在使用 vue-router 的时候通常需要在 main.js 中初始化 Vue 实例时将 vue-router 实例对象当做参数传入
例如:
import Router from 'vue-router'Vue.use(Router)const routes = [ { path: '/student', name: 'student', component: Layout, meta: { title: '学生信息查询', icon: 'documentation', roles: ['student'] }, children: [ { path: 'info', component: () => import('@/views/student/info'), name: 'studentInfo', meta: { title: '信息查询', icon: 'form' } }, { path: 'score', component: () => import('@/views/student/score'), name: 'studentScore', meta: { title: '成绩查询', icon: 'score' } } ] } ...];const router = new Router({ mode: "history", linkActiveClass: "active", base: process.env.BASE_URL, routes});new Vue({ router, store, render: h => h(App)}).$mount("#app");Vue.use
那么 Vue.use(Router) 又在做什么事情呢
问题定位到 Vue 源码中的 src/core/global-api/use.js 源码地址 (https://github.com/vuejs/vue/blob/dev/src/core/global-api/use.js)
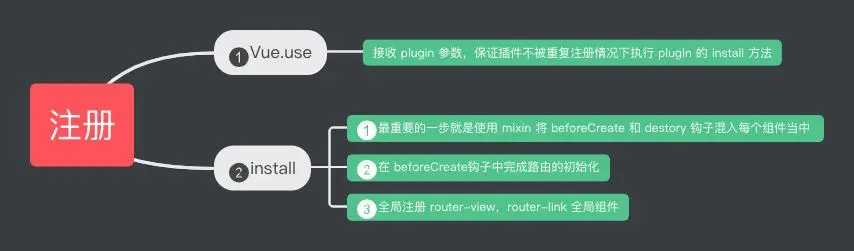
export function initUse (Vue: GlobalAPI) { Vue.use = function (plugin: Function | Object) { // 拿到 installPlugins const installedPlugins = (this._installedPlugins || (this._installedPlugins = [])) // 保证不会重复注册 if (installedPlugins.indexOf(plugin) > -1) { return this } // 获取第一个参数 plugins 以外的参数 const args = toArray(arguments, 1) // 将 Vue 实例添加到参数 args.unshift(this) // 执行 plugin 的 install 方法 每个 insatll 方法的第一个参数都会变成 Vue,不需要额外引入 if (typeof plugin.install === 'function') { plugin.install.apply(plugin, args) } else if (typeof plugin === 'function') { plugin.apply(null, args) } // 最后用 installPlugins 保存 installedPlugins.push(plugin) return this }}可以看到 Vue 的 use 方法会接受一个 plugin 参数,然后使用 installPlugins 数组 保存已经注册过的 plugin。首先保证 plugin 不被重复注册,然后将 Vue 从函数参数中取出,将整个 Vue 作为 plugin 的install 方法的第一个参数,这样做的好处就是不需要麻烦的另外引入 Vue,便于操作。接着就去判断 plugin 上是否存在 install 方法。存在则将赋值后的参数传入执行 ,最后将所有的存在 install 方法的 plugin 交给 installPlugins维护。
install
了解清楚 Vue.use 的结构之后,可以得出 Vue 注册插件其实就是在执行插件的 install 方法,参数的第一项就是 Vue,所以我们将代码定位到 vue-router 源码中的 src/install.js 源码地址 (https://github.com/vuejs/vue-router/blob/dev/src/install.js)
// 保存 Vue 的局部变量export let _Vueexport function install (Vue) { // 如果已安装 if (install.installed && _Vue === Vue) return install.installed = true // 局部变量保留传入的 Vue _Vue = Vue const isDef = v => v !== undefined const registerInstance = (vm, callVal) => { let i = vm.$options._parentVnode if (isDef(i) && isDef(i = i.data) && isDef(i = i.registerRouteInstance)) { i(vm, callVal) } } // 全局混入钩子函数 每个组件都会有这些钩子函数,执行就会走这里的逻辑 Vue.mixin({ beforeCreate () { if (isDef(this.$options.router)) { // new Vue 时传入的根组件 router router对象传入时就可以拿到 this.$options.router // 根 router this._routerRoot = this this._router = this.$options.router this._router.init(this) // 变成响应式 Vue.util.defineReactive(this, '_route', this._router.history.current) } else { // 非根组件访问根组件通过$parent this._routerRoot = (this.$parent && this.$parent._routerRoot) || this } registerInstance(this, this) }, destroyed () { registerInstance(this) } }) // 原型加入 $router 和 $route Object.defineProperty(Vue.prototype, '$router', { get () { return this._routerRoot._router } }) Object.defineProperty(Vue.prototype, '$route', { get () { return this._routerRoot._route } })// 全局注册 Vue.component('RouterView', View) Vue.component('RouterLink', Link)// 获取合并策略 const strats = Vue.config.optionMergeStrategies // use the same hook merging strategy for route hooks strats.beforeRouteEnter = strats.beforeRouteLeave = strats.beforeRouteUpdate = strats.created}可以看到这段代码核心部分就是在执行 install 方法时使用 mixin 的方式将每个组件都混入 beforeCreate,destroyed 这两个生命周期钩子。在 beforeCreate 函数中会去判断当前传入的 router 实例是否是根组件,如果是,则将 _routerRoot 赋值为当前组件实例、_router 赋值为传入的VueRouter 实例对象,接着执行 init 方法初始化 router,然后将 this_route 响应式化。非根组件的话 _routerRoot 指向 $parent 父实例。然后执行 registerInstance(this,this) 方法,该方法后会,接着原型加入 $router 和 $route,最后注册 RouterView 和 RouterLink,这就是整个 install 的过程。
小结
Vue.use(plugin) 实际上在执行 plugin 上的 install 方法,insatll 方法有个重要的步骤:
使用
mixin在组件中混入beforeCreate,destory这俩个生命周期钩子在
beforeCreate这个钩子进行初始化。全局注册
router-view,router-link组件
VueRouter
接着就是这个最重要的 class : VueRouter。这一部分代码比较多,所以不一一列举,挑重点分析。vueRouter源码地址 。
构造函数
constructor (options: RouterOptions = {}) { this.app = null this.apps = [] // 传入的配置项 this.options = options this.beforeHooks = [] this.resolveHooks = [] this.afterHooks = [] this.matcher = createMatcher(options.routes || [], this) // 一般分两种模式 hash 和 history 路由 第三种是抽象模式 let mode = options.mode || 'hash' // 判断当前传入的配置是否能使用 history 模式 this.fallback = mode === 'history' && !supportsPushState && options.fallback !== false // 降级处理 if (this.fallback) { mode = 'hash' } if (!inBrowser) { mode = 'abstract' } this.mode = mode // 根据模式实例化不同的 history,history 对象会对路由进行管理 继承于history class switch (mode) { case 'history': this.history = new HTML5History(this, options.base) break case 'hash': this.history = new HashHistory(this, options.base, this.fallback) break case 'abstract': this.history = new AbstractHistory(this, options.base) break default: if (process.env.NODE_ENV !== 'production') { assert(false, `invalid mode: ${mode}`) } } }首先在初始化 vueRouter 整个对象时定义了许多变量,app 代表 Vue 实例,options 代表传入的配置参数,然后就是路由拦截有用的 hooks 和重要的 matcher (后文会写到)。构造函数其实在做两件事情: 1. 确定当前路由使用的 mode;2. 实例化对应的 history 对象。
init
接着完成实例化 vueRouter 之后,如果这个实例传入后,也就是刚开始说的将 vueRouter 实例在初始化 Vue 时传入,它会在执行 beforeCreate 时执行 init 方法
init (app: any) { ... this.apps.push(app) // 确保后面的逻辑只走一次 if (this.app) { return } // 保存 Vue 实例 this.app = app const history = this.history // 拿到 history 实例之后,调用 transitionTo 进行路由过渡 if (history instanceof HTML5History) { history.transitionTo(history.getCurrentLocation()) } else if (history instanceof HashHistory) { const setupHashListener = () => { history.setupListeners() } history.transitionTo( history.getCurrentLocation(), setupHashListener, setupHashListener ) }}init 方法传入 Vue 实例,保存到 this.apps 当中。Vue实例 会取出当前的 this.history,如果是哈希路由,先走 setupHashListener 函数,然后调一个关键的函数 transitionTo 路由过渡,这个函数其实调用了 this.matcher.match 去匹配。
小结
首先在 vueRouter 构造函数执行完会完成路由模式的选择,生成 matcher ,然后初始化路由需要传入 vueRouter 实例对象,在组件初始化阶段执行 beforeCreate 钩子,调用 init 方法,接着拿到 this.history 去调用 transitionTo 进行路由过渡。
Matcher

之前在 vueRouter 的构造函数中初始化了 macther,本节将详细分析下面这句代码到底在做什么事情,以及 match 方法在做什么 源码地址 (https://github.com/vuejs/vue-router/blob/dev/src/create-matcher.js)。
this.matcher = createMatcher(options.routes || [], this)首先将代码定位到create-matcher.js
export function createMatcher ( routes: Array<RouteConfig>, router: VueRouter): Matcher { // 创建映射表 const { pathList, pathMap, nameMap } = createRouteMap(routes) // 添加动态路由 function addRoutes(routes){...} // 计算新路径 function match ( raw: RawLocation, currentRoute?: Route, redirectedFrom?: Location ): Route {...} // ... 后面的一些方法暂不展开 return { match, addRoutes }}createMatcher 接受俩参数,分别是 routes,这个就是我们平时在 router.js 定义的路由表配置,然后还有一个参数是 router 他是 new vueRouter 返回的实例。
createRouteMap
下面这句代码是在创建一张 path-record,name-record 的映射表,我们将代码定位到 create-route-map.js 源码地址
export function createRouteMap ( routes: Array<RouteConfig>, oldPathList?: Array<string>, oldPathMap?: Dictionary<RouteRecord>, oldNameMap?: Dictionary<RouteRecord>): { pathList: Array<string>, pathMap: Dictionary<RouteRecord>, nameMap: Dictionary<RouteRecord>} { // 记录所有的 path const pathList: Array<string> = oldPathList || [] // 记录 path-RouteRecord 的 Map const pathMap: Dictionary<RouteRecord> = oldPathMap || Object.create(null) // 记录 name-RouteRecord 的 Map const nameMap: Dictionary<RouteRecord> = oldNameMap || Object.create(null) // 遍历所有的 route 生成对应映射表 routes.forEach(route => { addRouteRecord(pathList, pathMap, nameMap, route) }) // 调整优先级 for (let i = 0, l = pathList.length; i < l; i++) { if (pathList[i] === '*') { pathList.push(pathList.splice(i, 1)[0]) l-- i-- } } return { pathList, pathMap, nameMap }}createRouteMap 需要传入路由配置,支持传入旧路径数组和旧的 Map 这一步是为后面递归和 addRoutes 做好准备。首先用三个变量记录 path,pathMap,nameMap,接着我们来看 addRouteRecord 这个核心方法。这一块代码太多了,列举几个重要的步骤
// 解析路径const pathToRegexpOptions: PathToRegexpOptions = route.pathToRegexpOptions || {}// 拼接路径const normalizedPath = normalizePath(path, parent, pathToRegexpOptions.strict)// 记录路由信息的关键对象,后续会依此建立映射表const record: RouteRecord = { path: normalizedPath, regex: compileRouteRegex(normalizedPath, pathToRegexpOptions), // route 对应的组件 components: route.components || { default: route.component }, // 组件实例 instances: {}, name, parent, matchAs, redirect: route.redirect, beforeEnter: route.beforeEnter, meta: route.meta || {}, props: route.props == null ? {} : route.components ? route.props : { default: route.props }}使用 recod 对象 记录路由配置有利于后续路径切换时计算出新路径,这里的 path 其实是通过传入父级 record 对象的path和当前 path 拼接出来的 。然后 regex 使用一个库将 path 解析为正则表达式。如果 route 有子节点就递归调用 addRouteRecord
// 如果有 children 递归调用 addRouteRecord route.children.forEach(child => { const childMatchAs = matchAs ? cleanPath(`${matchAs}/${child.path}`) : undefined addRouteRecord(pathList, pathMap, nameMap, child, record, childMatchAs) })最后映射两张表,并将 record·path 保存进 pathList,nameMap 逻辑相似就不列举了
if (!pathMap[record.path]) { pathList.push(record.path) pathMap[record.path] = record }废了这么大劲将 pathList 和 pathMap 和 nameMap 抽出来是为啥呢? 首先 pathList 是记录路由配置所有的 path,然后 pathMap 和 nameMap 方便我们传入 path 或者 name 快速定位到一个 record,然后辅助后续路径切换计算路由的。
addRoutes
这是在 vue2.2.0 之后新添加的 api ,或许很多情况路由并不是写死的,需要动态添加路由。有了前面的 createRouteMap 的基础上我们只需要传入 routes 即可,他就能在原基础上修改
function addRoutes (routes) { createRouteMap(routes, pathList, pathMap, nameMap)}并且看到在 createMathcer 最后返回了这个方法,所以我们就可以使用这个方法
return { match, addRoutes }match
function match ( raw: RawLocation, currentRoute?: Route, redirectedFrom?: Location): Route { ...}接下来就是 match 方法,它接收 3 个参数,其中 raw 是 RawLocation 类型,它可以是一个 url 字符串,也可以是一个 Location 对象;currentRoute 是 Route 类型,它表示当前的路径;redirectedFrom 和重定向相关。match 方法返回的是一个路径,它的作用是根据传入的 raw 和当前的路径 currentRoute 计算出一个新的路径并返回。至于他是如何计算出这条路径的,可以详细看一下如何计算出location的 normalizeLocation 方法和 _createRoute 方法。
小结
createMatcher: 根据路由的配置描述建立映射表,包括路径、名称到路由record的映射关系, 最重要的就是createRouteMap这个方法,这里也是动态路由匹配和嵌套路由的原理。addRoutes: 动态添加路由配置match: 根据传入的raw和当前的路径currentRoute计算出一个新的路径并返回。
头图:Unsplash
作者:墨痕
原文:https://mp.weixin.qq.com/s/mf8BFkQvkO13L9QssU8mjA
原文:浅析 vue-router 源码和动态路由权限分配
来源:政采云前端团队 - 微信公众号 [ID:Zoo-Team]
转载:著作权归作者所有。商业转载请联系作者获得授权,非商业转载请注明出处。


