
Google cloud 的 Binary Authorization 可以帮助用户在部署 container 时采用信任的 image。可以通过配置信任的 repository,也可以通过 Key 认证的方式实现 image 的认证。
本文将介绍,如何采用 Binary Authorization 实现容器的 Image 的安全部署。
一 创建相关服务
1、开启相关的 API
首先打开 cloud shell,在 cloud shell 中检查相关的配置:
hengwei@cloudshell:~ (wh-service01)$ gcloud config list [component_manager] disable_update_check = True [compute] gce_metadata_read_timeout_sec = 5 [core] account = hengwei@google.com disable_usage_reporting = False project = wh-service01 [metrics] environment = devshell
定义参数:
PROJECT_ID=wh-service01 echo $PROJECT_ID Wh-service01 ZONE=us-central1-a echo $ZONE us-central1-a
开启 API:
gcloud services enable \ > container.googleapis.com \ > containeranalysis.googleapis.com \ > binaryauthorization.googleapis.com Operation "operations/acf.0587658c-ebed-42a4-ac53-5f68b3b3bb3f" finished successfully.
可以看到,此时 Binary Authorization 的 API 已经 enable 了:
2、创建 GKE cluster
采用命令行模式创建 GKE Cluster:
gcloud container clusters create \ --enable-binauthz \ --zone $ZONE \ gkecluster01 NAME LOCATION MASTER_VERSION MASTER_IP gkecluster01 us-central1-a 1.13.11-gke.23 35.222.79.234 MACHINE_TYPE NODE_VERSION NUM_NODES STATUS n1-standard-1 1.13.11-gke.23 3 RUNNING gcloud container clusters get-credentials --zone $ZONE gkecluster01 Fetching cluster endpoint and auth data. kubeconfig entry generated for gkecluster01. kubectl get node NAME STATUS ROLES AGE VERSION gke-gkecluster01-default-pool-5ecb124a-520n Ready <none> 15m v1.13.11-gke.23 gke-gkecluster01-default-pool-5ecb124a-b314 Ready <none> 16m v1.13.11-gke.23 gke-gkecluster01-default-pool-5ecb124a-vn7p Ready <none> 15m v1.13.11-gke.23
3、创建 Container Image
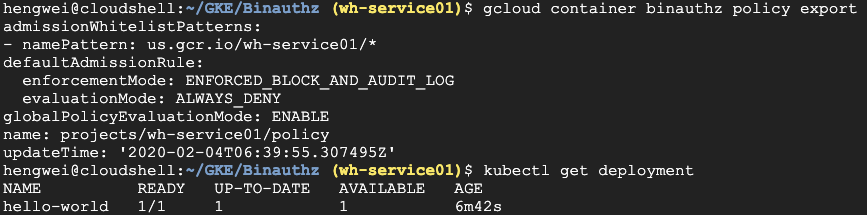
查看 Binauthz 的策略:
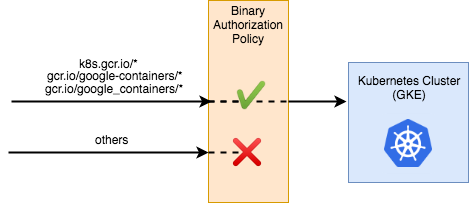
gcloud container binauthz policy export admissionWhitelistPatterns: - namePattern: gcr.io/google_containers/* - namePattern: gcr.io/google-containers/* - namePattern: k8s.gcr.io/* - namePattern: gke.gcr.io/* - namePattern: gcr.io/stackdriver-agents/* defaultAdmissionRule: enforcementMode: ENFORCED_BLOCK_AND_AUDIT_LOG evaluationMode: ALWAYS_ALLOW name: projects/wh-service01/policy
Console 中的配置:

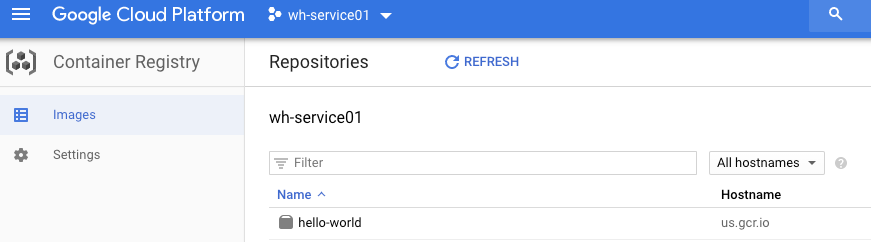
创建 docker image,并 push 到 Google Container Registry(GCR)中。
image 的 Dockerfile:
cat << EOF > Dockerfile FROM alpine CMD tail -f /dev/null EOF
Build 和 push:
export CONTAINER_PATH=us.gcr.io/$PROJECT_ID/hello-world docker build -t $CONTAINER_PATH ./ gcloud auth configure-docker --quiet docker push $CONTAINER_PATH
此时可以看到 GCR 中已经有 image 上传上来:
使用这个 image 创建 deployment:
kubectl create deployment hello-world --image=$CONTAINER_PATH
可以看到已经创建成功:
kubectl get pod NAME READY STATUS RESTARTS AGE hello-world-55b45c79cd-bwvgl 1/1 Running 0 13s
二 配置 Binary Authorization 策略
根据前文的描述,Binary Authorization 的策略有三种:
- Allow All Image
- Disallow All Image
- Allow only images that have been approved by all the following attestors
我们在第一节中,测试 Allow all image 和 Disallow all image 两个策略,在第二节中,测试 attestor 相关的策略。
1、Binary Authorization Policy
创建 policy.yaml 文件:
cat > ./policy.yaml << EOF globalPolicyEvaluationMode: ENABLE defaultAdmissionRule: evaluationMode: ALWAYS_DENY enforcementMode: ENFORCED_BLOCK_AND_AUDIT_LOG EOF
可以看到,这里把 Adminission Rule 改成了 Always Deny,除白名单内的 image,是不能创建 pod 的。
部署此策略:
gcloud container binauthz policy import policy.yaml
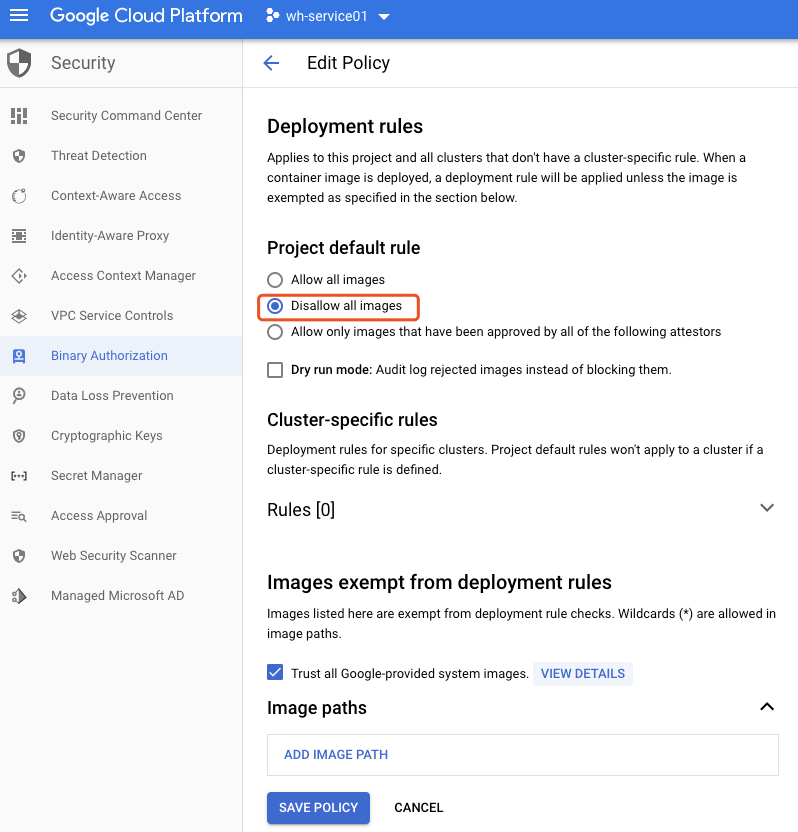
此时中 console 中可以看到策略如下:
重新部署 deployment:
kubectl delete deployment --all kubectl delete event --all kubectl create deployment hello-world --image=$CONTAINER_PATH
可以看到,pod 因为 image policy,不能创建:

手工添加白名单:
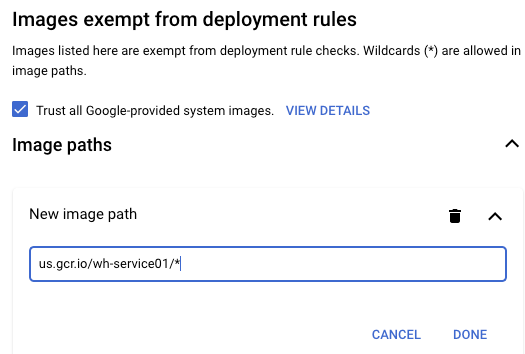
保存后,deployment 部署成功:
2、Attestor 策略
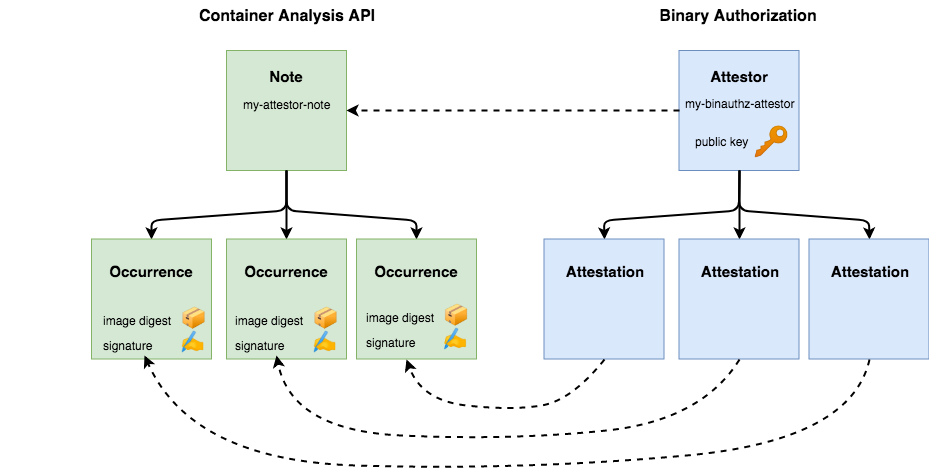
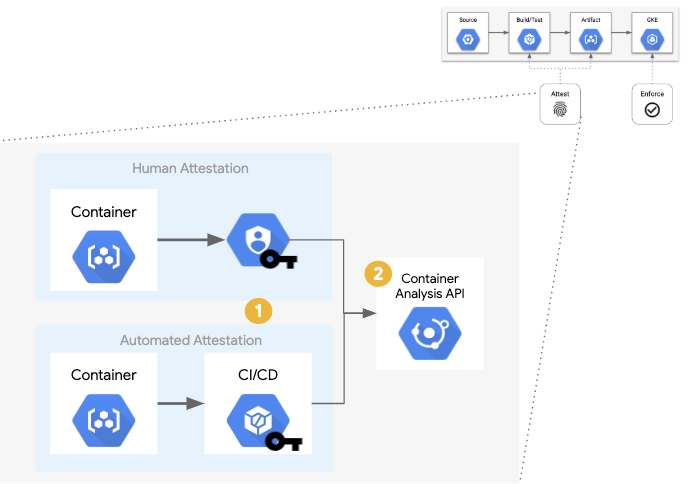
GKE 的 Binary Authorization 功能通过调用 Container Analysis 功能中的 container image 的 metadata,来确定是否是认证过的 image。具体实现方式如下:
-
在 Container Analysis 中定义 Note,通过手工或自动的方式在创建 image 时,metadata 中加入数字签名。
-
Binary Authorization 中设置 Attestor,调用 Note,确认 image 的 metadata 中的数字签名。如果数字签名通过,可以把 image 部署到 container 中,否则不允许。从而实现对 container Image 的授权。
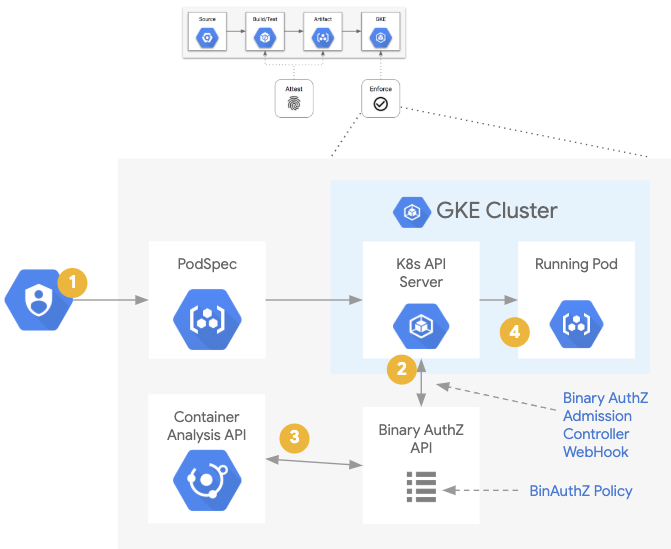
如下是 container build 的 pipline:
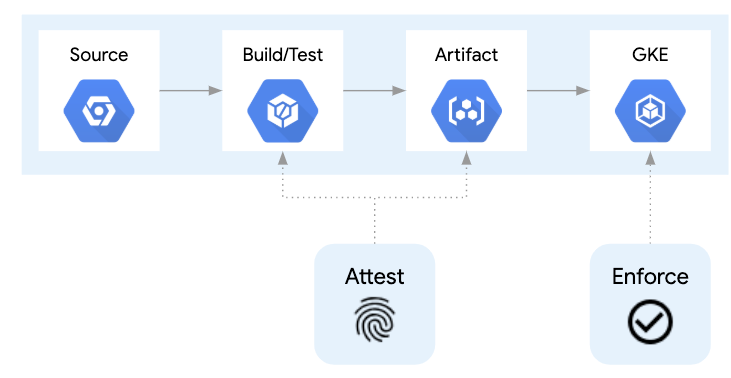
在 Build/Test 以及 Artifact 阶段实现 Attest:
在部署阶段,实现 enforce:
A 创建 Container Analysis Note
创建 note 配置文件:
cat > ./create_note_request.json << EOM { "attestation": { "hint": { "human_readable_name": "This note represents an attestation authority" } } } EOM
创建 note-01:
export NOTE_ID=attestor-note-01 curl -vvv -X POST \ -H "Content-Type: application/json" \ -H "Authorization: Bearer $(gcloud auth print-access-token)" \ --data-binary @./create_note_request.json \ "https://containeranalysis.googleapis.com/v1/projects/${PROJECT_ID}/notes/?noteId=${NOTE_ID}"
查看 note:

B 创建 Attestor
用命令行:
export ATTESTOR_ID=binauthz-attestor-01 gcloud container binauthz attestors create $ATTESTOR_ID \ --attestation-authority-note=$NOTE_ID \ --attestation-authority-note-project=${PROJECT_ID}
查看 Attestor:
gcloud container binauthz attestors list

C 添加 key
Enable KMS 服务:
gcloud services enable cloudkms.googleapis.com
采用 Google Cloud KMS 创建 Key,并添加到 attestor 中。
创建 Key-ring、Key:
export KEY_LOCATION=global export KEYRING=key-ring-01 export KEY_NAME=key-01 export KEY_VERSION=1 gcloud kms keyrings create "${KEYRING}" --location="${KEY_LOCATION}" gcloud kms keys create "${KEY_NAME}" \ --keyring="${KEYRING}" --location="${KEY_LOCATION}" \ --purpose asymmetric-signing --default-algorithm="ec-sign-p256-sha256"
查看 key 的情况:

Attestor 中添加 Key:
gcloud beta container binauthz attestors public-keys add \ --attestor="${ATTESTOR_ID}" \ --keyversion-project="${PROJECT_ID}" \ --keyversion-location="${KEY_LOCATION}" \ --keyversion-keyring="${KEYRING}" \ --keyversion-key="${KEY_NAME}" \ --keyversion="${KEY_VERSION}"
此时,Attestor 中添加了 Public Key:

D 对 container Image 进行签名
先获取 Image 对 Digest:
export DIGEST=$(gcloud container images describe ${CONTAINER_PATH}:latest \ --format='get(image_summary.digest)')
是一串 hash 值:
echo $DIGEST sha256:e4551a5ded95740f0be38b37dbcebac081a9f5c717d223e1998c871d6a8a79dd
手工对 Image 进行签名:
gcloud beta container binauthz attestations sign-and-create \ --artifact-url="${CONTAINER_PATH}@${DIGEST}" \ --attestor="${ATTESTOR_ID}" \ --attestor-project="${PROJECT_ID}" \ --keyversion-project="${PROJECT_ID}" \ --keyversion-location="${KEY_LOCATION}" \ --keyversion-keyring="${KEYRING}" \ --keyversion-key="${KEY_NAME}" \ --keyversion="${KEY_VERSION}"
可以查看签名对情况:
gcloud container binauthz attestations list \ > --attestor=$ATTESTOR_ID --attestor-project=${PROJECT_ID} --- attestation: attestation: genericSignedAttestation: contentType: SIMPLE_SIGNING_JSON serializedPayload: ewogICJjc……= signatures: - publicKeyId: //cloudkms.googleapis.com/v1/projects/wh-service01/locations/global/keyRings/key-ring-01/cryptoKeys/key-01/cryptoKeyVersions/1 signature: MEUCIQCh_SIeuAoAzuGl7dymtgrFFclJk6EJ-u5Jeg_x3xU2gQIgKFyG__OGBdMVgVC21iIqBIa_ETeHHKJ7MrM0tB7LICo= createTime: '2020-02-04T08:01:19.206181Z' kind: ATTESTATION name: projects/wh-service01/occurrences/9b462272-33bb-46de-ad6a-61312223cf05 noteName: projects/wh-service01/notes/attestor-note-01 resource: uri: https://us.gcr.io/wh-service01/hello-world@sha256:e4551a5ded95740f0be38b37dbcebac081a9f5c717d223e1998c871d6a8a79dd updateTime: '2020-02-04T08:01:19.206181Z'
E 更新 Binary Authorization 的策略
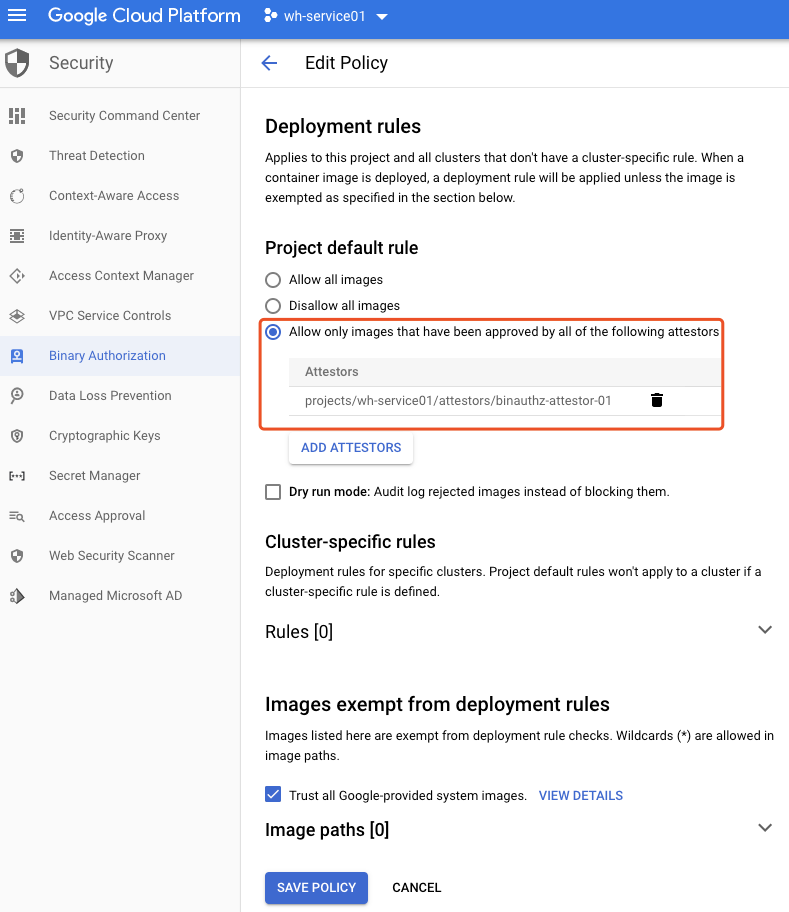
将策略改成,只允许 Attestor 方式的 Image。此时 Binary Authorization 的策略如下:
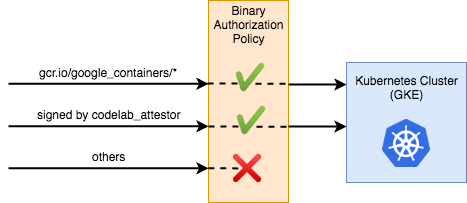
两张模式的 Image 都可以部署到 Container 中。
F 部署 Container
kubectl create deployment hello-world-signed --image="${CONTAINER_PATH}@${DIGEST}"
查看部署情况:

三 总结
通过 Google Cloud 的 Binary Authorization,可以方便的对 Container 的 Image 进行管理。可以通过简单的镜像源进行粗略的管理,也可以通过 Attestor 的方式对镜像签名进行验证,从而实现相对严格的验证和授权。


评论