

Terraform 是一个高度可扩展的 IT 基础架构自动化编排工具,主张基础设施即代码,可通过代码集中管理云资源和基础架构,这意味着用户能够在京东云上轻松使用简单模板语言来定义、预览和部署云基础架构,能够快速将环境部署到京东云或本地数据中心,实现多云管理和跨云迁移。其应用场景包括:基础设施即代码、快速部署多云环境、自动化管理降低成本。
Terraform 是 Hashicorp 公司一款开源的资源编排工具,代表了业界前沿的技术和标准。相对于其他云上资源管理方式,具有快速创建基础设施、高效部署多云环境和大幅降低管理成本三大功能特性。
Terraform 通过代码管理维护云资源,可保存基础设施资源的状态,快速创建和维护管理云主机、网络、负载均衡等云资源,并通过代码与其他人共享云资源的编排配置。
Terraform 支持 200 多个基础设施提供商,适用于多云方案,可快速将用户的环境部署到京东云、其他云厂商或者本地的数据中心。开发者可同时管理不同云厂商的资源,也可快速方便地迁移到另外一个云厂商。Terraform 通过代码批量按计划地管理资源,可编排、重复地自动化管理云资源,减少人为因素造成的不确定管理错误,同时能快速创建相同的开发、测试、预发和生成环境,降低开发者的管理成本。
本文通过简单 demo 做一个技术入门的演示,目的是帮助大家了解如何采用 Terraform 来自动化管理京东云上的资源。
Terraform 安装
Terraform 是一个 IT 基础架构自动化编排工具,它的口号是 “Write, Plan, and create Infrastructure as Code”, 其程序安装在客户的终端 PC 上,可以运行于多种操作系统平台。本文实例采用的是 CentOS 操作系统。
登录到主机后先下载一下安装包
1[jdc@mysandbox ~]$ mkdir tf 2[jdc@mysandbox ~]$ cd tf 3[jdc@mysandbox tf]$ wget https://releases.hashicorp.com/terraform/0.11.13/terraform_0.11.13_linux_amd64.zip 4--2019-05-16 14:41:57-- https://releases.hashicorp.com/terraform/0.11.13/terraform_0.11.13_linux_amd64.zip 5Resolving releases.hashicorp.com (releases.hashicorp.com)... 151.101.109.183, 2a04:4e42:1a::439 6Connecting to releases.hashicorp.com (releases.hashicorp.com)|151.101.109.183|:443... connected. 7HTTP request sent, awaiting response... 200 OK 8Length: 21128942 (20M) [application/zip] 9Saving to: ‘terraform_0.11.13_linux_amd64.zip’1011100%[============================================================================================================================================================>] 21,128,942 4.30MB/s in 66s12132019-05-16 14:43:05 (312 KB/s) - ‘terraform_0.11.13_linux_amd64.zip’ saved [21128942/21128942]
解压缩
1[jdc@mysandbox tf]$ ls2terraform_0.11.13_linux_amd64.zip[jdc@mysandbox tf]$ unzip terraform_0.11.13_linux_amd64.zip3Archive: terraform_0.11.13_linux_amd64.zip4inflating: terraform
直接运行程序可以看到以下命令行的帮助信息:
1$ terraform 2Usage: terraform [--version] [--help] <command> [args] 3 4The available commands for execution are listed below. 5The most common, useful commands are shown first, followed byless common or more advanced commands. If you're just gettingstarted with Terraform, stick with the common commands. For theother commands, please read the help and docs before usage. 6 7Common commands: 8apply Builds or changes infrastructure 9console Interactive console for Terraform interpolations destroy Destroy Terraform-managed infrastructure10fmt Rewrites config files to canonical format11get Download and install modules for the configuration12graph Create a visual graph of Terraform resources import Import existing infrastructure into Terraform init Initialize a new or existing Terraform configuration13output Read an output from a state file14plan Generate and show an execution plan15providers Prints a tree of the providers used in the configuration16push Upload this Terraform module to Terraform Enterprise to run17refresh Update local state file against real resources18show Inspect Terraform state or plan19taint Manually mark a resource for recreation20untaint Manually unmark a resource as tainted21validate Validates the Terraform files22version Prints the Terraform version23workspace Workspace management2425All other commands:26debug Debug output management (experimental)27force-unlock Manually unlock the terraform state28state Advanced state management
举例:查看 Terraform 版本
1[jdc@mysandbox tf]$ ./terraform version2Terraform v0.11.13
初始化环境
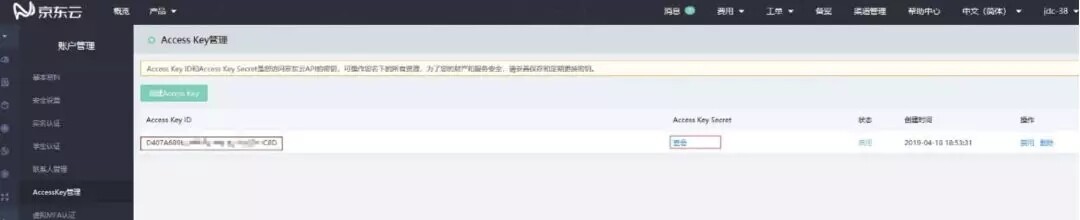
Terraform 访问京东云的服务,首先需要身份认证鉴权。认证采用 Access Key 与 Secret key 来完成。从控制台取得 AK、SK 身份鉴权信息两种方法保存:
方法 1:将 AK,SK 加入运行环境
1[jdc@mysandbox tf]$ cat >> ~/.bash_profile <<EOF2> #### add Hongwei 201905163> export access_key="D4xxxxxxxxxxxxxxxxxxxxxxxxxxxx8D"4> export secret_key="7xxxxxxxxxxxxxxxxxxxxxxxxxxxxxxE"5> export region="cn-north-1"> EOF6[jdc@mysandbox tf]$ . ~/.bash_profile
方法 2:将 AK,SK 放入 json 文件
1cat >> jdcloud.tf <<EOF2provider "jdcloud" {3 access_key = "D4xxxxxxxxxxxxxxxxxxxxxxxxxxxx8D"4 secret_key = "7xxxxxxxxxxxxxxxxxxxxxxxxxxxxxxE "5 region = "cn-north-1"}6EOF
初始化环境
1[jdc@mysandbox tf]$ ./terraform init 2 3Initializing provider plugins... 4- Checking for available provider plugins on https://releases.hashicorp.com... 5- Downloading plugin for provider "jdcloud" (0.0.1)... 6 7The following providers do not have any version constraints in configuration,so the latest version was installed. 8 9To prevent automatic upgrades to new major versions that may contain breakingchanges, it is recommended to add version = "..." constraints to thecorresponding provider blocks in configuration, with the constraint stringssuggested below.1011* provider.jdcloud: version = "~> 0.0"1213Terraform has been successfully initialized!1415You may now begin working with Terraform. Try running "terraform plan" to seeany changes that are required for your infrastructure. All Terraform commandsshould now work.1617If you ever set or change modules or backend configuration for Terraform,rerun this command to reinitialize your working directory. If you forget, othercommands will detect it and remind you to do so if necessary.
演示:创建一个云主机实例
参考 Terraform 的联机文档,创建以下 tf 文件:jdcloud_instance.tf
1resource "jdcloud_instance" "vm-1" { 2 az = "cn-north-1a" 3 instance_name = "vm-1" 4 instance_type = "g.n2.medium" 5 image_id = "bba85cab-dfdc-4359-9218-7a2de429dd80" 6 password = "cNXOxJywMU6IY7c0CgIj" 7 subnet_id = "subnet-35h6keqh4m" 8 network_interface_name = "example_ni_name" 9 primary_ip = "10.0.0.27"10 secondary_ip_count = 011 security_group_ids = ["sg-chx9tv75xa"]1213 system_disk = {14 disk_category = "local"15 device_name = "vda"16 disk_type="ssd"17 disk_size_gb = 4018}1920data_disk = {21 disk_category = "cloud"22 device_name = "vdc"23 disk_type = "ssd"24 disk_name = "exampleDisk"25 disk_size_gb = 5026 az = "cn-north-1a"2728 auto_delete = true29 disk_name = "vm1-datadisk-1"30 description = "test"31 }32}
plan 命令可以显示执行计划:
1[jdc@mysandbox tf]$ ./terraform plan 2Refreshing Terraform state in-memory prior to plan... 3The refreshed state will be used to calculate this plan, but will not bepersisted to local or remote state storage. 4 5jdcloud_instance.vm-1: Refreshing state... (ID: i-y8ye9jd6ny) 6 7------------------------------------------------------------------------ 8 9An execution plan has been generated and is shown below.10Resource actions are indicated with the following symbols:-/+ destroy and then create replacement1112Terraform will perform the following actions:1314-/+ jdcloud_instance.vm-1 (new resource required)15id: "i-y8ye9jd6ny" => <computed> (forces new resource)16az: "cn-north-1a" => "cn-north-1a"17data_disk.#: "1" => "1"18data_disk.0.auto_delete: "true" => "true"19data_disk.0.az: "cn-north-1a" => "cn-north-1a"20data_disk.0.description: "test" => "test"21data_disk.0.device_name: "vdc" => "vdc"22data_disk.0.disk_category: "cloud" => "cloud"23data_disk.0.disk_id: "vol-fhvqnjyxw7" => <computed>24data_disk.0.disk_name: "vm1-datadisk-1" => "vm1-datadisk-1"25data_disk.0.disk_size_gb: "50" => "50"26data_disk.0.disk_type: "ssd" => "ssd" image_id: "bba85cab-dfdc-4359-9218-7a2de429dd80" => "bba85cab-dfdc-4359-9218-7a2de429dd80"27instance_name: "vm-1" => "vm-1"28instance_type: "g.n2.medium" => "g.n2.medium"29ip_addresses.#: "0" => <computed>30network_interface_name: "example_ni_name" => "example_ni_name"31password: <sensitive> => <sensitive> (attribute changed)32primary_ip: "10.0.0.27" => "10.0.0.27"33secondary_ip_count: <sensitive> => <sensitive> (attribute changed)34security_group_ids.#: "1" => "1"35security_group_ids.4008937636: "sg-chx9tv75xa" => "sg-chx9tv75xa"36subnet_id: "subnet-35h6keqh4m" => "subnet-35h6keqh4m"37system_disk.#: "1" => "1"38system_disk.0.auto_delete: "true" => <computed>39system_disk.0.az: "" => <computed>40system_disk.0.device_name: "vda" => "vda"41system_disk.0.disk_category: "local" => "local"42system_disk.0.disk_id: "" => <computed>43system_disk.0.disk_name: "" => <computed>44system_disk.0.disk_size_gb: "40" => "40"45system_disk.0.disk_type: "" => "ssd" (forces new resource)
提交执行:
1[jdc@mysandbox tf]$ ./terraform apply -auto-approve 2jdcloud_instance.vm-1: Creating... 3az: "" => "cn-north-1a" 4data_disk.#: "" => "1" 5data_disk.0.auto_delete: "" => "true" 6data_disk.0.az: "" => "cn-north-1a" 7data_disk.0.description: "" => "test" 8data_disk.0.device_name: "" => "vdc" 9data_disk.0.disk_category: "" => "cloud"10data_disk.0.disk_id: "" => "<computed>"11data_disk.0.disk_name: "" => "vm1-datadisk-1"12data_disk.0.disk_size_gb: "" => "50"13data_disk.0.disk_type: "" => "ssd"14image_id: "" => "bba85cab-dfdc-4359-9218-7a2de429dd80"15instance_name: "" => "vm-1"16instance_type: "" => "g.n2.medium"17ip_addresses.#: "" => "<computed>"18network_interface_name: "" => "example_ni_name"19password: "<sensitive>" => "<sensitive>"20primary_ip: "" => "10.0.0.27"21secondary_ip_count: "<sensitive>" => "<sensitive>"22security_group_ids.#: "" => "1"23security_group_ids.4008937636: "" => "sg-chx9tv75xa"24subnet_id: "" => "subnet-35h6keqh4m"25system_disk.#: "" => "1"26system_disk.0.auto_delete: "" => "<computed>"27system_disk.0.az: "" => "<computed>"28system_disk.0.device_name: "" => "vda"29system_disk.0.disk_category: "" => "local"30system_disk.0.disk_id: "" => "<computed>"31system_disk.0.disk_name: "" => "<computed>"32system_disk.0.disk_size_gb: "" => "40" system_disk.0.33disk_type: "" => "ssd"jdcloud_instance.vm-1: Still creating... (10s elapsed)34jdcloud_instance.vm-1: Still creating... (20s elapsed)35jdcloud_instance.vm-1: Still creating... (30s elapsed)36jdcloud_instance.vm-1: Still creating... (40s elapsed)37jdcloud_instance.vm-1: Still creating... (50s elapsed)38jdcloud_instance.vm-1: Still creating... (1m0s elapsed)39jdcloud_instance.vm-1: Creation complete after 1m1s (ID: i-y8ye9jd6ny)40Apply complete! Resources: 1 added, 0 changed, 0 destroyed.
成功提交后,我们可以在控制台看到正在运行的实例创建过程:

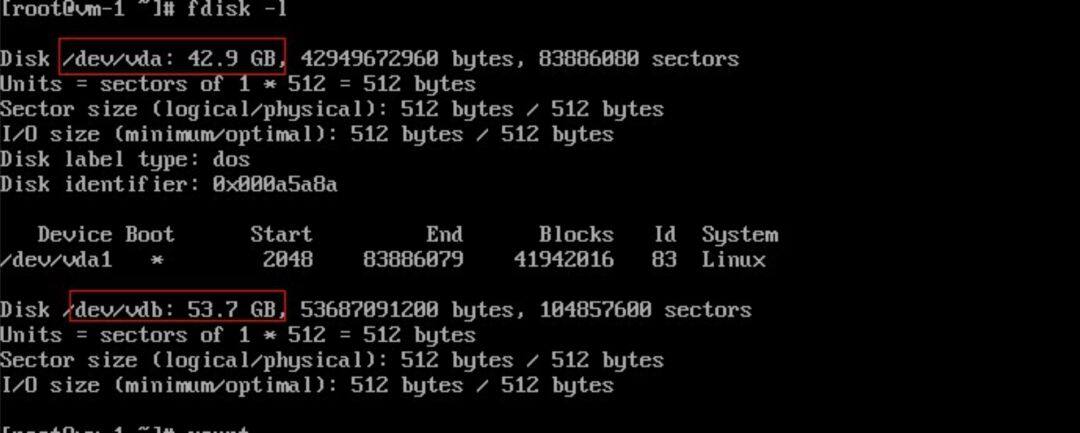
创建完成后登录主机查看是否与定义文件符合:
查看磁盘划分是否一致:
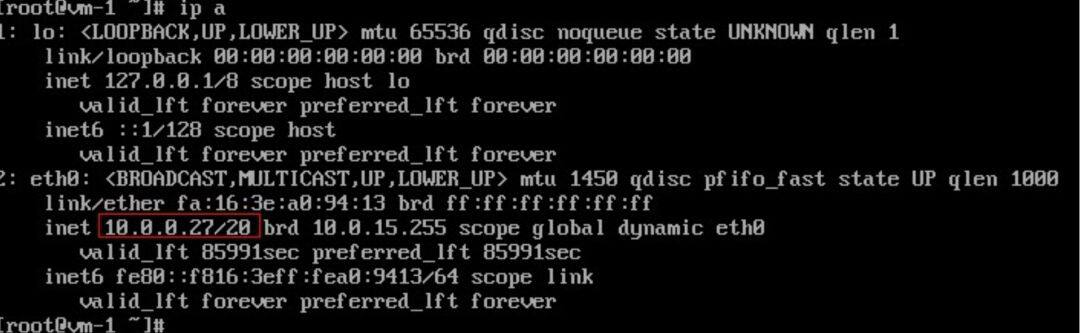
查看 IP 地址是否一致:
演示:销毁实例
通过 destroy 命令可以方便的删除实例。
1[jdc@mysandbox tf]$ ./terraform destroy 2jdcloud_instance.vm-1: Refreshing state... (ID: i-y8ye9jd6ny) 3 4An execution plan has been generated and is shown below. 5Resource actions are indicated with the following symbols: - destroy 6 7Terraform will perform the following actions: 8 - jdcloud_instance.vm-1 910Plan: 0 to add, 0 to change, 1 to destroy.1112Do you really want to destroy all resources?13 Terraform will destroy all your managed infrastructure, as shown above.14 There is no undo. Only 'yes' will be accepted to confirm.1516 Enter a value: yesjdcloud_instance.vm-1: Destroying... (ID: i-y8ye9jd6ny)1718jdcloud_instance.vm-1: Still destroying... (ID: i-y8ye9jd6ny, 10s elapsed)19jdcloud_instance.vm-1: Still destroying... (ID: i-y8ye9jd6ny, 20s elapsed)20jdcloud_instance.vm-1: Still destroying... (ID: i-y8ye9jd6ny, 30s elapsed)21jdcloud_instance.vm-1: Still destroying... (ID: i-y8ye9jd6ny, 40s elapsed)22jdcloud_instance.vm-1: Destruction complete after 41s2324Destroy complete! Resources: 1 destroyed.
在控制台上查看删除进度:

Terraform 自动编排的流程
以上只是演示了 Terraform 管理京东云最简单的流程。实际上通过 Terraform 完成复杂的编排,完全可以完成一个复杂的大型环境的部署与管理。以下是 Terraform 的流程:
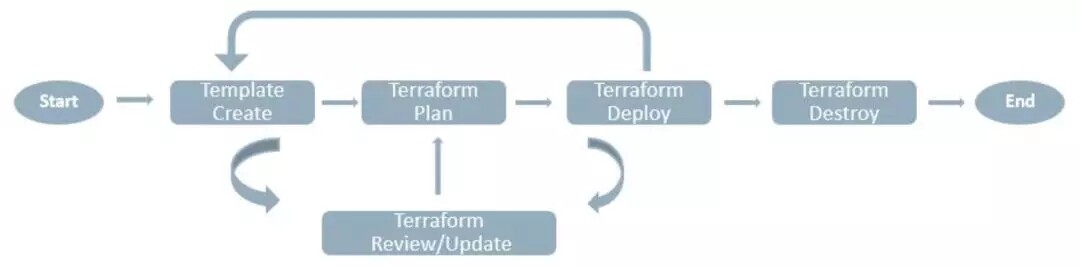
到此,我们的演示就结束了。
大家可以自己动手试一下这种简洁高效的京东云自动化管理工具了。
更多内容推荐
项目部署:如何快速部署 IAM 系统?
今天我们来部署和使用 IAM 系统。
2021 年 5 月 26 日
硬核干货|使用 GitLab CI 部署 Rancher 集群
在当今瞬息万变的DevOps世界中,遵循最佳实践至关重要。
云上容器服务:从 Docker 到 Kubernetes,迎接云原生浪潮
从Docker到Kubernetes,容器生态不断地发展,云原生的技术浪潮已经袭来。
2020 年 4 月 3 日
浅谈:国内低代码开发平台能搭建哪些企业管理系统?
目前,国内低代码开发平台主要用于企业管理系统的开发,包括:ERP系统,CRM系统,人事系统,OA系统等的开发,以及部分业务流程管理的开发。例如物流管理,销售管理,财务管理等。
2021 年 3 月 12 日
持续交付的第一关键点:配置管理
今天我们来看持续交付的第一个关键点:配置管理。
2018 年 1 月 26 日
容器存储实践:CSI 插件编写指南
在今天这篇文章中,我以一个DigitalOcean的CSI插件为例,和你分享了编写CSI插件的具体流程。
2018 年 11 月 2 日
Serverless 实战:快速搭建 SpringBoot 应用
本文介绍如何快速搭建 SpringBoot 应用。
四面拿到京东 Java 岗 30K offer 全过程分享
今天给大家分享的是我一位幸运拿到京东offer的朋友的面试经历,问到了我朋友京东面试的一些真题,以及我整理的一些真题分享给大家。
2021 年 4 月 24 日
京东如何从 OpenStack 迁移至 Kubernetes
中国最大电商公司之一的京东,最近分享了自己通过Kubernetes对基于应用程序容器的基础架构进行革新,取代OpenStack托管的IaaS基础架构过程中所获得的经验。本次迁移同时涉及内部网络组件,借此可将资源利用率提高30%。
如何使用 Terraform 管理七牛云对象存储
你想通过同一套命令和类似的配置,就能管理和操作不同的云平台么?
如何将基础设施自动导入 Terraform ?
Terraform 是一个 CLI 工具,可基于现有的基础设施(逆向 Terraform)生成 `tf/json` 和 `tfstate` 文件。
使用 AWS CDK 轻松构建云原生应用之 EKS 平台(一)
熟悉AWS或者云计算的朋友一定都知道AWS CloudFormation。
Eureka 进阶:健康检查和蓝绿部署
无
2018 年 10 月 12 日
使用 AWS CDK 结合 OPA 实现“策略即代码”
本文译自亚马逊全球官方博客文章 ,展示了如何使用AWS CDK结合OPA(开放策略代理),构建合规策略驱动的基础设施,在部署或更改发生之前,自动进行合规策略检查以降低风险(即策略即代码),以此为云资源的管理提供防护和信心。
不改一行代码!快速迁移 Express 应用上云
快来一起实践吧!
快速构建持续交付系统(四):Ansible 解决自动部署问题
在今天这篇文章中,我主要基于Ansible系统的能力,和你分享了搭建一套部署系统的过程。
2018 年 9 月 27 日
Google Cloud 和 HashiCorp 扩展合作
作为与开源社区更深入结合工作的一部分,Google宣布增进与HashiCorp的合作,合作成果包括用于Treeaform的增强GCP(Google Cloud Platform)功能、基础设施即代码(IaC)云配置工具以及安全管理工具Vault。
京东 T7 架构师手写的 10 万字 Spring Boot 详细学习笔记 + 源码免费下载
读者朋友们好,今天给大家免费分享一份京东大牛手写的的 10 万字 Spring Boot 学习笔记(带完整目录)以及对应的源码。这是京东大牛之前讲过的一门Spring Boot课,所以笔记非常详细完整,我准备将资料分享出来给大家免费学习,相信大家看完一定会有所收获(下
2020 年 9 月 16 日
亚马逊发布用于以太坊和 Hyperledger Fabric 的区块链模板
亚马逊最近宣布为以太坊和Hyperledger Fabric引入区块链模板。 AWS区块链模板用于帮助开发人员快速搭建区块链基础设施,让他们专注于构建应用程序,不必处理底层基础设施细节,以及如何构建、维护和保护好应用程序。
推荐阅读
Azure 正式整合 SaltStack
Amazon AWS 推出 CloudFormation
AWS 推出一个微软系统中心虚拟机管理器加载项
全面实现自动化!Windows Azure 添加对 DevOps 工具 Puppet 的支持
如何构建高效的 Flutter App 打包发布环境?
2019 年 10 月 3 日
环境管理:一切皆代码是一种什么样的体验?
2019 年 11 月 16 日
唯品会容器环境与应用一键拉起——大规模微服务多环境部署管理实践
2019 年 7 月 25 日
电子书
大厂实战PPT下载
换一换 
贺师俊 | 360 高级前端架构师
谭崇康 | 联想研究院 高级研究员
徐强 | 菜鸟网络 高级技术专家


评论