本文最初发布于 Christos Ploutarchou 博客,经原作者授权由 InfoQ 中文站翻译并分享。
这篇文章中,我们会使用 Express、Sequelize 和 MySQL 构建一个 Node.js Rest API。这里我们将使用 Sequelize 来与 MySQL 实例交互。
所需的应用程序
Node.js Rest CRUD API 概述
我们准备构建的 Rest API 可以按标题来创建、检索、更新、删除和查找帖子(post)。
首先我们做一个 Express Web 服务器。然后我们为 MySQL 数据库添加配置,使用 Sequelize 为 Post 创建一个模型,编写控制器。接下来,我们定义用来处理所有 CRUD 操作(包括自定义查找)的路由。
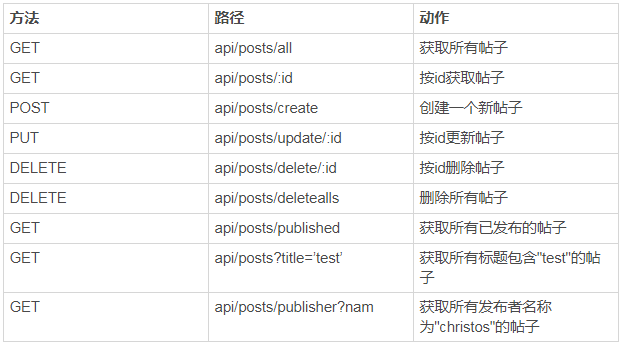
下表概述了将要导出的 Rest API
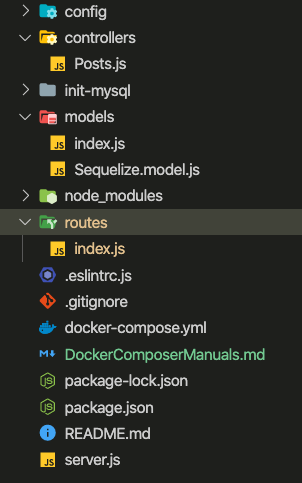
下图是我们的项目结构:
现在开始创建 Node.js 应用
首先,我们创建一个文件夹:
$ mkdir node_rest_api_with_mysql$ cd node_rest_api_with_mysql
复制代码
接下来,我们使用 package.json 文件初始化 Node.js 应用:
npm initname: (nodejs-express-sequelize-mysql) version: (1.0.0) description: Node.js Rest Apis with Express, Sequelize & MySQL.entry point: (index.js) server.jstest command: git repository: keywords: nodejs, express, sequelize, mysql, rest, api, dockerauthor: Christos Ploutarchoulicense: (ISC)Is this ok? (yes) yes
复制代码
如果你的 PC 上已经安装了 MySQL,则可以忽略以下步骤
接下来,需要为 mysql 和 phpMyAdmin 安装 docker。
安装 Docker(在此处了解有关 Docker 安装的更多信息「https://docs.docker.com/install/」)
进入项目根目录
up compose
your_ip:8183Server: mysqlUsername: root/rootPassword: root/pass
复制代码
docker exec -it mysql_container_name mysql -u root -p
复制代码
Docker phpmyadmin ENV
我们还要在项目上安装必要的模块:express、sequelize、mysql2 和 body-parser。
运行命令:
npm install express body-parser cors sequelize mysql2 --save
复制代码
安装完成后,package.json 文件应如下所示:
{ "name": "node_rest_api_with_mysql", "version": "1.0.0", "description": "Node.js Rest Api with Express, Sequelize, MySQL & phpMyAdmin .", "main": "server.js", "scripts": { "start": "nodemon server.js" }, "repository": { "type": "git", "url": "git+https://github.com/cploutarchou/node_rest_api_with_mysql.git" }, "keywords": [ "node", "rest-api", "tutorial", "mysql", "phpMyAdmin", "docker", "node.js", "sequilize" ], "author": "Christos Ploutarchou", "license": "ISC", "bugs": { "url": "https://github.com/cploutarchou/node_rest_api_with_mysql/issues" }, "homepage": "https://github.com/cploutarchou/node_rest_api_with_mysql#readme", "dependencies": { "body-parser": "^1.19.0", "cors": "^2.8.5", "express": "^4.17.1", "mysql2": "^2.1.0", "sequelize": "^5.21.5" }, "devDependencies": { "nodemon": "^2.0.2" }}
复制代码
设置 Express Web 服务器
在我们的根目录中需要创建一个新的 server.js 文件:
const express = require("express");const bodyParser = require("body-parser");const cors = require("cors");const server = express();const db = require("./models");const corsSettings = { originL: "http://localhost:8081"};const api = require("./routes/index");server.use(cors(corsSettings));// Parse request of content-type - application/jsonserver.use(bodyParser.json());// parse requests of content-type -application/x-www-form-urlencodedserver.use(bodyParser.urlencoded({ extended: true }));create a simple routeserver.get("/", (_req, res) => { res.json({ message: "Welcome to node.js rest api application. Created for learning purposes by Christos Ploutarchou" });});// set listening ports for requestconst port = process.env.PORT || 8080;server.listen(port, () => { console.log("Server running on port : " + port );});
复制代码
我们在这里做的事情是:
导入 express、body-parser 和 cors 模块:
Express 用于构建 Rest API。
body-parser 帮助解析请求并创建 req.body 对象。
cors 提供了 Express 中间件,以多种选项启用 CORS。
创建一个 Express 应用,然后使用 app.use()方法添加 body-parser 和 cors 中间件。请注意,我们设置了原点:http://localhost:8081。
定义一个易于测试的 GET 路由。
在端口 8080 上侦听传入请求。
现在运行以下命令来运行应用:
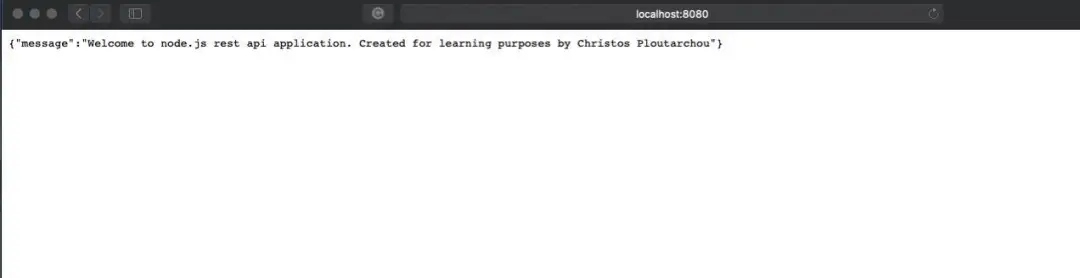
在浏览器中打开 URL http://localhost:8080/,你将看到:
正确,第一步已经完成。在下一部分中我们将动用 Sequelize。
配置 MySQL 数据库和 Sequelize
在根文件夹中,我们创建一个单独的 config 文件夹,用来使用 db.config.js 文件进行配置,如下所示:
注意:如果你不使用 docker compose 项目,则需要使用本地环境凭据和信息来更新数据库信息。
module.exports = { HOST: "localhost", USER: "root", PASSWORD: "pass", DB: "restapi", dialect: "mysql", pool: { max: 10, min: 0, acquire: 30000, idle: 50000 }};
复制代码
前五个参数用于 MySQL 连接。
pool 是可选的,它将用于 Sequelize 连接池配置:
有关更多信息,你可以访问 Sequelize 构造函数的 API 参考(https://sequelize.org/master/class/lib/sequelize.js~Sequelize.html#instance-constructor-constructor)。
初始化 Sequelize
我们将在 app/models 文件夹中初始化 Sequelize,下一步中这个文件夹里会包含模型。
现在使用以下代码创建 app/models/index.js:
const dbConfig = require("../config/db.config");const Sequelize = require("sequelize");const database = new Sequelize(dbConfig.DB, dbConfig.USER, dbConfig.PASSWORD, { host: dbConfig.HOST, dialect: dbConfig.dialect, operatorsAliases: false, pool: { max: dbConfig.pool.max, min: dbConfig.pool.min, acquire: dbConfig.pool.acquire, idle: dbConfig.pool.idle }});const db = {};db.Sequelize = Sequelize;db.databaseConf = database;db.posts = require("./Sequelize.model")(database, Sequelize);module.exports = db;
复制代码
不要忘记在 server.js 中调用 sync()方法:
const db = require("./models");db.databaseConf.sync();
复制代码
之后,你的 server.js 文件应该如下所示:
const express = require("express");const bodyParser = require("body-parser");const cors = require("cors");const server = express();const db = require("./models");const corsSettings = { originL: "http://localhost:8081"};const api = require("./routes/index");server.use(cors(corsSettings));// Parse request of content-type - application/jsonserver.use(bodyParser.json());// parse requests of content-type -application/x-www-form-urlencodedserver.use(bodyParser.urlencoded({ extended: true }));create a simple routeserver.get("/", (_req, res) => { res.json({ message: "Welcome to node.js rest api application. Created for learning purposes by Christos Ploutarchou" });});// set listening ports for requestconst port = process.env.PORT || 8080;server.listen(port, () => { console.log("Server running on port : " + port );});db.databaseConf.sync();
复制代码
定义 Sequelize 模型
在 models 文件夹中,创建 Sequelize.model.js 文件,如下所示:
module.exports = (database, Sequelize) => { return database.define("restTutorial", { title: { type: Sequelize.STRING }, description: { type: Sequelize.TEXT }, published: { type: Sequelize.BOOLEAN }, publisher: { type: Sequelize.STRING } });};
复制代码
这个 Sequelize 模型表示 MySQL 数据库中的 restTutorials 表。以下列将自动生成:id、title(标题)、description(描述)、published(已发布)、createdAt、updatedAt。
初始化 Sequelize 之后我们不需要编写 CRUD 函数,Sequelize 支持下列所有功能:
这些函数将用在我们的控制器上。
创建控制器
在 app/controllers 文件夹中,我们使用以下 CRUD 函数创建 Post.js:
create
findAll
findOne
update
delete
deleteAll
findAllPublished
findByPublisherName
const db = require('../models')const postObj = db.postsconst Op = db.Sequelize.Op// 创建并保存一个新帖子exports.create = (request, result) => {}// 将帖子对象保存到数据库postObj.create(post).then(data => {}// 获取所有帖子 (接收带条件的数据).exports.getAllPosts = (request, result) => {}// 按ID获取帖子对象exports.getPostByID = (request, result) => {}// 按id更新一个帖子对象exports.updatePostByID = (request, result) => {}// 按ID删除帖子对象exports.deletePostByID = (request, result) => {}// 从数据库删除所有帖子对象exports.deleteAllPosts = (request, result) => {}// 获取所有已发布帖子exports.getAllPublishedPosts = (request, result) => {}// 按发布者名称获取所有帖子exports.getAllPostsByPublisherName = (request, result) => {}// 按标题获取所有已发布帖子exports.getPostByTitle = (request, result) => {}
复制代码
现在我们来实现这些函数。
创建一个新的帖子对象
// 创建并保存新帖子exports.create = (request, result) => { if (!request.body.title) { result.status(400).send({ message: "Content cannot be empty" }); } // 创建一个帖子对象 const post = { title: request.body.title, description: request.body.description, published: request.body.published ? request.body.published : false, publisher: request.body.publisher ? request.body.publisher : false }; // 将帖子对象保存到数据库 postObj.create(post).then(data => { result.send(data); }).catch(err => { result.status(500).send({ message: err.message || "Some error occurred while saving." }); });};
复制代码
获取所有对象(按帖子标题)
// 按标题获取所有已发布帖子exports.getPostByTitle = (request, result) => { const title = request.query.title; postObj.findAll({ where: { publisher: { [Op.like]: <code data-enlighter-language="generic" class="EnlighterJSRAW">%${title}%</code> }, published: true } }).then(data => { result.send(data); }).catch(err => { result.status(500).send({ message: err.message || "Something going wrong. Unable to retrieve data!" }); });};
复制代码
在这个函数上,我们使用 request.query.title 从 Request 中获取查询字符串,并将其视为 findAll()方法的条件。
获取单个帖子对象(按帖子 ID)
// 按ID获取帖子对象exports.getPostByID = (request, result) => { const paramID = request.params.id; console.log(paramID); console.log(paramID); postObj.findAll({ where: { id: paramID } }).then(data => { result.send(data); }).catch(err => { result.status(500).send({ message: err.message || <code data-enlighter-language="generic" class="EnlighterJSRAW">Some error occurred while retrieving data with id : ${paramID}</code> }); });};
复制代码
按 id 更新帖子对象
// 按id更新一个帖子对象exports.updatePostByID = (request, result) => { const id = request.params.id; postObj.update(request.body, { where: { id: id } }).then(num => { if (num === 1) { result.send({ message: "Post object successfully updated." }); } else { result.send({ message: <code data-enlighter-language="generic" class="EnlighterJSRAW">Cannot update Post object with id=${id}!</code> }); } }).catch(err => { result.status(500).send({ message: err.message || <code data-enlighter-language="generic" class="EnlighterJSRAW">Error while updating Post object with id=${id}!</code> }); });};
复制代码
按 ID 删除帖子对象
// 按id删除帖子对象exports.deletePostByID = (request, result) => { const id = request.params.id; postObj.destroy({ where: { id: id } }).then(num => { if (num === 1) { result.send({ message: "Post object successfully deleted." }); } else { result.send({ message: <code data-enlighter-language="generic" class="EnlighterJSRAW">Cannot delete Post object with id=${id}!</code> }); } }).catch(err => { result.status(500).send({ message: err.message || <code data-enlighter-language="generic" class="EnlighterJSRAW">Cannot delete Post object with id=${id}!</code> }); });};
复制代码
从数据库中删除所有帖子对象
// 从数据库删除所有帖子对象exports.deleteAllPosts = (request, result) => { postObj.destroy({ where: {}, truncate: false }).then(nums => { result.send({ message: <code data-enlighter-language="generic" class="EnlighterJSRAW">${nums} Post objects was deleted successfully!</code> }); }).catch(err => { result.status(500).send({ message: err.message || "Cannot delete Post objects. Something going wrong}!" }); });};
复制代码
获取所有已发布的帖子
// 获取所有已发布帖子exports.getAllPublishedPosts = (request, result) => { postObj.findAll({ where: { published: true } }).then(data => { result.send(data); }).catch(err => { result.status(500).send({ message: err.message || "Something going wrong. Unable to retrieve data!" }); });};
复制代码
从数据库获取所有已发布的帖子对象
exports.getAllPosts = (request, result) => { postObj.findAll() .then(data => { result.send(data); }).catch(err => { result.status(500).send({ message: err.message || "Some error occurred while retrieving data." }); });};
复制代码
按发布者名称获取所有帖子
// 按发布者名称获取所有帖子exports.getAllPostsByPublisherName = (request, result) => { const name = request.params.name; const condition = name ? { publisher: { [Op.like]: <code data-enlighter-language="generic" class="EnlighterJSRAW">%${name}%</code> } } : null; postObj.findAll({ where: condition }).then(data => { result.send(data); }).catch(err => { result.status(500).send({ message: err.message || "Something going wrong. Unable to retrieve data!" }); });};
复制代码
定义路由
当客户端使用 HTTP 请求(GET、POST、PUT、DELETE)发送对一个端点的请求时,我们需要设置路由来确定服务器的响应方式。
现在我们在 route/文件夹中创建一个 index.js 文件,其内容如下:
const post = require("../controllers/Post");const express = require("express");const router = express.Router();// 创建新帖子router.post("/api/posts/create", post.create);// // 检索所有帖子router.get("/api/posts/all", post.getAllPosts);// 检索所有已发布帖子router.get("/api/posts/published", post.getAllPublishedPosts);// 按发布者名称检索所有已发布帖子router.get("/api/posts/publisher", post.getAllPostsByPublisherName);// 按标题检索所有帖子router.get("/api/posts", post.getPostByTitle);// 按id检索帖子router.get("/api/posts/:id", post.getPostByID);// // 按id更新帖子router.put("/api/post/update/:id", post.updatePostByID);// // 按id删除帖子router.delete("/api/post/delete/:id", post.deletePostByID);// 删除所有帖子router.delete("/api/posts/deleteAll", post.deleteAllPosts);module.exports = router;
复制代码
你可以看到我们使用了…controllers/Post 中的一个控制器。
我们还需要在 server.js 中包含路由(在 app.listen()之前):
const api = require("./routes/index");server.use("/", api);
复制代码
更新之后,我们的 server.js 文件应该如下所示:
const express = require("express");const bodyParser = require("body-parser");const cors = require("cors");const server = express();const db = require("./models");const corsSettings = { originL: "http://localhost:8081"};const api = require("./routes/index");server.use(cors(corsSettings));// Parse request of content-type - application/jsonserver.use(bodyParser.json());// parse requests of content-type -application/x-www-form-urlencodedserver.use(bodyParser.urlencoded({ extended: true }));server.use("/", api);// set listening ports for requestconst port = process.env.PORT || 80;server.listen(port, () => { console.log(<code data-enlighter-language="generic" class="EnlighterJSRAW">Server running on port : ${port}</code>);});// 如果你要删除已有的表并重新同步数据库,请运行以下函数// db.dropRestApiTable();db.databaseConf.sync();
复制代码
注意:在开发过程中,你可能需要删除现有的表并重新同步数据库。因此我们要在 models/index.js 上创建一个新函数以应用这个步骤。
在 index.js 上添加以下函数:
db.dropRestApiTable = () => { db.databaseConf.sync({ force: true }).then(() => { console.log("restTutorial table just dropped and db re-synced."); });};
复制代码
要删除现有表时,可以在 server.js 文件上调用该函数:
测试 API
使用以下命令运行我们的 Node.js 应用程序:
Server running on port : 80Executing (default): CREATE TABLE IF NOT EXISTS restTutorials (id INTEGER NOT NULL auto_increment , title VARCHAR(255), description TEXT, published TINYINT(1), publisher VARCHAR(255), createdAt DATETIME NOT NULL, updatedAt DATETIME NOT NULL, PRIMARY KEY (id)) ENGINE=InnoDB;Executing (default): SHOW INDEX FROM restTutorials
复制代码
我们将使用 Postman 测试以上所有的 API。
1. 使用/api/posts/create API 创建一个新帖子
下面是我们的发帖请求示例:
{ "title": "JS Tutorials : Part 1", "description": "Node.js Rest APIs with Express, Sequelize & MySQL Part 1", "published": true, "publisher": "Christos Ploutarchou"}
复制代码
当我们发送发帖请求(如果数据存储在数据库上)时,我们应该会收到 STATUS: 200OK
注意:如果使用 docker-compose 运行 MySQL,则可以使用以下凭据 username: root | password: pass 在 localhost:8183 上访问 phpMyAdmin。
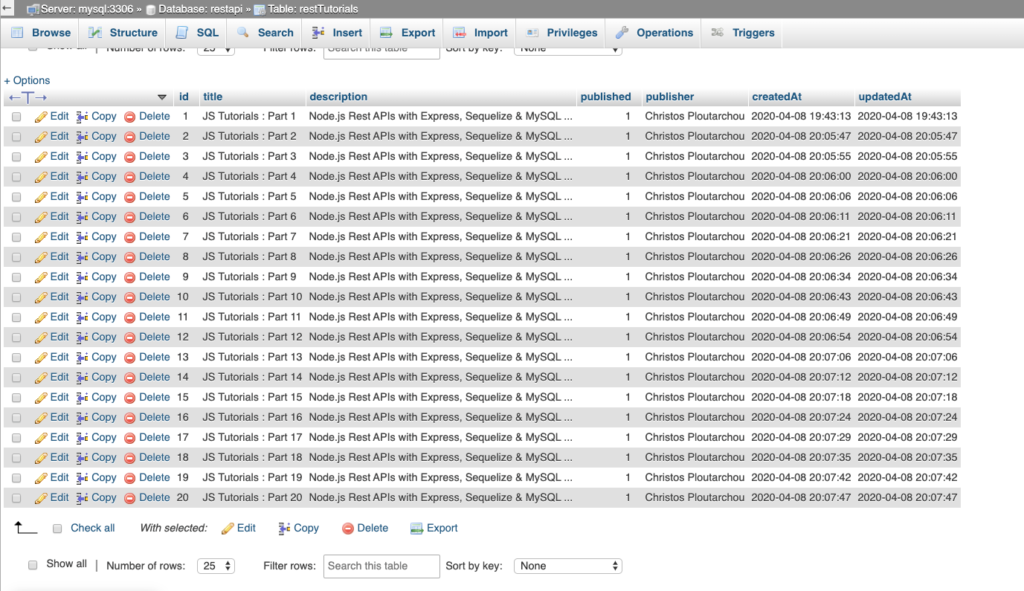
创建了一些新帖子后,你可以在 phpMyAdmin 上运行以下查询来检查 MySQL 表
你的输出应该如下图所示:
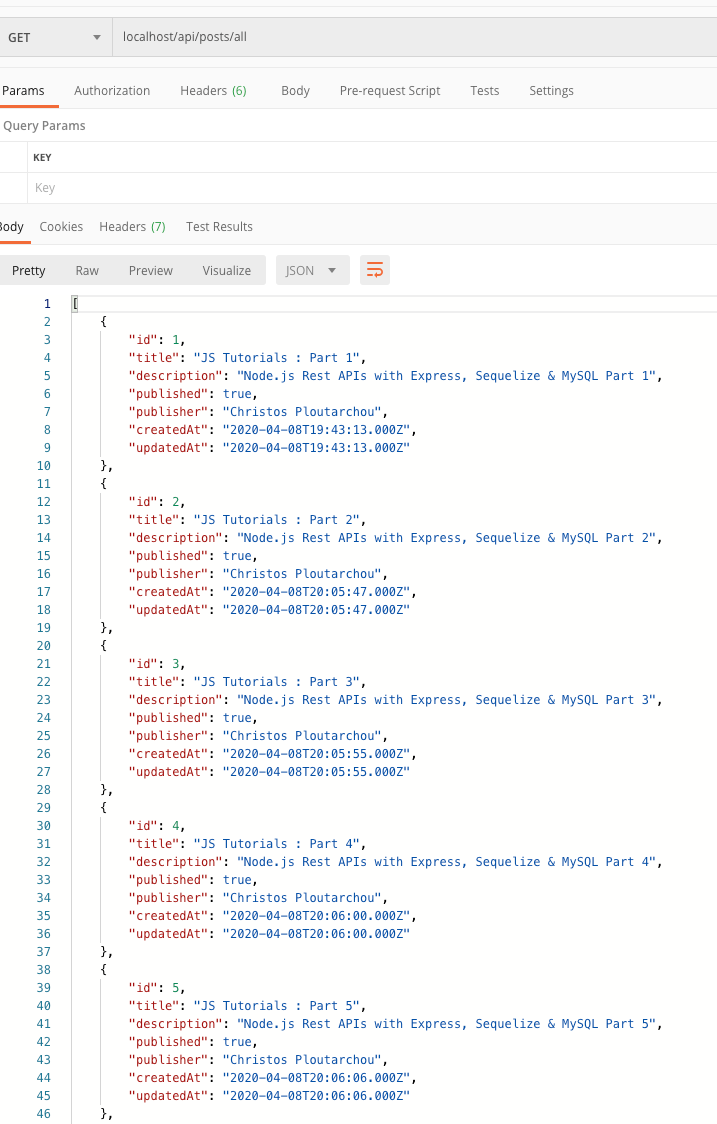
2. 使用 GET /api/posts/all API 检索所有帖子
你应该获得如下图所示的反馈:
获取所有帖子
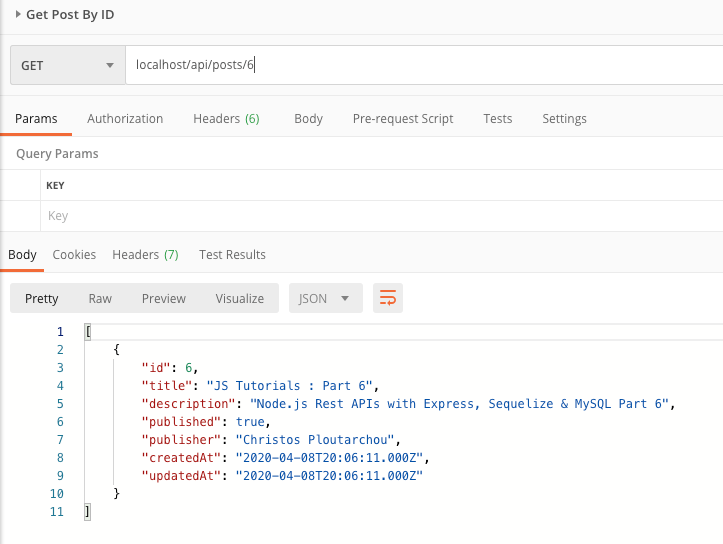
3. 使用 GET /api/posts/:id API 检索所有帖子
按 ID 获取帖子
4. 使用 PUT /api/post/update/:id API 更新帖子
按 ID 更新帖子
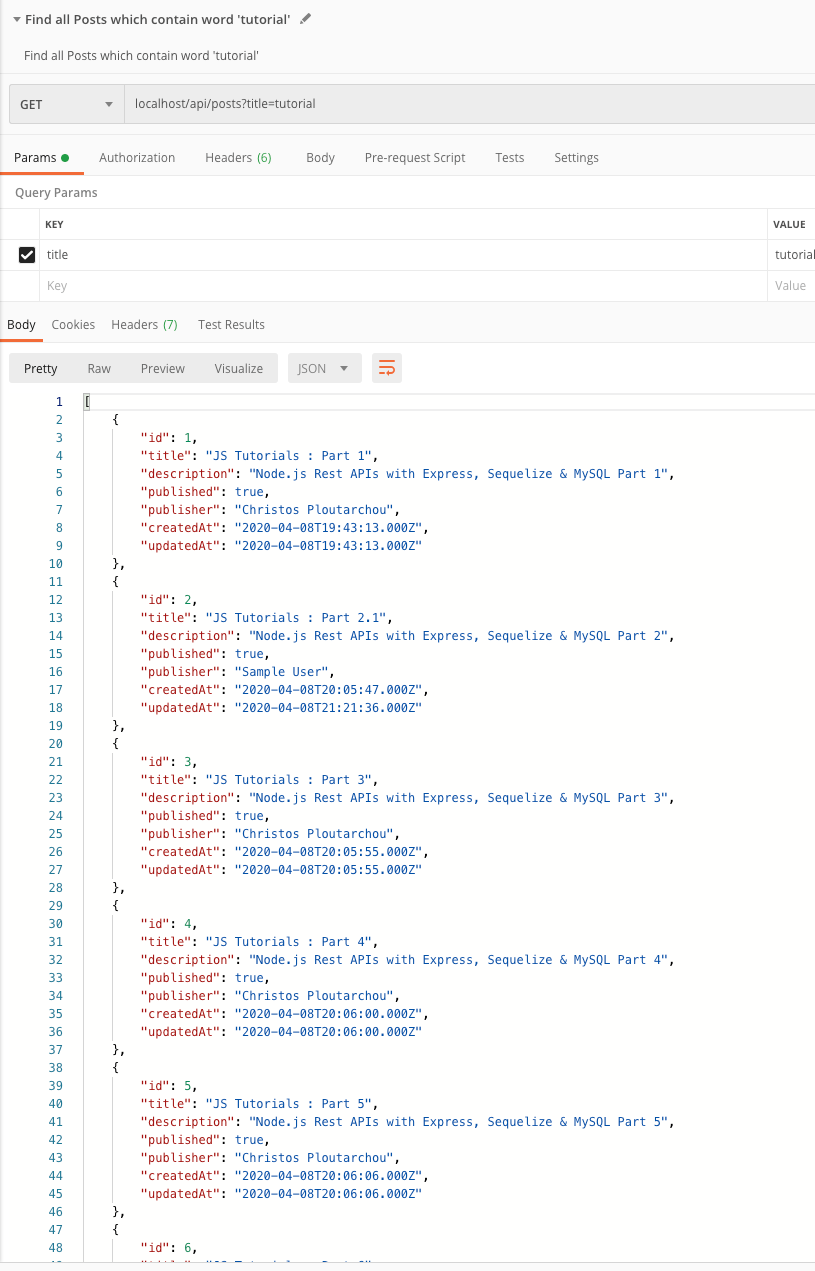
5. 使用 GET /api/posts?title=tutorial API 查找所有包含单词“tutorials”的帖子
按标题获取帖子
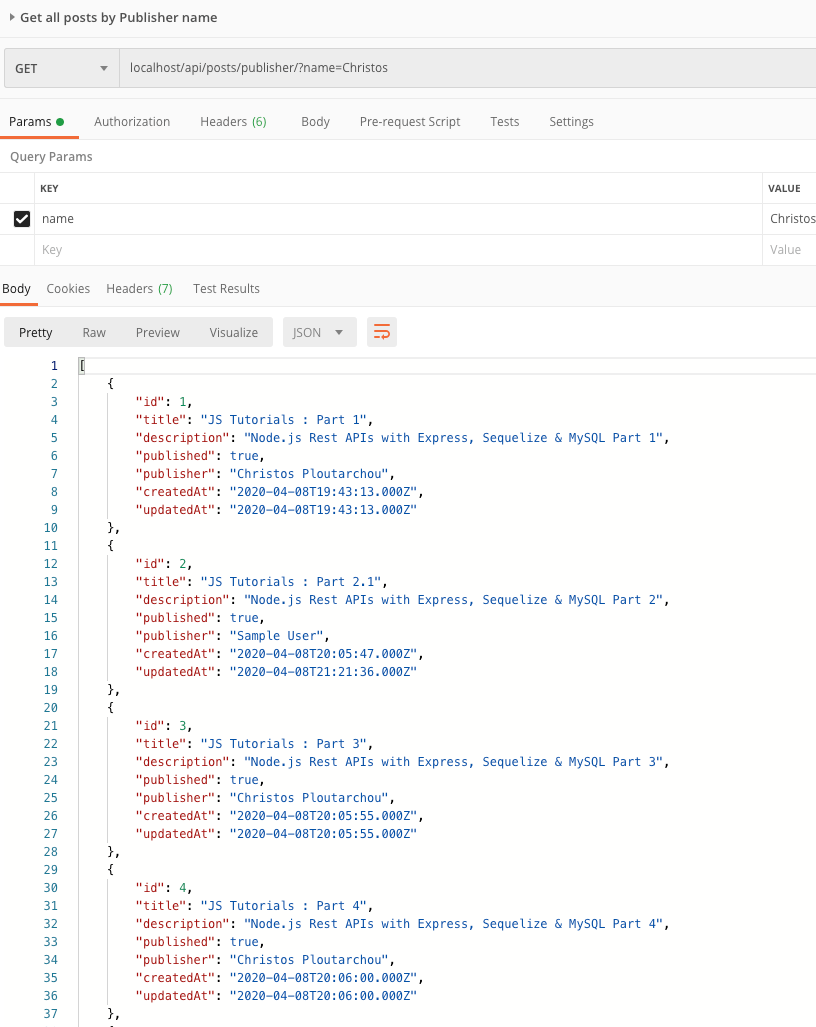
6. 使用 GET /api/posts/publisher/?name=Christos API 按发布者名称查找所有帖子
按发布者名称获取所有帖子
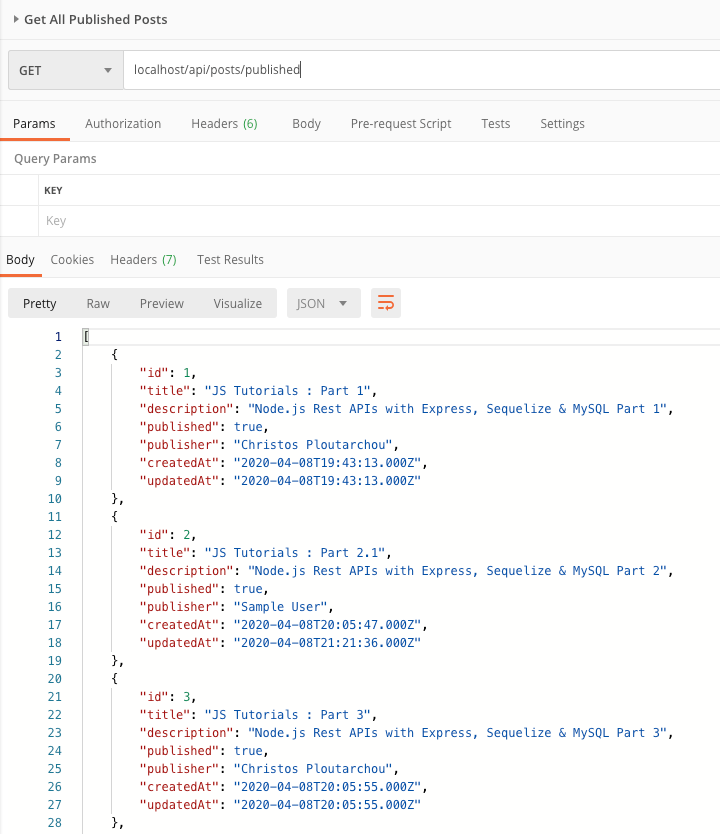
7. 使用 GET /api/posts/published API 查找所有已发布的帖子
获取所有已发布的帖子
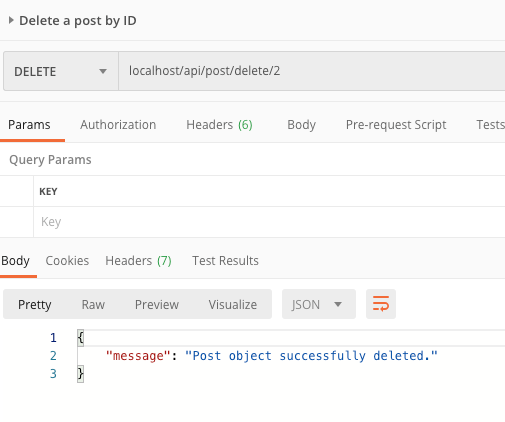
8. 使用 DELETE /api/posts/delete/:id API 删除帖子
按帖子 ID 删除帖子
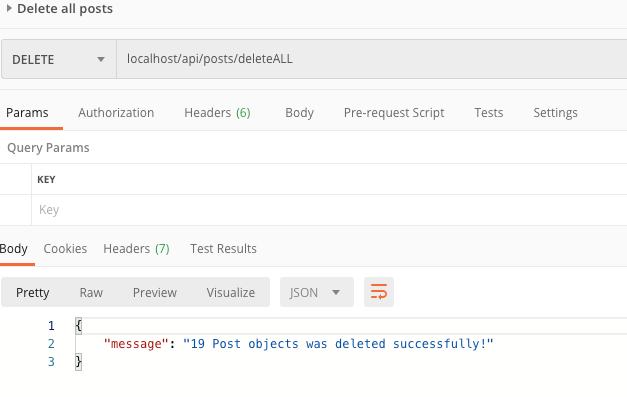
9. 使用 DELETE /api/posts/deleteAll API 删除所有帖子
删除所有帖子
你可以通过我的 GitHub 存储库下载项目的完整副本(https://github.com/cploutarchou/node_rest_api_with_mysql)。(如果你喜欢我的项目,请留下一颗星星)
原文链接:https://christosploutarchou.com/how-to-build-simple-node-js-rest-api


评论