1 前言
在这个大数据的时代,很多信息只有通过图形才能更好的展示给用户。例如:房屋的历史价格、基金股票的历史增长、数据占比分析图等。如何做图形?需要用到什么知识?本文将从 建模、显示 两方面来展开介绍。
2 建模
建模是一切图形的基础,其他内容的前提,要用代码展示一个图形,首先要有它的几何模型表达。目前在客户端二维图形建模上,Bézier curve(贝塞尔曲线)可以称为 经典 和 主流 并重的数学曲线。
对于贝塞尔曲线来说,最重要的是 起始点、终止点(也称锚点)、控制点。控制点决定了一条路径的弯曲轨迹,根据控制点的个数,贝塞尔曲线被分为:一阶贝塞尔曲线(0 个控制点)、二阶贝塞尔曲线(1 个控制点)、三阶贝塞尔曲线(2 个控制点)、N 阶贝塞尔曲线(n - 1 个控制点)。
2.1 贝塞尔曲线原理
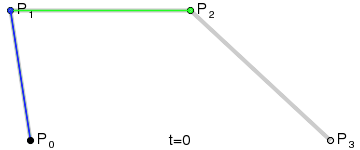
以二阶贝塞尔曲线为例 解释说明:
起始点:P0 ; 控制点:P1 ; 终止点:P2
连接 P0P1 线 和 P1P2 线。
在 P0P1 线上找到点 A,在 P1P2 线上找到点 B,使得 P0A/AP1 = P1B/BP2
连接 AB,在 AB 上找到点 X,X 点满足:AX/XB = P0A/AP1 = P1B/BP2
找出所有满足公式:AX/XB = P0A/AP1 = P1B/BP2 的 X 点。(从 P0 到 P2 的红色曲线点为所有 X 点的连线)这条由所有 X 点组成的连线 即为 贝塞尔曲线。
二阶贝塞尔曲线 起始点:P0 ; 控制点:P1 ; 终止点:P2
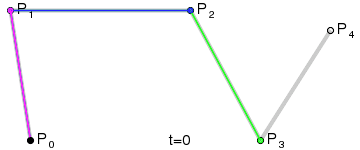
三阶贝塞尔曲线 起始点:P0 ; 控制点:P1、P2; 终止点:P3
四阶贝塞尔曲线 起始点:P0 ; 控制点:P1、P2、P3 ; 终止点:P4
2.2 UIBezierPath 类
系统给我们提供了一个叫做 UIBezierPath 类,用它可以画简单的圆形,椭圆,矩形,圆角矩形,也可以通过添加点去生成任意的图形,还可以简单的创建一条二阶贝塞尔曲线和三阶贝塞尔曲线。我们来了解一下它的常用方法:
2.2.1 初始化方法
// 创建UIBezierPath对象+ (instancetype)bezierPath;// 创建在rect内的矩形+ (instancetype)bezierPathWithRect:(CGRect)rect;// 设定特定的角为圆角的矩形,corners:指定的角为圆角,其他角不变,cornerRadii:圆角的大小+ (instancetype)bezierPathWithRoundedRect:(CGRect)rect byRoundingCorners:(UIRectCorner)corners cornerRadii:(CGSize)cornerRadii;// 创建圆弧+ (instancetype)bezierPathWithArcCenter:(CGPoint)center radius:(CGFloat)radius startAngle:(CGFloat)startAngle endAngle:(CGFloat)endAngle clockwise:(BOOL)clockwise;// 通过已有路径创建路径+ (instancetype)bezierPathWithCGPath:(CGPathRef)CGPath;// 创建三次贝塞尔曲线 endPoint:终点 controlPoint1:控制点1 controlPoint2:控制点2- (void)addCurveToPoint:(CGPoint)endPoint controlPoint1:(CGPoint)controlPoint1 controlPoint2:(CGPoint)controlPoint2;- // 创建二次贝塞尔曲线 endPoint:终点 controlPoint:控制点- (void)addQuadCurveToPoint:(CGPoint)endPoint controlPoint:(CGPoint)controlPoint;
复制代码
2.2.2 使用方法
// 移动到某一点- (void)moveToPoint:(CGPoint)point;// 绘制一条线- (void)addLineToPoint:(CGPoint)point;// 闭合路径,即在终点和起点连一根线- (void)closePath;// 清空路径- (void)removeAllPoints;// 填充- (void)fill;// 描边,路径创建需要描边才能显示出来- (void)stroke;
复制代码
2.2.3 常用属性
// 将UIBezierPath类转换成CGPath,类似于UIColor的CGColor@property(nonatomic) CGPathRef CGPath;// path线的宽度@property(nonatomic) CGFloat lineWidth;// path端点样式@property(nonatomic) CGLineCap lineCapStyle;// 拐角样式@property(nonatomic) CGLineJoin lineJoinStyle;
复制代码
2.2.4 举个栗子🌰
先看效果👇:
代码如下:
- (void)drawRect:(CGRect)rect {
    [[UIColor redColor] set];
    // 右边第一个图    UIBezierPath* maskPath = [UIBezierPath bezierPathWithRoundedRect:CGRectMake(50, 50, 100, 100) byRoundingCorners:UIRectCornerTopLeft cornerRadii:CGSizeMake(30, 30)];    maskPath.lineWidth     = 20.f;    maskPath.lineJoinStyle = kCGLineJoinBevel;    [maskPath stroke];    // 中间第二个图    UIBezierPath* maskFillPath = [UIBezierPath bezierPathWithRoundedRect:CGRectMake(200, 50, 100, 100) byRoundingCorners:UIRectCornerTopLeft cornerRadii:CGSizeMake(30, 30)];    maskFillPath.lineWidth     = 20.f;    maskFillPath.lineJoinStyle = kCGLineJoinBevel;    [maskFillPath fill];    [maskFillPath stroke];    // 右边第三个图    UIBezierPath *maskLinePath = [UIBezierPath bezierPath];    maskLinePath.lineWidth     = 20.f;    maskLinePath.lineCapStyle  = kCGLineCapRound;    [maskLinePath moveToPoint:CGPointMake(250.0, 50)];    [maskLinePath addLineToPoint:CGPointMake(300.0, 100.0)];    [maskLinePath stroke];}
复制代码
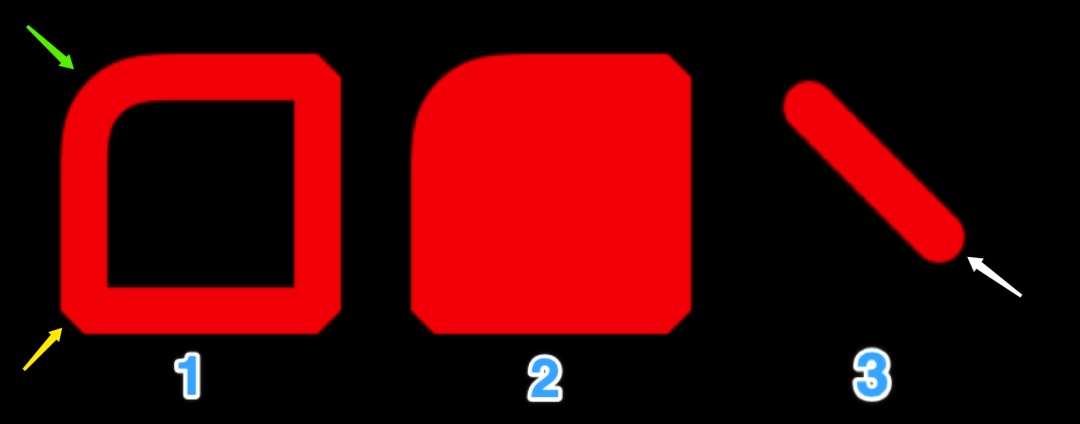
上图中:
1)图一和图二 唯一的不同是[maskFillPath fill]方法,fill 方法要在封闭的曲线调用。
2)图一和图二 为设定特定的角为圆角的矩形,corners 为 UIRectCornerTopLeft 左上角,cornerRadii 圆角大小为 30,绿色的箭头 表示的设定的这个角。
corners 为下面五种类型typedef NS_OPTIONS(NSUInteger, UIRectCorner) { UIRectCornerTopLeft = 1 << 0, // 左上角 UIRectCornerTopRight = 1 << 1, // 右上角 UIRectCornerBottomLeft = 1 << 2, // 左下角 UIRectCornerBottomRight = 1 << 3, // 右下角 UIRectCornerAllCorners = ~0UL // 全部};
复制代码
3)图一和图二 黄色的箭头 设置的属性 拐角样式:lineJoinStyle kCGLineJoinBevel(缺角)
lineJoinStyle 为下面三种类型typedef CF_ENUM(int32_t, CGLineJoin) { kCGLineJoinMiter, // 尖角 kCGLineJoinRound, // 圆角 kCGLineJoinBevel // 缺角};
复制代码
4)图三 白色的箭头 设置的属性 path 端点样式:lineCapStyle kCGLineCapRound(圆形端点)
lineCapStyle 为下面三种类型typedef CF_ENUM(int32_t, CGLineCap) { kCGLineCapButt, // 无端点 kCGLineCapRound, // 圆形端点 kCGLineCapSquare // 方形端点};
复制代码
有兴趣的 可以试试别的方法属性~
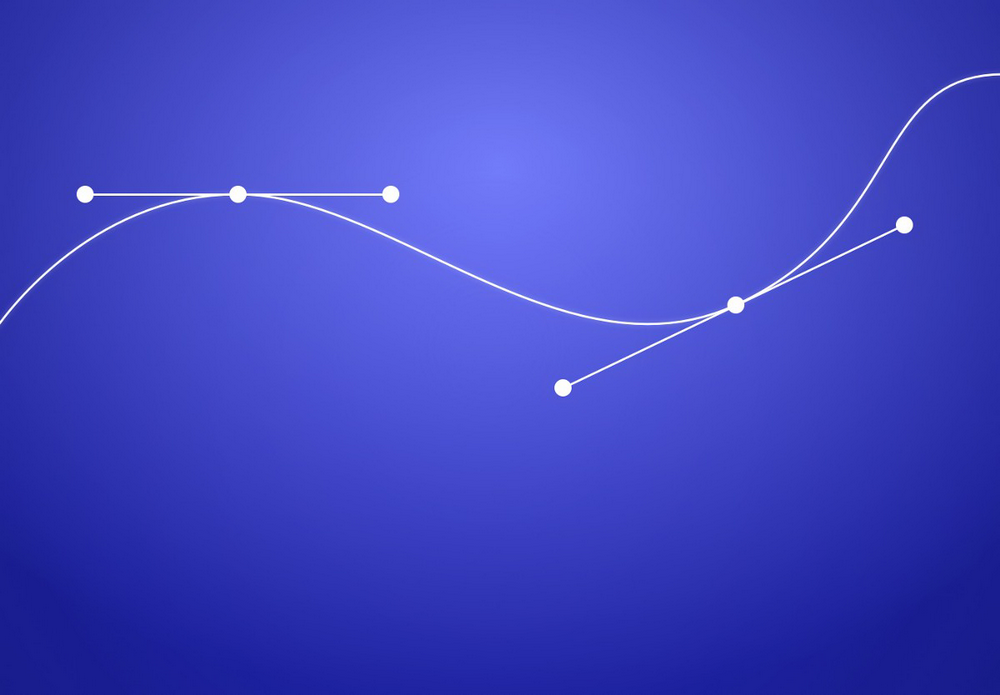
2.3 波浪曲线实现
如何实现 N 阶 波浪式曲线?如何找到 N-1 个对应的控制点?
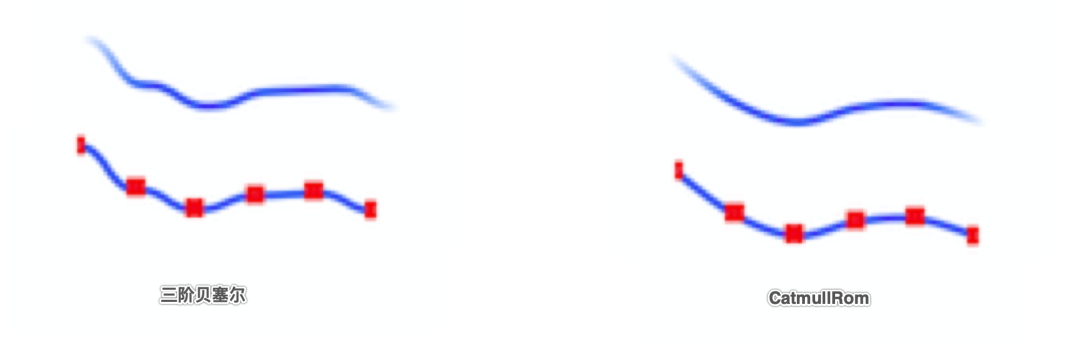
有两个方法,下图为同数据,方案一 和 方案二 分别所得曲线图。
方案一 为左边(三阶贝塞尔)图 其中 第二条的红点 为数据的位置
方案二 为右边(CatmullRom)图 其中 第二条的红点 为数据的位置
方案一:根据 创建三次贝塞尔曲线 方法 实现波浪曲线
控制点的选取方案不唯一,以下为我选择控制点的方案:
控制点 P1:CGPointMake((PrePonit.x+NowPoint.x)/2, PrePonit.y)
控制点 P2:CGPointMake((PrePonit.x+NowPoint.x)/2, NowPoint.y)
可以根据前一个点 PrePonit 和 现在的点 NowPoint 进行计算 控制点。
主要代码如下:
UIBezierPath *path = [UIBezierPath bezierPath];[path moveToPoint:[self pointAtIndex:0]];NSInteger count = self.points.count;CGPoint PrePonit;
for (NSInteger i = 0; i < count; i++) {
    CGPoint NowPoint = [self pointAtIndex:i];    if(i == 0) {        PrePonit = NowPoint;    } else {          // 利用三次曲线 形成波浪曲线        [path addCurveToPoint:point controlPoint1:CGPointMake((PrePonit.x+NowPoint.x)/2, PrePonit.y) controlPoint2:CGPointMake((PrePonit.x+NowPoint.x)/2, NowPoint.y)];        PrePonit = NowPoint;    }}return path;
复制代码
方案二:使用 CatmullRom 插值样条。(有兴趣的可以百度一下~这里只简单介绍)
要点分析:
1)给定一组控制点而得到一条曲线,曲线经过给定所有数据点。
2)Catmull-Rom 公式:P(t) = 0.5 * (2*p1 + (p2 - p0) *t + (2*p0 - 5*p1 + 4*p2 - p3)* t * t + (3*p1 - p0 - 3*p2 + p3) * t * t * t);
注:t 为分割的最小粒尺寸,根据 P0 P1 P2 P3 顺序的四个点 求得 P1P2 曲线公式。
主要代码如下:
void getPointsFromBezier(void *info, const CGPathElement *element) {    NSMutableArray *bezierPoints = (__bridge NSMutableArray *)info;    CGPathElementType type = element->type;    CGPoint *points = element->points;
    if (type != kCGPathElementCloseSubpath) {        [bezierPoints addObject:VALUE(0)];        if ((type != kCGPathElementAddLineToPoint) &&            (type != kCGPathElementMoveToPoint))            [bezierPoints addObject:VALUE(1)];    }    if (type == kCGPathElementAddCurveToPoint)        [bezierPoints addObject:VALUE(2)];}
NSArray *pointsFromBezierPath(UIBezierPath *bpath) {    NSMutableArray *points = [NSMutableArray array];    // 获取贝塞尔曲线上所有的点    CGPathApply(bpath.CGPath, (__bridge void *)points, getPointsFromBezier);    return points;}
- (UIBezierPath*)smoothedPathWithGranularity:(NSInteger)granularity path:(UIBezierPath *)path {    NSMutableArray *points = [pointsFromBezierPath(path) mutableCopy];
    if (points.count < 4) return [path copy];    [points insertObject:[points objectAtIndex:0] atIndex:0];    [points addObject:[points lastObject]];
    UIBezierPath *smoothedPath = [path copy];    [smoothedPath removeAllPoints];    [smoothedPath moveToPoint:POINT(0)];
    for (NSUInteger index = 1; index < points.count - 2; index++) {        CGPoint p0 = POINT(index - 1);        CGPoint p1 = POINT(index);        CGPoint p2 = POINT(index + 1);        CGPoint p3 = POINT(index + 2);
        for (int i = 1; i < granularity; i++) {              // granularity 这里按照 20 粒度划分的            float t = (float) i * (1.0f / (float) granularity);            float tt = t * t;            float ttt = tt * t;
            CGPoint pi;            // 根据 CatmullRom 公式 根据 P0 P1 P2 P3 获取点的坐标            pi.x = 0.5 * (2*p1.x+(p2.x-p0.x)*t + (2*p0.x-5*p1.x+4*p2.x-p3.x)*tt + (3*p1.x-p0.x-3*p2.x+p3.x)*ttt);            pi.y = 0.5 * (2*p1.y+(p2.y-p0.y)*t + (2*p0.y-5*p1.y+4*p2.y-p3.y)*tt + (3*p1.y-p0.y-3*p2.y+p3.y)*ttt);            if (pi.x <= self.width) {                [smoothedPath addLineToPoint:pi];            }        }
        if (p2.x <= self.width) {            [smoothedPath addLineToPoint:p2];        }    }
    return smoothedPath;}
复制代码
对比总结:
方案一 控制点的选取比较难,曲线的弯度 也取决于控制点,操作简单,易理解。
方案二 曲线更顺滑,但实现更复杂,不易理解。
这里推荐两个好用的网站:
a 这个网站提供了丰富的曲线类型可供选择,非常直观。
http://easings.net
b 这个网站提供了可视化的修改两个控制点,来生成一条三阶贝塞尔曲线,并切右边还可以看到这条曲线产生的动画会做怎样的速度改变。
http://www.roblaplaca.com/examples/bezierBuilder/#
3 显示
当 layer 与贝塞尔曲线相遇,会发生什么样的神奇反应?
3.1 CALayer
苹果官网注释:“An object that manages image-based content and allows you to perform animations on that content.” 管理基于图像的内容并允许您对该内容执行动画的对象。
CALayer 主要就两方面作用:
1) 管理展示内容
2)内容可执行动画
CALayer 自身有很多情况下自带隐式动画,但是 UIView 的根 Layer 是没有隐式动画的。
3.1.1 常用属性
// 图层大小 支持隐式动画@property CGRect bounds;// 图层位置 支持隐式动画@property CGPoint position;// 在z轴上的位置 支持隐式动画@property CGFloat zPosition;// 沿z轴位置的锚点 支持隐式动画@property CGFloat anchorPointZ;// 锚点 默认在layer的中心点 取值范围(0~1) 支持隐式动画@property CGPoint anchorPoint;// 图层变换 支持隐式动画@property CATransform3D transform;// 图层大小和位置 不支持隐式动画@property CGRect frame;// 是否隐藏 支持隐式动画@property(getter=isHidden) BOOL hidden;// 图层背景是否显示 支持隐式动画@property(getter=isDoubleSided) BOOL doubleSided;// 父图层 支持隐式动画@property(nullable, readonly) CALayer *superlayer;// 子图层 支持隐式动画@property(nullable, copy) NSArray<__kindof CALayer *> *sublayers;// 子图层变换 支持隐式动画@property CATransform3D sublayerTransform;// 图层蒙版 支持隐式动画@property(nullable, strong) __kindof CALayer *mask;// 子图层是否裁切超出父图层的部分,默认为NO@property BOOL masksToBounds;// 图层显示内容 设置layer的contents可以为layer添加显示内容 支持隐式动画@property(nullable, strong) id contents;// 图层显示内容的大小和位置 支持隐式动画@property CGRect contentsRect;// 用于指定层的内容如何在其范围内定位或缩放@property(copy) CALayerContentsGravity contentsGravity;// 是否包含完全不透明内容的布尔值@property(getter=isOpaque) BOOL opaque;// 背景色 支持隐式动画@property(nullable) CGColorRef backgroundColor;// 圆角半径 支持隐式动画@property CGFloat cornerRadius;// 边框宽度 支持隐式动画@property CGFloat borderWidth;// 边框颜色 支持隐式动画@property(nullable) CGColorRef borderColor;// 透明度 支持隐式动画@property float opacity;// 阴影颜色 支持隐式动画@property(nullable) CGColorRef shadowColor;// 阴影透明度 默认为0 需要显示阴影 必须设置值 支持隐式动画@property float shadowOpacity;// 阴影偏移量 支持隐式动画@property CGSize shadowOffset;// 阴影半径 支持隐式动画@property CGFloat shadowRadius;// 阴影形状 支持隐式动画@property(nullable) CGPathRef shadowPath;
复制代码
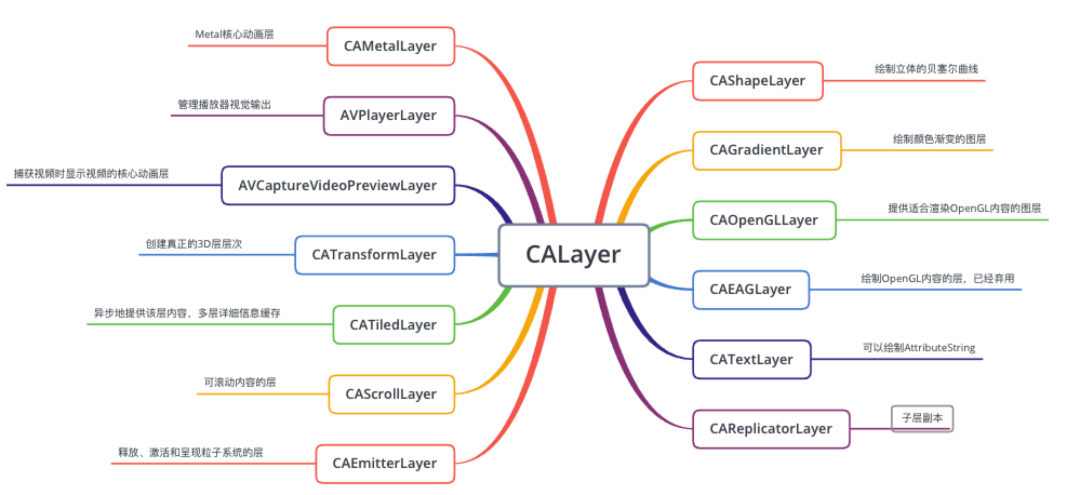
3.1.2 子类
CALayer 的子类有很多,下面说几个比较常用的。
3.2 CAShapeLayer
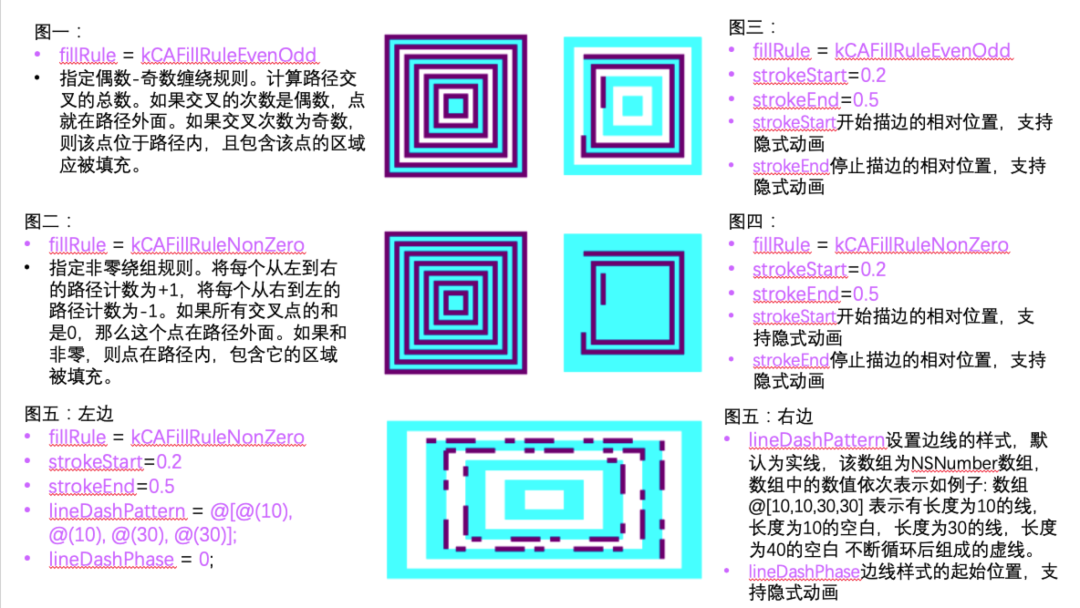
苹果官网注释:“A layer that draws a cubic Bezier spline in its coordinate space.” 专门用于绘制贝塞尔曲线的 layer。
3.2.1 看一下它独特的属性:
// path属性是曲线的路径,也是它和贝塞尔曲线紧密连接一个入口,决定了图层上画的是什么形状。@property(nullable) CGPathRef path;// 填充颜色@property(nullable) CGColorRef fillColor;// 曲线 指定哪块区域为内部,内部会被填充颜色@property(copy) CAShapeLayerFillRule fillRule;// 线的颜色@property(nullable) CGColorRef strokeColor;// strokeStart 和 strokeEnd 两者的取值都是0~1,决定贝塞尔曲线的划线百分比@property CGFloat strokeStart;@property CGFloat strokeEnd;// 虚线开始的位置@property CGFloat lineDashPhase;// 虚线设置,数组中奇数位实线长度,偶数位带遍空白长度@property(nullable, copy) NSArray<NSNumber *> *lineDashPattern;// 线的宽度@property CGFloat lineWidth;// 最大斜接长度 只有lineJoin属性为kCALineJoinMiter时miterLimit才有效@property CGFloat miterLimit;// 线端点样式(样式与 贝塞尔曲线的CGLineCap 属性一致)@property(copy) CAShapeLayerLineCap lineCap;// 拐角样式(样式与 贝塞尔曲线的CGLineJoin 属性一致)@property(copy) CAShapeLayerLineJoin lineJoin;
复制代码
3.2.2 举个栗子🌰
使用上面的一些属性,再结合贝塞尔曲线,我们实现了如下一些效果:
其中图五的效果,代码实现如下:
UIBezierPath *maskPath = [UIBezierPath bezierPath];for (NSInteger i = 1; i < 9; i++) {    UIBezierPath *tempPath = [UIBezierPath bezierPathWithRect:CGRectMake(190 - 20 * i, 550 - 10 * i, 40 * i, 20 * i)];    [maskPath appendPath:tempPath];}[maskPath stroke];
// CAShapeLayerCAShapeLayer *maskLayer = [[CAShapeLayer alloc] init];maskLayer.frame = self.view.bounds;maskLayer.path = maskPath.CGPath;maskLayer.lineWidth = 5;maskLayer.strokeColor = [UIColor purpleColor].CGColor;maskLayer.fillRule = kCAFillRuleEvenOdd;maskLayer.fillColor = [UIColor cyanColor].CGColor;maskLayer.strokeStart = 0.2;maskLayer.strokeEnd = 0.5;maskLayer.lineDashPattern = @[@(10), @(10), @(30), @(30)];maskLayer.lineDashPhase = 0;[self.view.layer addSublayer:maskLayer];
复制代码
3.3 CAGradientLayer
苹果官网注释:“A layer that draws a color gradient over its background color, filling the shape of the layer (including rounded corners)” 专门用于在背景色上绘制颜色渐变的图层,填充图层的形状。
3.3.1 看一下它独特的属性:
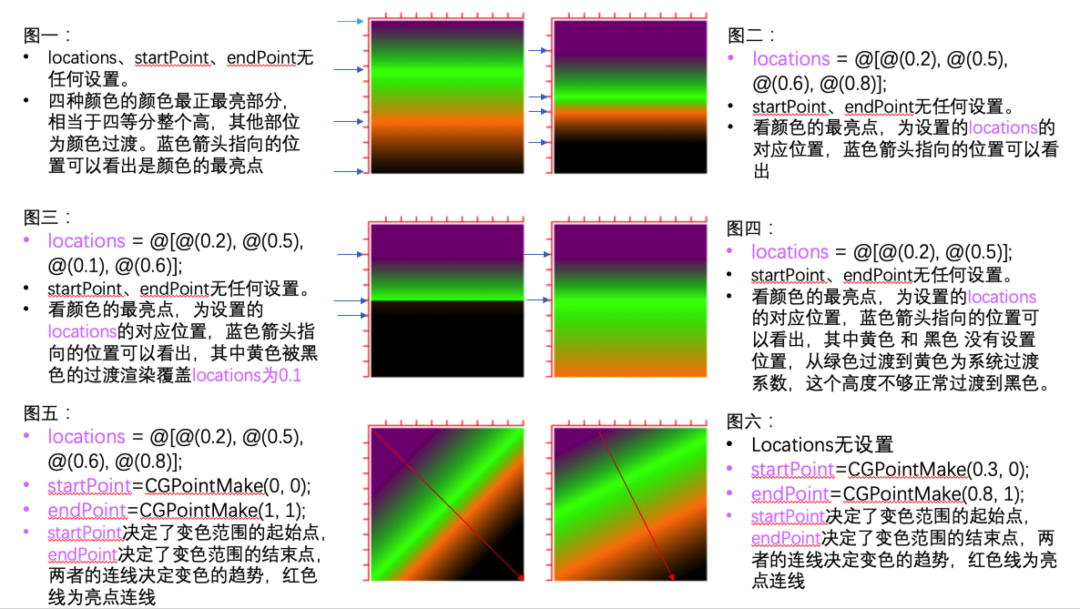
// colors属性是CAGradientLayer的特殊属性,完美实现几种颜色的过渡。@property(nullable, copy) NSArray *colors;// 定义每个梯度停止的位置。取值范围为0~1递增@property(nullable, copy) NSArray<NSNumber *> *locations;// 决定了变色范围的起始点@property CGPoint startPoint;// 决定了变色范围的结束点@property CGPoint endPoint;// startPoint 和 endPoint两者的连线决定变色的趋势
复制代码
3.3.2 举个栗子🌰
使用上面的一些属性我们实现了如下一些效果:
其中图五的效果,代码实现如下:
CAGradientLayer *gradientLayer = [CAGradientLayer layer];gradientLayer.frame = CGRectMake(20, 450, 150, 150);gradientLayer.locations = @[@(0.2), @(0.5), @(0.6), @(0.8)];gradientLayer.startPoint = CGPointMake(0, 0);gradientLayer.endPoint = CGPointMake(1, 1);gradientLayer.colors = @[(id)[UIColor purpleColor].CGColor, (id)[UIColor greenColor].CGColor, (id)[UIColor orangeColor].CGColor, (id)[UIColor blackColor].CGColor];[self.view.layer addSublayer:gradientLayer];
复制代码
3.4 再举个栗子🌰🌰
当 CAGradientLayer + CAShapeLayer + 贝塞尔曲线 会有什么效果?上代码~
- (void)setupUI {    // 贝塞尔曲线    UIBezierPath *maskPath = [UIBezierPath bezierPath];    [maskPath moveToPoint:CGPointMake(100, 220)];    [maskPath addLineToPoint:CGPointMake(200, 150)];    [maskPath addLineToPoint:CGPointMake(300, 220)];    [maskPath stroke];
    UIBezierPath *maskBottomPath = [UIBezierPath bezierPath];    [maskBottomPath moveToPoint:CGPointMake(280, 250)];    [maskBottomPath addCurveToPoint:CGPointMake(120, 250) controlPoint1:CGPointMake(250, 320) controlPoint2:CGPointMake(150, 320)];    [maskBottomPath stroke];
    [maskPath appendPath:maskBottomPath];
    // CAShapeLayer    CAShapeLayer *maskLayer = [[CAShapeLayer alloc] init];    maskLayer.frame = self.view.bounds;    maskLayer.path = maskPath.CGPath;    maskLayer.lineWidth = 20;    maskLayer.strokeColor = UIColorFromRGB(0xF0F5FF).CGColor;    maskLayer.lineCap = kCALineCapRound;    maskLayer.lineJoin = kCALineJoinRound;    maskLayer.fillColor = [UIColor clearColor].CGColor;    maskLayer.strokeStart = 0;    maskLayer.strokeEnd = 0;    [self.view.layer addSublayer:maskLayer];
    // CAGradientLayer    NSMutableArray *colorArray = [NSMutableArray new];    for (NSInteger i = 0; i < 6; i++) {        [colorArray addObject:[self arc4randomColor]];    }
    CAGradientLayer *gradientLayer = [CAGradientLayer layer];    gradientLayer.frame = self.view.bounds;    gradientLayer.colors = colorArray;    gradientLayer.startPoint = CGPointMake(0, 0.5);    gradientLayer.endPoint = CGPointMake(1, 0.5);    gradientLayer.mask = maskLayer;    [self.view.layer addSublayer:gradientLayer];
    // 创建全局并发队列    dispatch_queue_t queue = dispatch_get_global_queue(DISPATCH_QUEUE_PRIORITY_DEFAULT, 0);    // 创建定时器    dispatch_source_t timer = dispatch_source_create(DISPATCH_SOURCE_TYPE_TIMER, 0, 0, queue);    // 设置定时器,每N秒触发    int64_t intervalInNanoseconds = (int64_t)(0.3 * NSEC_PER_SEC);    dispatch_source_set_timer(timer, dispatch_walltime(NULL, 0), (uint64_t)intervalInNanoseconds, 0);    // 设置定时器处理事件    dispatch_source_set_event_handler(timer, ^{        dispatch_async(dispatch_get_main_queue(), ^{
            if (maskLayer.strokeEnd < 0.6) {                maskLayer.strokeEnd += 0.4;            } else if (maskLayer.strokeEnd < 0.8){                maskLayer.strokeEnd += 0.2;            } else if (maskLayer.strokeEnd < 1){                maskLayer.strokeEnd += 0.1;            } else {                maskLayer.strokeEnd = 1;                if (maskLayer.strokeStart < 0.6) {                    maskLayer.strokeStart += 0.4;                } else if (maskLayer.strokeStart < 0.8){                    maskLayer.strokeStart += 0.2;                } else if (maskLayer.strokeStart < 1){                    maskLayer.strokeStart += 0.1;                } else {                    [colorArray removeObjectAtIndex:0];                    [colorArray addObject:[self arc4randomColor]];                    gradientLayer.colors = colorArray;
                    maskLayer.strokeStart = 0;                    maskLayer.strokeEnd = 0;                }            }        });    });
    _timer = timer;
    // 开启定时器    dispatch_resume(_timer);}
- (id)arc4randomColor {    return (id)[UIColor colorWithRed:arc4random()%255/255.f                               green:arc4random()%255/255.f                                blue:arc4random()%255/255.f                               alpha:1].CGColor;}
复制代码
运行结果👇
<https://v.qq.com/x/page/l3146iykm06.html
其他 layer 怎么使用?贝塞尔曲线 + Layer 还可以组合出更多神奇的反应!感兴趣的可以去试试哦~本文仅为抛砖引玉~~
本文转载自公众号贝壳产品技术(ID:beikeTC)。
原文链接:
贝塞尔曲线在iOS端的绘图实践


评论